REST API deprecated functions
Deprecated authentication method
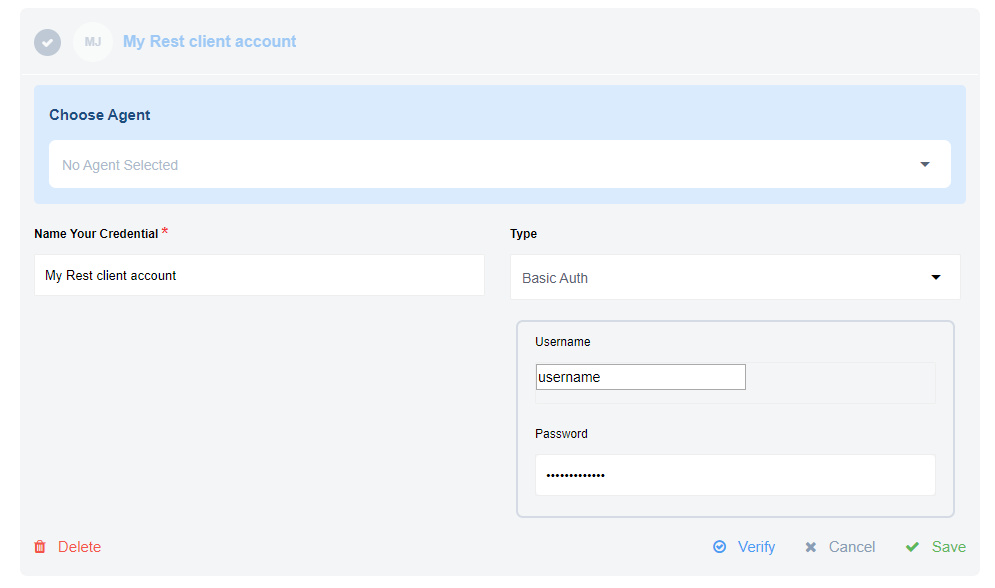
To use the REST API component with any restricted access API provide the authorisation information.
Example above shows how to add the username/password to access the API during the integration flow design.
You must the authorisation methods during the integration flow design or by
navigating to your Integrate > Credentials > REST API from the main menu and
adding there. REST API component supports 4 authorisation types.
Please note: The result of creating a credential is an HTTP header automatically placed for you. You can also specify the authorisation in the headers section directly.
No Auth
Use No Auth method to work with any open REST API. You don’t need to Verify it, just Save it and proceed further.
Basic Auth
Use Basic Auth to provide login credentials like username/password.
Please note: If you intend to make calls to our own API then you MUST use this method. Use your email address as username and your API-Key as a password.
API Key Auth
Use API Key Auth method for systems where an API Key is required to access
the resource. You need the Header Name (like api-key) and Header Value
(the value of API-KEY).
OAuth2
Use OAuth2 method when the external resource dictates an Oauth2 authorisation to
access their resources.
Before you can fill-in the configuration fields, we strongly suggest creating the OAuth2 app at service side. Here is an example how you could create an OAuth2 app for Salesforce.
To help you get started here is our Callback URL (https://app.elastic.io/callback/oauth2)
to use during OAuth2 App creation at the third party service side.
There are six configuration fields here from which four are mandatory:
- Client Id - This is the standard Client ID of your OAuth2 app.
- Client Secret - The Client Secret of your OAuth2 app.
- Auth URI - This is the authorisation URL which you should get from the service to which you are connecting. As an example Salesforce uses
https://login.salesforce.com/services/oauth2/authorizeaddress. Other services have similar addresses. - Token URI - This would be the URL where you make a call to obtain your access token. Using the Salesforce as an example, here is their
https://login.salesforce.com/services/oauth2/tokenaddress to obtain tokens. - Scopes - A comma-separated list of special scopes your case needs. Something like
users:write, teams:write - Additional parameters - A comma-separated list of any additional parameters that your case requires. For example
prompt:consent, access_type:offlinecould be given.
HTTP Request (Request library)
In a REST API component the trigger and action perform the same function - HTTP request witch will send a GET/POST/PUT/PATCH/DELETE requests and parse the response back to the flow.
Configuration options
Don't throw Error on Failed Calls- if enabled return Error, Error code, and Stack trace in message body otherwise throw error in flow.Split Result if it's an Array- if enabled and response is an array, create a message for each item of array. Otherwise, create one message with response array.-
Retry on failure- enabling rebound feature for following HTTP status codes:408– Request Timeout423– Locked429– Too Many Requests500– Internal Server Error502– Bad Gateway503– Service Unavailable504– Gateway Timeout- DNS lookup timeout
Do not verify SSL certificate (unsafe)- disable verifying the server SSL certificate - unsafe.Follow redirect mode- If you want to disable Follow Redirect functionality, you can use the option Follow redirect mode. By default Follow redirect mode option has value Follow redirects.Delay- If you want to slow down requests to your API you can set a delay value (in seconds) and the component will delay calling the next request after the previous request. The time for the delay is calculated asDelay/CallCount and shouldn’t be more than 1140 seconds (19 minutes due to platform limitations). The Call Count value by default is 1. If you want to use another value, please set the Call Count field. Notice: See Known Limitations about Delay value.Call Count- the field should be used only in pair with Delay, default to 1.Request timeout- Timeout period in milliseconds (1-1140000) while component waiting for server response also can be configured withREQUEST_TIMEOUTenvironment variable if configuration field is not provided. Defaults to 100000 (100 sec).Notice: Specified for component
REQUEST_TIMEOUTenvironment variable would be overwritten by specified value of Request timeout, the default value would be also overwritten.
Output
The messages produced by the REST API component will have the following properties:
headers: Object containing the HTTP response headersstatusCode: HTTP Status Code of the Response. Number between100and599statusMessage: Human readable equivalent to the response codebody: The contents of the HTTP response body:- When the content type header includes
json, then the result will be parsed into the corresponding object - When the content type header includes
xml, then the result will be converted into the JSON equivalent of the represented XML using the same rules as above - When the content type header includes one of
image,msword,msexcel,pdf,csv,octet-streamorbinarythe request body contents will be stored as an attachment and there will be nobodyproperty in the outgoing message - When there is no body (because the content-length is 0), then there will be no
bodyproperty in the outbound message. - If there is another content type, then the response will be treated as text
- If the content type header is omitted, then an attempt to convert the result to JSON will be made. If that fails, then the result will be treated as if it were text.
- When the content type header includes
For more details you can see the usage example.
Defining request body
If the HTTP method is any other but GET, you will see a Body tab appear next to the Header tab. The Body tab enables
configuration options such as the content type drop-down menu and the body input field.
Here is the list of all supported content types:
multipart/form-dataapplication/x-www-form-urlencodedtext/plainapplication/jsonapplication/xmltext/xmltext/html
The body input field changes according to the chosen content type.
Notes:
- Response body will be stored in
msg.body- Request body that causes empty response body will return
{}
Sending JSON data
Here is how to send a JSON data in the body. Change the content type to
application/json and the body input part would change accordingly to accept
JSON object. Please note that this field supports JSONata expressions.

Example shows the JSON in the body where the name parameter value gets mapped using the value of project_name from the previous step of integration.
Sending XML data
To send an XML data, set the content type to application/xml or text/xml and place the XML in the body input field between double-quotes like:
"
<note>
  <to>" & fname & "</to>
  <from>Jani</from>
  <heading>Reminder</heading>
  <body>Don't forget me this weekend!</body>
</note>
"
Use a JSONata expression to include and map any values coming from the previous steps. It will replace the variable with a real value in the final mapping. Note that the rest of XML gets passed as a string.
Sending Form data
To send a form data, two content types are available:
application/x-www-form-urlencoded- used to submit simple values to a formmultipart/form-data- used to submit (non-alphanumeric) data or file attachment in payload
In both cases the payload gets transmitted in the message body.
In case of application/x-www-form-urlencoded content type, add the necessary parameters by giving the name and the values like:

Please note: the parameter value fields support JSONata expressions.*
This HTTP request would submit key1=value1&key2=value2 in the message body.
In case of multipart/form-data content type, add the parameters similarly.

The transmitted HTTP request body would be:
--__X_BOUNDARY__
Content-Disposition: form-data; name="part1"

Please note that this fields supports [JSONata](http://jsonata.org) expressions.
--__X_BOUNDARY__
Content-Disposition: form-data; name="part2"

<p>Some more text</p>
--__X_BOUNDARY__--
Notice how different parts get separated by the boundary. This form is capable of supporting attachments as well.
Working with XML
This component will try to parse XML content types in the HTTP Response assuming the Content-Type header has a
MIME Content Type with xml in it (e.g. application/xml).
In this case response body will be parsed to JSON using xml2js node library and following settings:
{
    trim: false,
    normalize: false,
    explicitArray: false,
    normalizeTags: false,
    attrkey: '_attr',
    tagNameProcessors: [
        (name) => name.replace(':', '-')
    ]
}
for more information please see the Documenattion of XML2JS library
HTTP Headers
You can get HTTP response header only if Don`t throw Error on Failed Calls option is checked.
In this case output structure of component will be:
    {
      headers:<HTTP headers>,
      body:<HTTP response body>,
      statusCode:<HTTP response status code>
      statusMessage:<HTTP response status message>
    }
Defining HTTP headers
Use this section to add the request headers.

Each header has a name and a value. Header name should be colon-separated
name-value pairs in clear-text string format. The header value can use
JSONata expressions.
Please note: HTTP Response headers will not be stored, the components stores body and attachment only.
Environment Variables
| NAME | DESCRIPTION | DEFAULT | OPTIONAL |
|---|---|---|---|
| REQUEST_TIMEOUT | HTTP authorization request timeout in milliseconds. | 10000 | true |
| REQUEST_RETRY_DELAY | Delay between authorization retry attempts in milliseconds. | 5000 | true |
| REQUEST_MAX_RETRY | Number of HTTP authorization request retry attempts. | 3 | true |
| REFRESH_TOKEN_RETRIES | Number of Rebound attempts for processing the message. | 10 | true |
Click here to learn more about the elastic.io iPaaS