Google Spreadsheets component v2
This component is a new version of Google Spreadsheets component but with breaking changes:
- Use Faceless service for authentication.
- Added
Create/Upsert/Update Spreadsheet Rowaction. - Added
Read Spreadsheetaction.
Requirements
Google preparations
Before building any integration flow you must at first configure the app from inside the Google Developers Console.
- In order to do this you, go to the
API & Servicepage and enable the following:- Google Drive API.
- Google Sheets API.
- Go to the
Credentialssection and create a new credential of typeOAuth client ID.- Set Application type to
Web application. - You can find the Authorized redirect URI in here f.e.
https://{your-tenant-address}/callback/oauth2.
- Set Application type to
In case of new domain you may get message like This app isn't verified. Please refer to this doc to check how to proceed:
https://support.google.com/cloud/answer/7454865?hl=en
Please Note: to prevent refresh token expiration, change the
Publishing statusfromTestingtoIn productionon the Audience page for your external Google app.
Environment variables
| Name | Mandatory | Description | Values |
|---|---|---|---|
REQUEST_MAX_RETRY |
false | Set how many time system try to make request to API on errors (3 by default) | any integer above 0 |
REQUEST_RETRY_DELAY |
false | Delay between retry attempts in milliseconds (1000 by default) | any integer above 0 |
REQUEST_TIMEOUT |
false | HTTP requests timeout in milliseconds (120000 by default) | any integer above 0 |
EIO_REQUIRED_RAM_MB |
false | recommended value of allocated memory is 512 MB | any integer above 0 |
Credentials
To get Client ID and Client Secret please use the Google Developers Console. As a callback please use https://{your-tenant.address}/callback/oauth2 that can be found here.
During credentials creation you would need to:
- Select existing Auth Client from drop-down list
Choose Auth Clientor create the new one. For creating Auth Client you should specify following fields:
| Field name | Mandatory | Description |
|---|---|---|
| Name | true | your Auth Client’s name |
| Client ID | true | your OAuth client key |
| Client Secret | true | your OAuth client secret |
| Authorization Endpoint | true | your OAuth authorization endpoint: https://accounts.google.com/o/oauth2/v2/auth |
| Token Endpoint | true | your OAuth Token endpoint for refreshing access token: https://www.googleapis.com/oauth2/v4/token |
- Fill field
Name Your Credential. - Fill field
Scopes (Comma-separated list)ashttps://www.googleapis.com/auth/spreadsheets, https://www.googleapis.com/auth/drive.metadata.readonly - Fill field
Additional parameters (Comma-separated list)asaccess_type:offline,prompt:consent. - Click on
Authenticatebutton - the process would take you to Google to log-in and give permissions to the platform to access your Spreadsheets. - Optional fill field
Enter number of retries. - Optional fill field
Max number of calls per second. - Click on
Verifybutton for verifying your credentials. - Click on
Savebutton for saving your credentials. - Enter number of retries (Default: 5).
Warning: To maintain a smooth experience, we recommend reusing stored credentials where possible. Duplicating secrets across OAuth clients can result in errors and complications.
Please Note: that Google applies quotas and limitations to their services. You can check the actual values here: https://developers.google.com/sheets/api/limits.
In case an API call throws a quota limit exceeded exception (or any other exception, e.g. a connectivity problem, etc.), the component will retry the call based on Exponential backoff algorithm (factor = 2) number of times configured in this field. The default value is 5.
E.g. Setting this to 1 means do a normal call once, then if failed - retry it once.
Please note that you should carefully calculate and plan a strategy to handle an expected load to the component. Note also that Google’s quota applies to credentials, not to a step in a flow. This means that if there is a default limit to 60 requests per minute per user per project and there is a component that makes exactly 60 requests per minute, adding a second component with the same user credentials would cause a quota exceeding. This is where careful calculating of number of retries and delay between calls is are very important.
- Max number of calls per second (Default: 5)
If you want to slow down requests to your API you can set a number of requests per second and the component will delay calling the next request after the previous request (1 / number of requests per second * 1000 ms ).
The calculated delay value can not be more than 1140 seconds (19 minutes due to platform limitations).
Please Note: if result quota restriction will be less than 1 request/min the component
Retrieve Sampletask won’t succeed.
Please also Note: If you don’t set a value to either
Enter number of retriesorMax number of calls per secondfields, they will remain empty. The component will consider them as the default values (5 in both cases).
Triggers
Get Spreadsheet Row
The New Spreadsheet Row trigger reads the data in each row of a given Google Spreadsheet and passes it to the next stage of your integration flow.
The process
First, the system reads all the rows from a given Google Spreadsheet and processes it further along with your designed integration flow. It will also create an initial state of your spreadsheet, we call it a snapshot, in order to have something to compare with after your data is updated.
After the initial read, any further requests for an update will be compared to this snapshot and in case any changes are detected they will be passed along with the integration flow as well. If Select All Data configuration property has value Yes, the system will read all the rows from a given Google Spreadsheet whenever flow processes the message.
Input fields description
| Input field | Required | Description | Example |
|---|---|---|---|
| Spreadsheet | true | Spreadsheet which will be used for data reading | MyTestSpreadsheet |
| Worksheet | true | Worksheet of spreadsheet which will be used for data reading | Sheet1 |
| Dimension | true | The major dimension of the values | ROWS, COLUMNS |
| Use first row/column as header | true | You should specify Yes if your data has a header in the first row/column and you want to use these values as json key in the output message. If you specify No, json key will be taken from row/column index according to A1 notation. Se example below | Yes |
| Select All Data | true | You should specify Yes if you want to fetch all spreadsheet data whenever step starts. If you specify No, a step will be emitting only delta changes (lines which were added after last step runs) | No |
Please Note: Using
Use first row/column as headerfeature, you must be sure that header values are unique.
Values from spreadsheets return as UNFORMATTED_VALUE type
Cases with ROWS dimension:
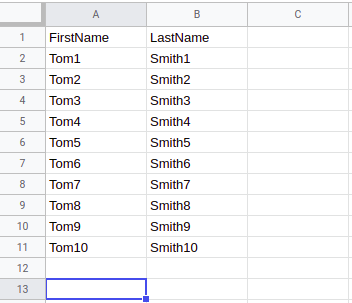
After a trigger execution, data will be extracted from the table above and the following message will be emitted:
1) Dimension: ROWS, Use first row/column as header: Yes
Click to expand for more details
  {
    "FirstName": "Tom1",
    "LastName": "Smith1"
  }
  {
    "FirstName": "Tom2",
    "LastName": "Smith2"
  }
  -----------------------
  {
    "FirstName": "Tom10",
    "LastName": "Smith10"
  }
2) Dimension: ROWS, Use first row/column as header: No
Click to expand for more details
  {
    "A": "FirstName",
    "B": "LastName"
  }
  {
    "A": "Tom1",
    "B": "Smith1"
  }
  {
    "A": "Tom2",
    "B": "Smith2"
  }
 ---------------------
  {
    "A": "Tom10",
    "B": "Smith10"
  }
Cases with COLUMNS dimension:

After a trigger execution, data will be extracted from the table above and the following message will be emitted:
1) Dimension: COLUMNS, Use first row/column as header: Yes
Click to expand for more details
  {
    "FirstName": "Tom1",
    "LastName": "Smith1"
  }
  {
    "FirstName": "Tom2",
    "LastName": "Smith2"
  }
  -----------------------
  {
    "FirstName": "Tom10",
    "LastName": "Smith10"
  }
2) Dimension: COLUMNS, Use first row/column as header: No
Click to expand for more details
  {
    "1": "FirstName",
    "2": "LastName"
  }
  {
    "1": "Tom1",
    "2": "Smith1"
  }
  {
    "1": "Tom2",
    "2": "Smith2"
  }
 ---------------------
  {
    "1": "Tom10",
    "2": "Smith10"
  }
Limitations
- Trigger can emit maximum 1000 messages per one execution.
- Currently
Enter number of retriesandMax number of calls per secondcredential fields use default values only. Those are 5 and 5 respectively. - Trigger uses version 4 of Google Sheet API.
Actions
Read Spreadsheet
Action read spreadsheet. This action is based on Google Spreadsheets API v4. All data structures and limitations are the same to Google API.
Important!: Place (start) your table in the top left corner (cell) for data to be processed in the right way.
Configuration Fields
- Spreadsheet - (dropdown, required): Spreadsheet name selected from dropdown.
- Worksheet - (dropdown, required): Worksheet to read.
- Dimension - (dropdown, required): The major dimension of the values.
ROWSorCOLUMNS. - Use first row or column as a header - (dropdown, required): If
yesfirst row or column will be skipped. - Emit Behavior - (dropdown, required): A way to emit items.
Emit IndividuallyorFetch All.
Input Metadata
There is no Input Metadata.
Output Metadata
If Emit Behavior = Fetch All: object with key result - array of items.
If Emit Behavior = Emit Individually: object with key result - each item emitted individually.
Create new Spreadsheet
Action to create a new Google spreadsheet. This action is based on Google Spreadsheets API v4. The action needs a JSON instance of a Spreadsheet object in order to create a new spreadsheet. All data structures and limitations are the same to Google API.
Add Spreadsheet Row
Action to create a new Google spreadsheet row. This action based on Google Spreadsheets API v4. Adds an array of given values to a spreadsheet as a new row. Data would be inserted in the same order as provided in the input array. Data will be inserted into the last empty line, starting from the first table column. A datatype of inserted values will be the same as for JSON type (string, numeric or boolean). Use “” value to make cell empty.
Input fields:
- Spreadsheet - Spreadsheet name to make changes.
- Worksheet - Worksheet name of selected Spreadsheet to make changes.
- Input Mode - Options: First Row As Headers, Array Based. Default is First Row As Headers.
- First Row As Headers (Default): generates input metadata based on values in first row cells.
This method has few limitations:
- There should be at least one value in first row;
- Values in first row cells must be distinct;
- There should be no empty cells in first row;
- Array Based: generates input for array of
values. Array mapped tovaluesis going to be inserted as first row.
- First Row As Headers (Default): generates input metadata based on values in first row cells.
This method has few limitations:
Common Errors
- Input Mode: “First Row As Headers” requires first row to have at least one cell with value. - check there are at least one non-empty cell in first row.
- Input Mode: “First Row As Headers” requires cells in first row to be not empty. - check there are no empty cells in between in first row.
- Input Mode: “First Row As Headers” requires cells in first row to be unique. - check values in first row are distinct.
Create/Upsert/Update Spreadsheet Row
Action search the row/column identified by Upsert Criteria and find rows/columns where the value in the sheet matches the value in the incoming message:
- If more than one match is found, throw an error.
- If no matches are found, add a new row to the bottom of the sheet.
- If exactly one match is found, re-write this row/column with the values provided in the incoming message:
- If a value is provided in the message, replace the existing cell.
- If the null value is provided in the message, clear the contents of the existing cell.
- If the value provided in the message is undefined or the empty string, leave the contents of the cell as is.
Configuration Fields
- Spreadsheet - (dropdown, required): Spreadsheet name to make changes.
- Worksheet - (dropdown, required): Worksheet name of selected Spreadsheet to make changes.
- Dimension - (dropdown, required): The major dimension of the values, allowed values:
ROWS,COLUMNS. - Input Mode - (dropdown, non required): Options:
First Row As Headers,Array Based. Default isFirst Row As Headers.- First Row As Headers (Default): generates input metadata based on values in first row or column cells (depend on dimension field).
This method has few limitations:
- There should be at least one value in first row/column;
- Values in first row cells must be distinct;
- There can be at most one empty cell in first row/column;
- Array Based: generates input as the sheet rows/column identifiers (A, B, C, 1, 2, 3, etc);
- First Row As Headers (Default): generates input metadata based on values in first row or column cells (depend on dimension field).
This method has few limitations:
- Upsert Criteria - (dropdown, required): List of available row/column headers (based on selected dimension).
Input Metadata
One input field for each row/column, all inputs optional except for the field identified by Upsert Criteria which is required.
Output Metadata
| Field | Type | Required | Description |
|---|---|---|---|
| spreadsheetId | string | true | Unique identifier of the spreadsheet |
| tableRange | string | true | Range of Table |
| updateRange | string | true | Updated Range |
| updatedRows | number | true | Count of updated rows |
| updatedColumns | number | true | Count of updated columns |
| updatedCells | number | true | Count of updated cells |
Get Spreadsheet Row Action
This action is very similar to Get Spreadsheet Row trigger. It works the same as the trigger does. To initiate it, a message of any structure should be sent to the step with this action.
Recommendations
Here are some general recommendations to help you avoid potentially confusing cases where you might get unexpected results while using Google Spreadsheets connector.
Spreadsheet Country Format
Depending on your Google Account settings your Google Drive and especially Google Spreadsheets would have some specific default formatting applicable to the Account Language/Country Setup in use. By default, Google will assume US formatting which would mean not only the default currency is US Dollar ($) but also, the date format will be of MM/DD/YYYY format, not DD/MM/YYYY which is widely used in European and other countries.
Google Spreadsheet default Language Settings
Please note if the data you are planning to write has values in different language/country formatting than your Google Spreadsheets then you are most likely to encounter unexpected results.
Make sure to change it to the desired one in the Google Spreadsheets in advance by selecting File > Spreadsheet Settings ... menu of your Spreadsheet.
Changing the Spreadsheet structure
Do NOT change the Spreadsheet structure while your flow is active
If you make structural changes to the Google Spreadsheet while it is being used it will cause a number of Errors and the flow will stop functioning properly.
Decide the structure of your spreadsheet file in advance and avoid making any structural changes during the integration. In particular, avoid adding or removing additional columns since you would need to repeat the flow design process to properly map or link your changes.
If you still wish to change the structure of your Google Spreadsheet then follow these steps:
- Stop the integration flow if it is running;
- Make your changes in the Google Spreadsheet;
- Go through the integration design stage again to ensure that all columns in the modified spreadsheet are properly linked with required fields or values necessary to run your integration flow.
- Activate the flow again.
Inserting a row
Do NOT insert a row between the records while your flow is active
If you insert a new row between existing structure the system would fail to recognize it as an update. Instead, this will cause the system to lose the connection between the unique IDs and the records since our unique ID is the row number.
If you wish to insert a row between existing records then you must first stop the integration flow in your Dashboard and then proceed to make the changes in your Google Spreadsheets file. You can activate your flow after you made the necessary changes. However, we recommend not to insert a row between the records even if you have deactivated it.
New inserted row will cause an additional data transfer
Avoid inserting a row in between the records during the integration since it would look different for the system. This would trigger an additional data transfer since not only the newly inserted row will be regarded as a new record but everything after the inserted row would be considered a new data.
Click here to learn more about the elastic.io iPaaS