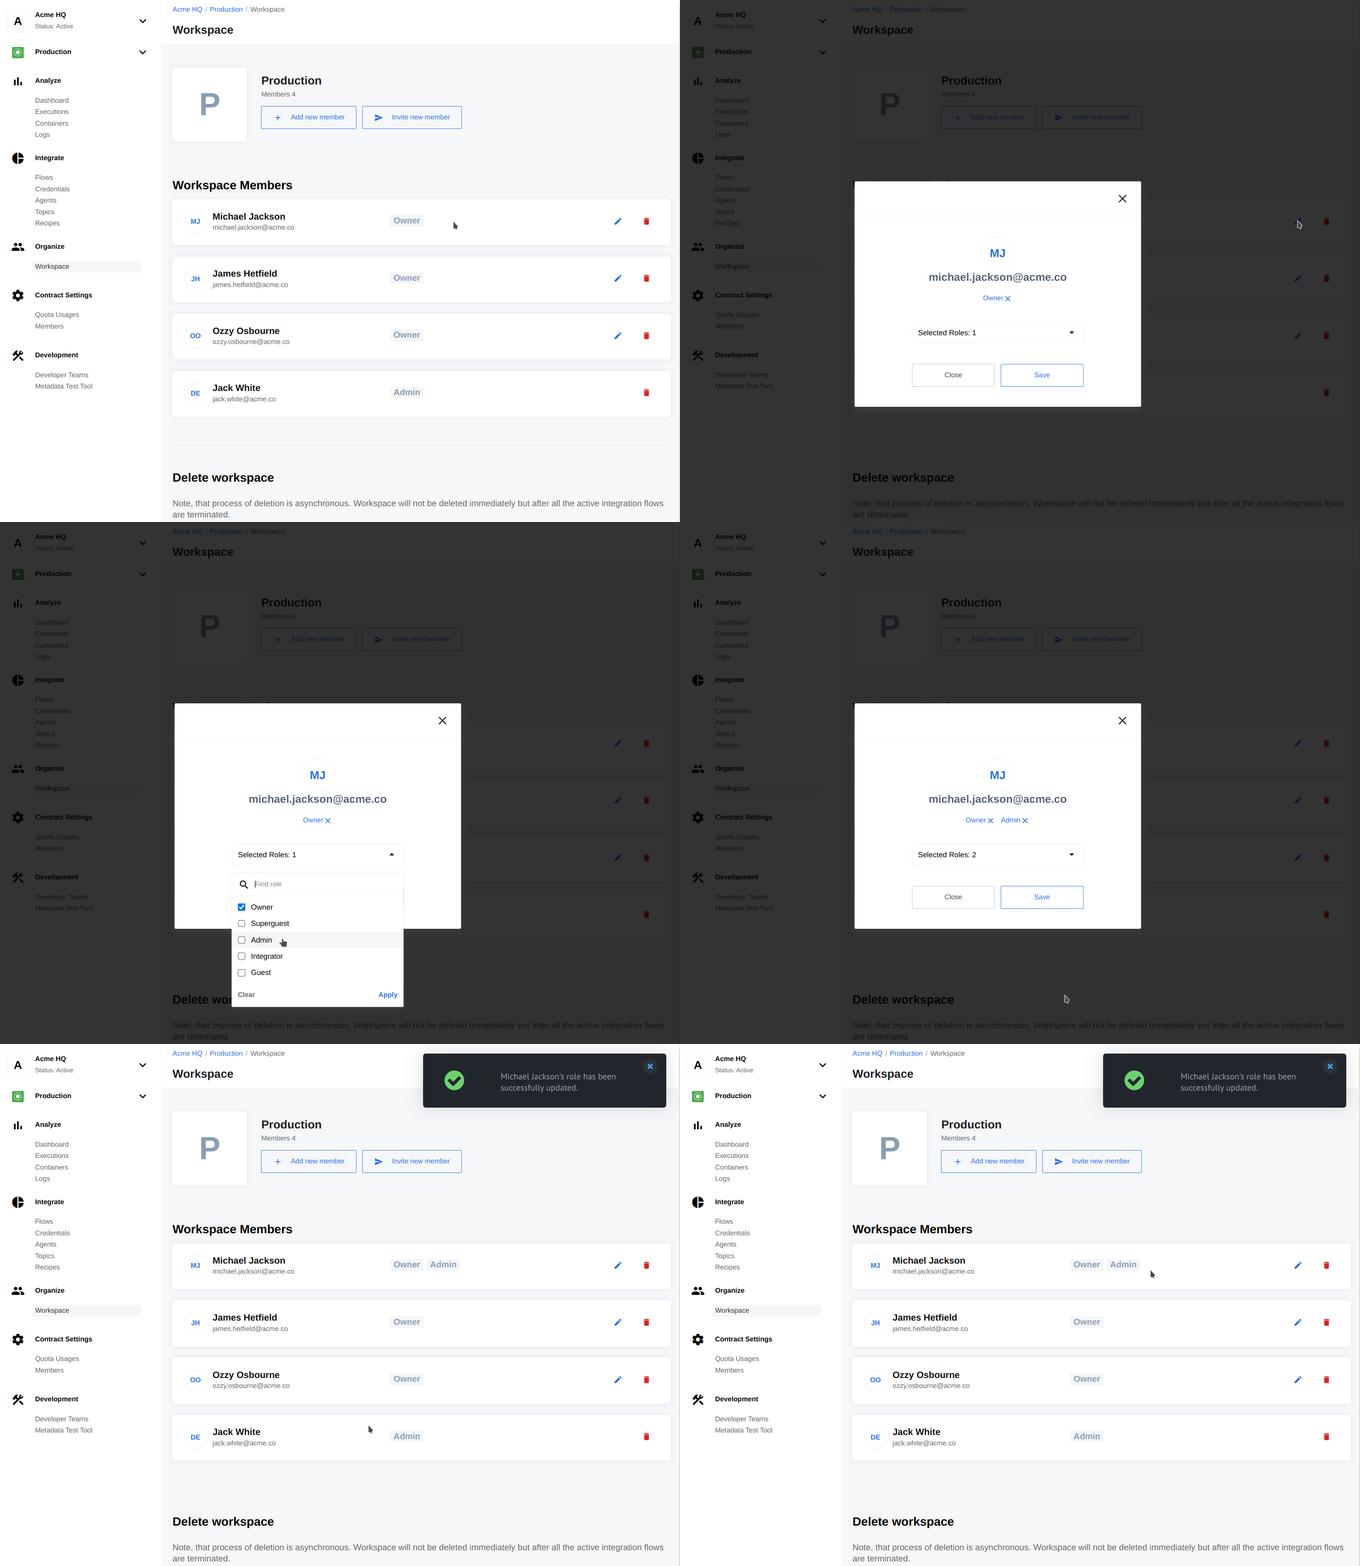
This document provides information on workspace management, namely the following actions: creating workspaces, editing the workspace, creating flows, editing flows in the workspace, creating credentials and editing credentials. Additionally, you will find all workspace-related retrieval API requests.
Workspaces are enclosed environments in a contract. You can find the basic information about workspaces here. A contract member can create workspaces in his contract via the UI or the API.
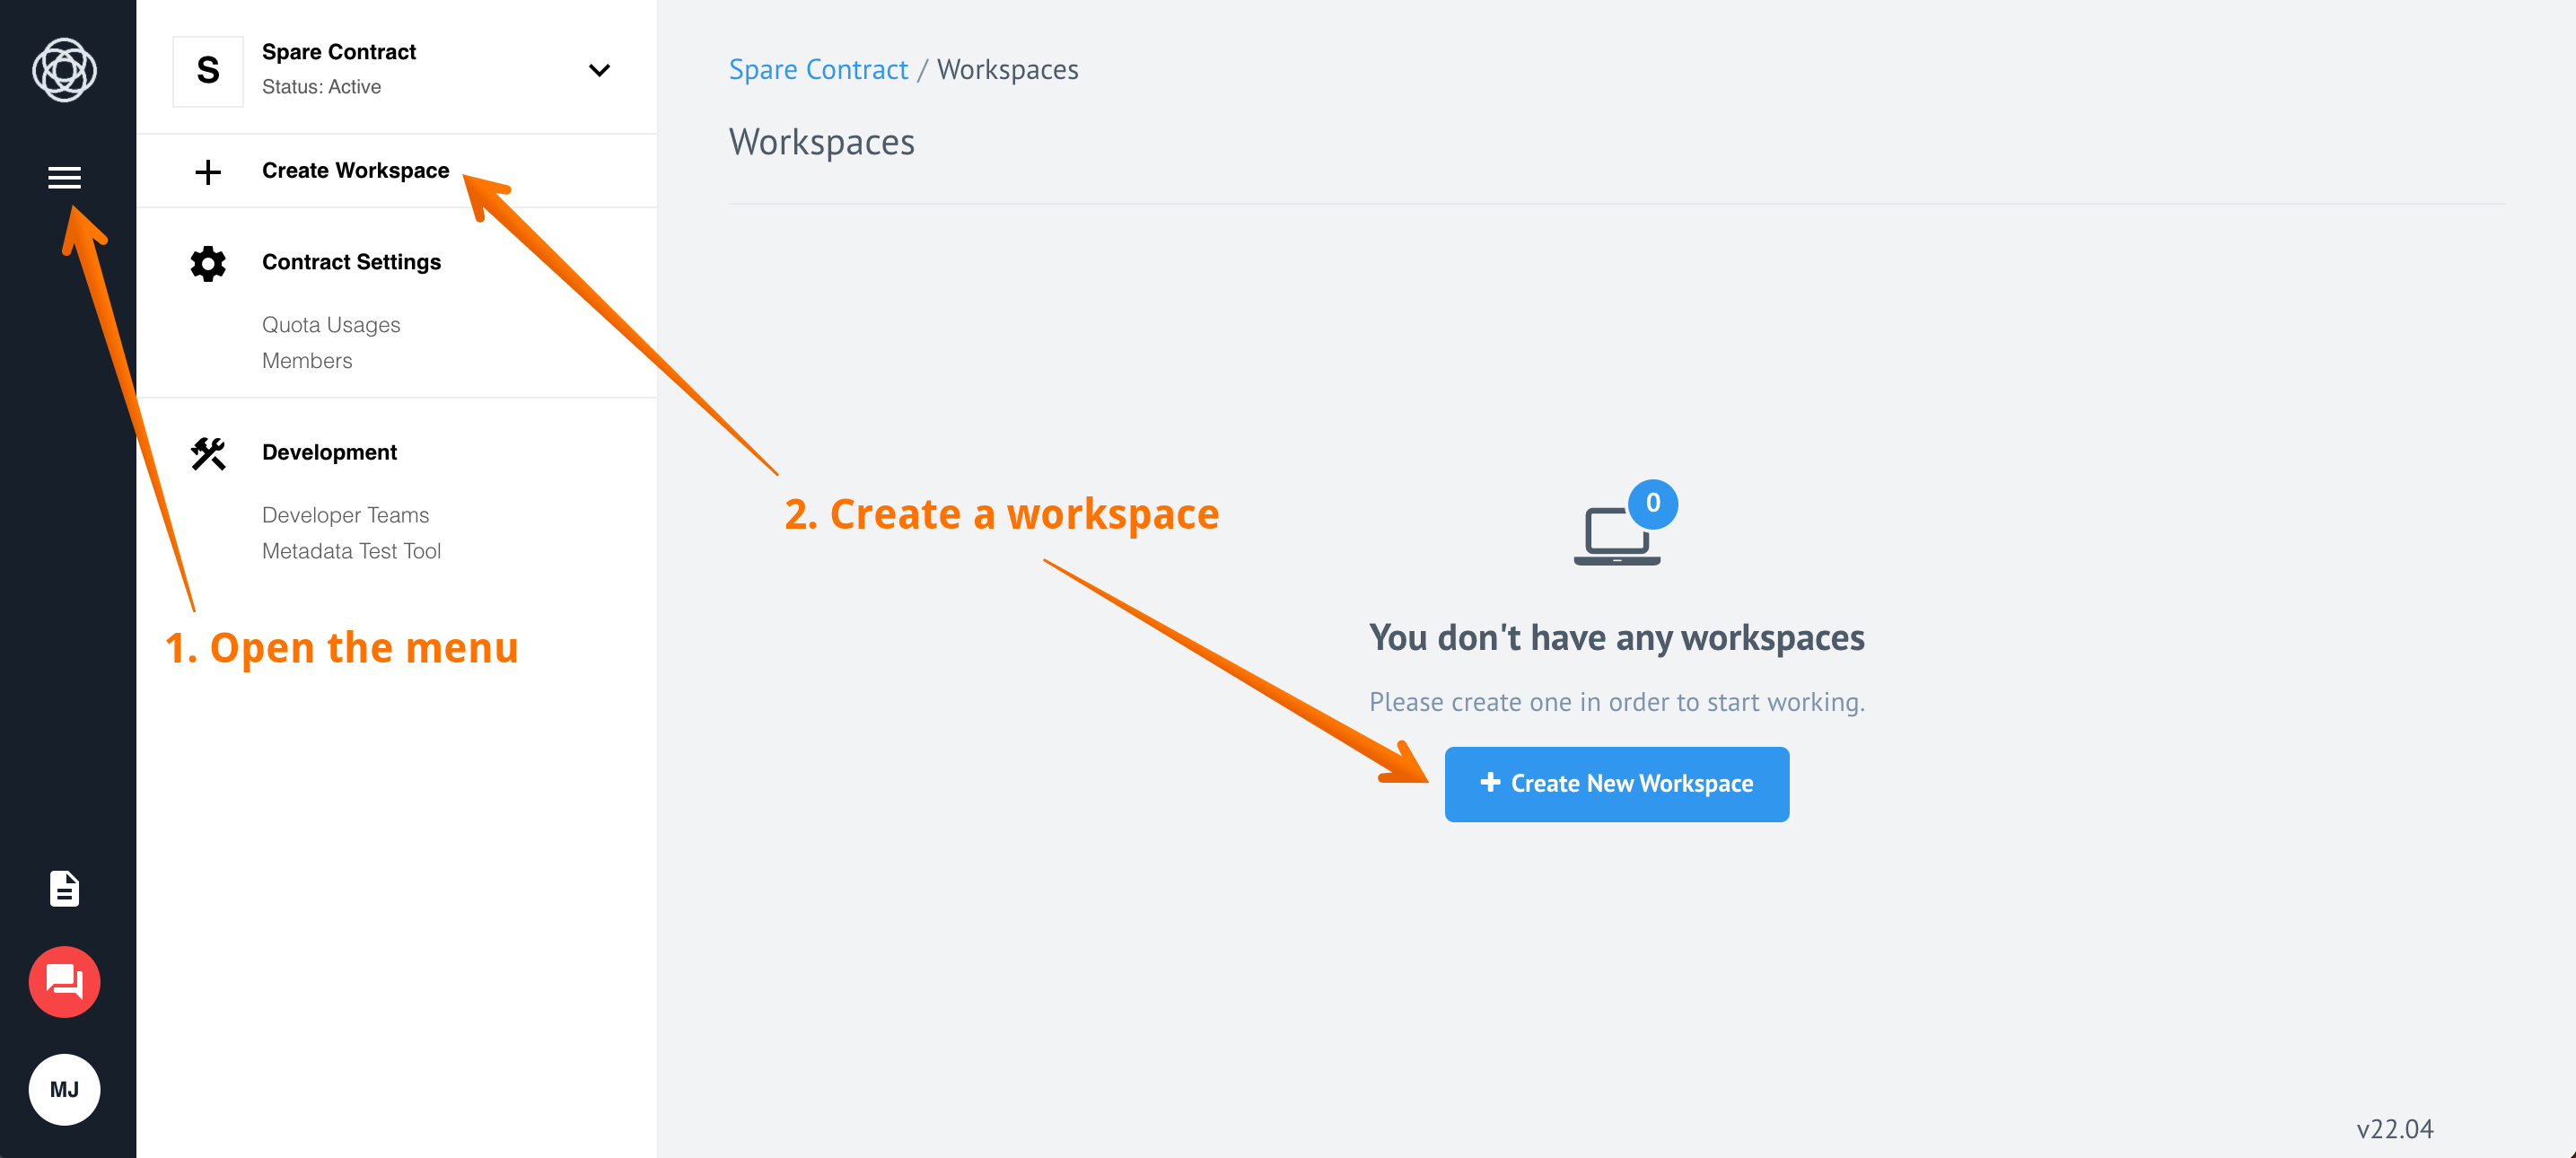
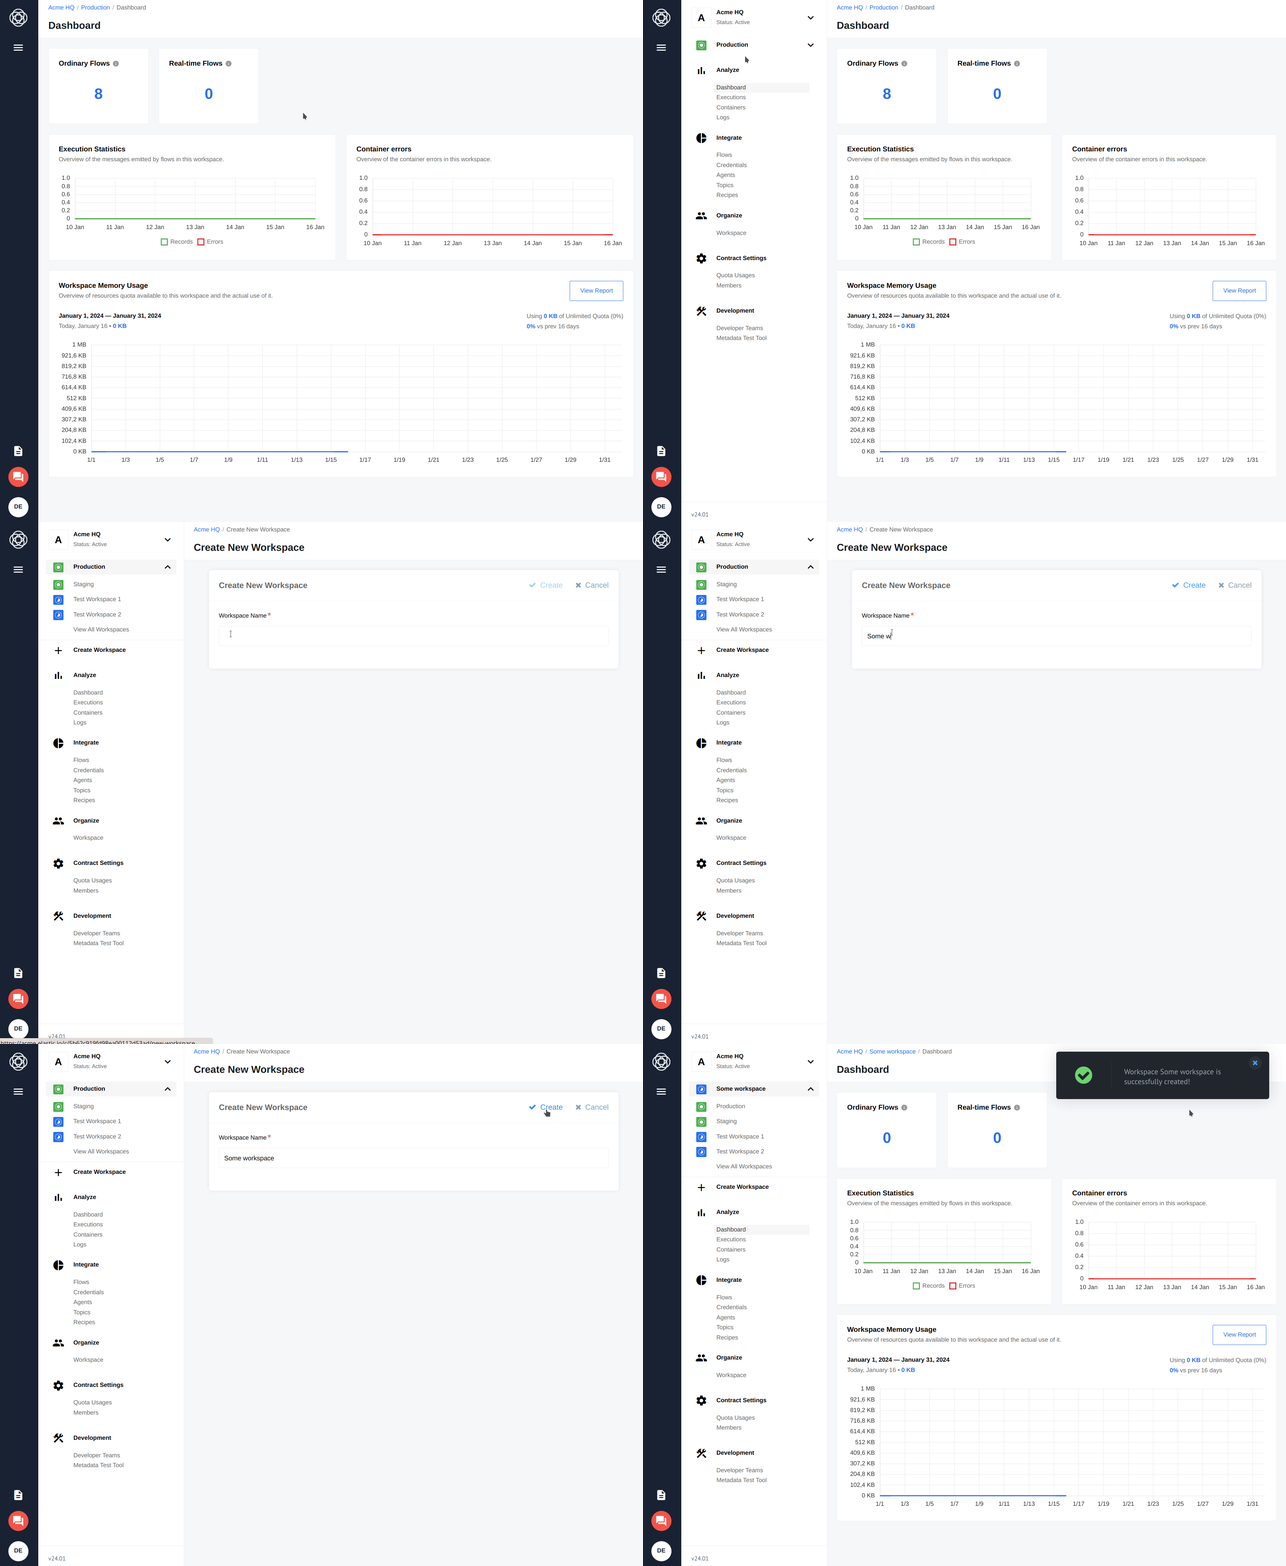
Option 1. Open the Navigational Menu, expand the list of Workspaces, and click Create Workspace. Enter new workspace name and click Create:
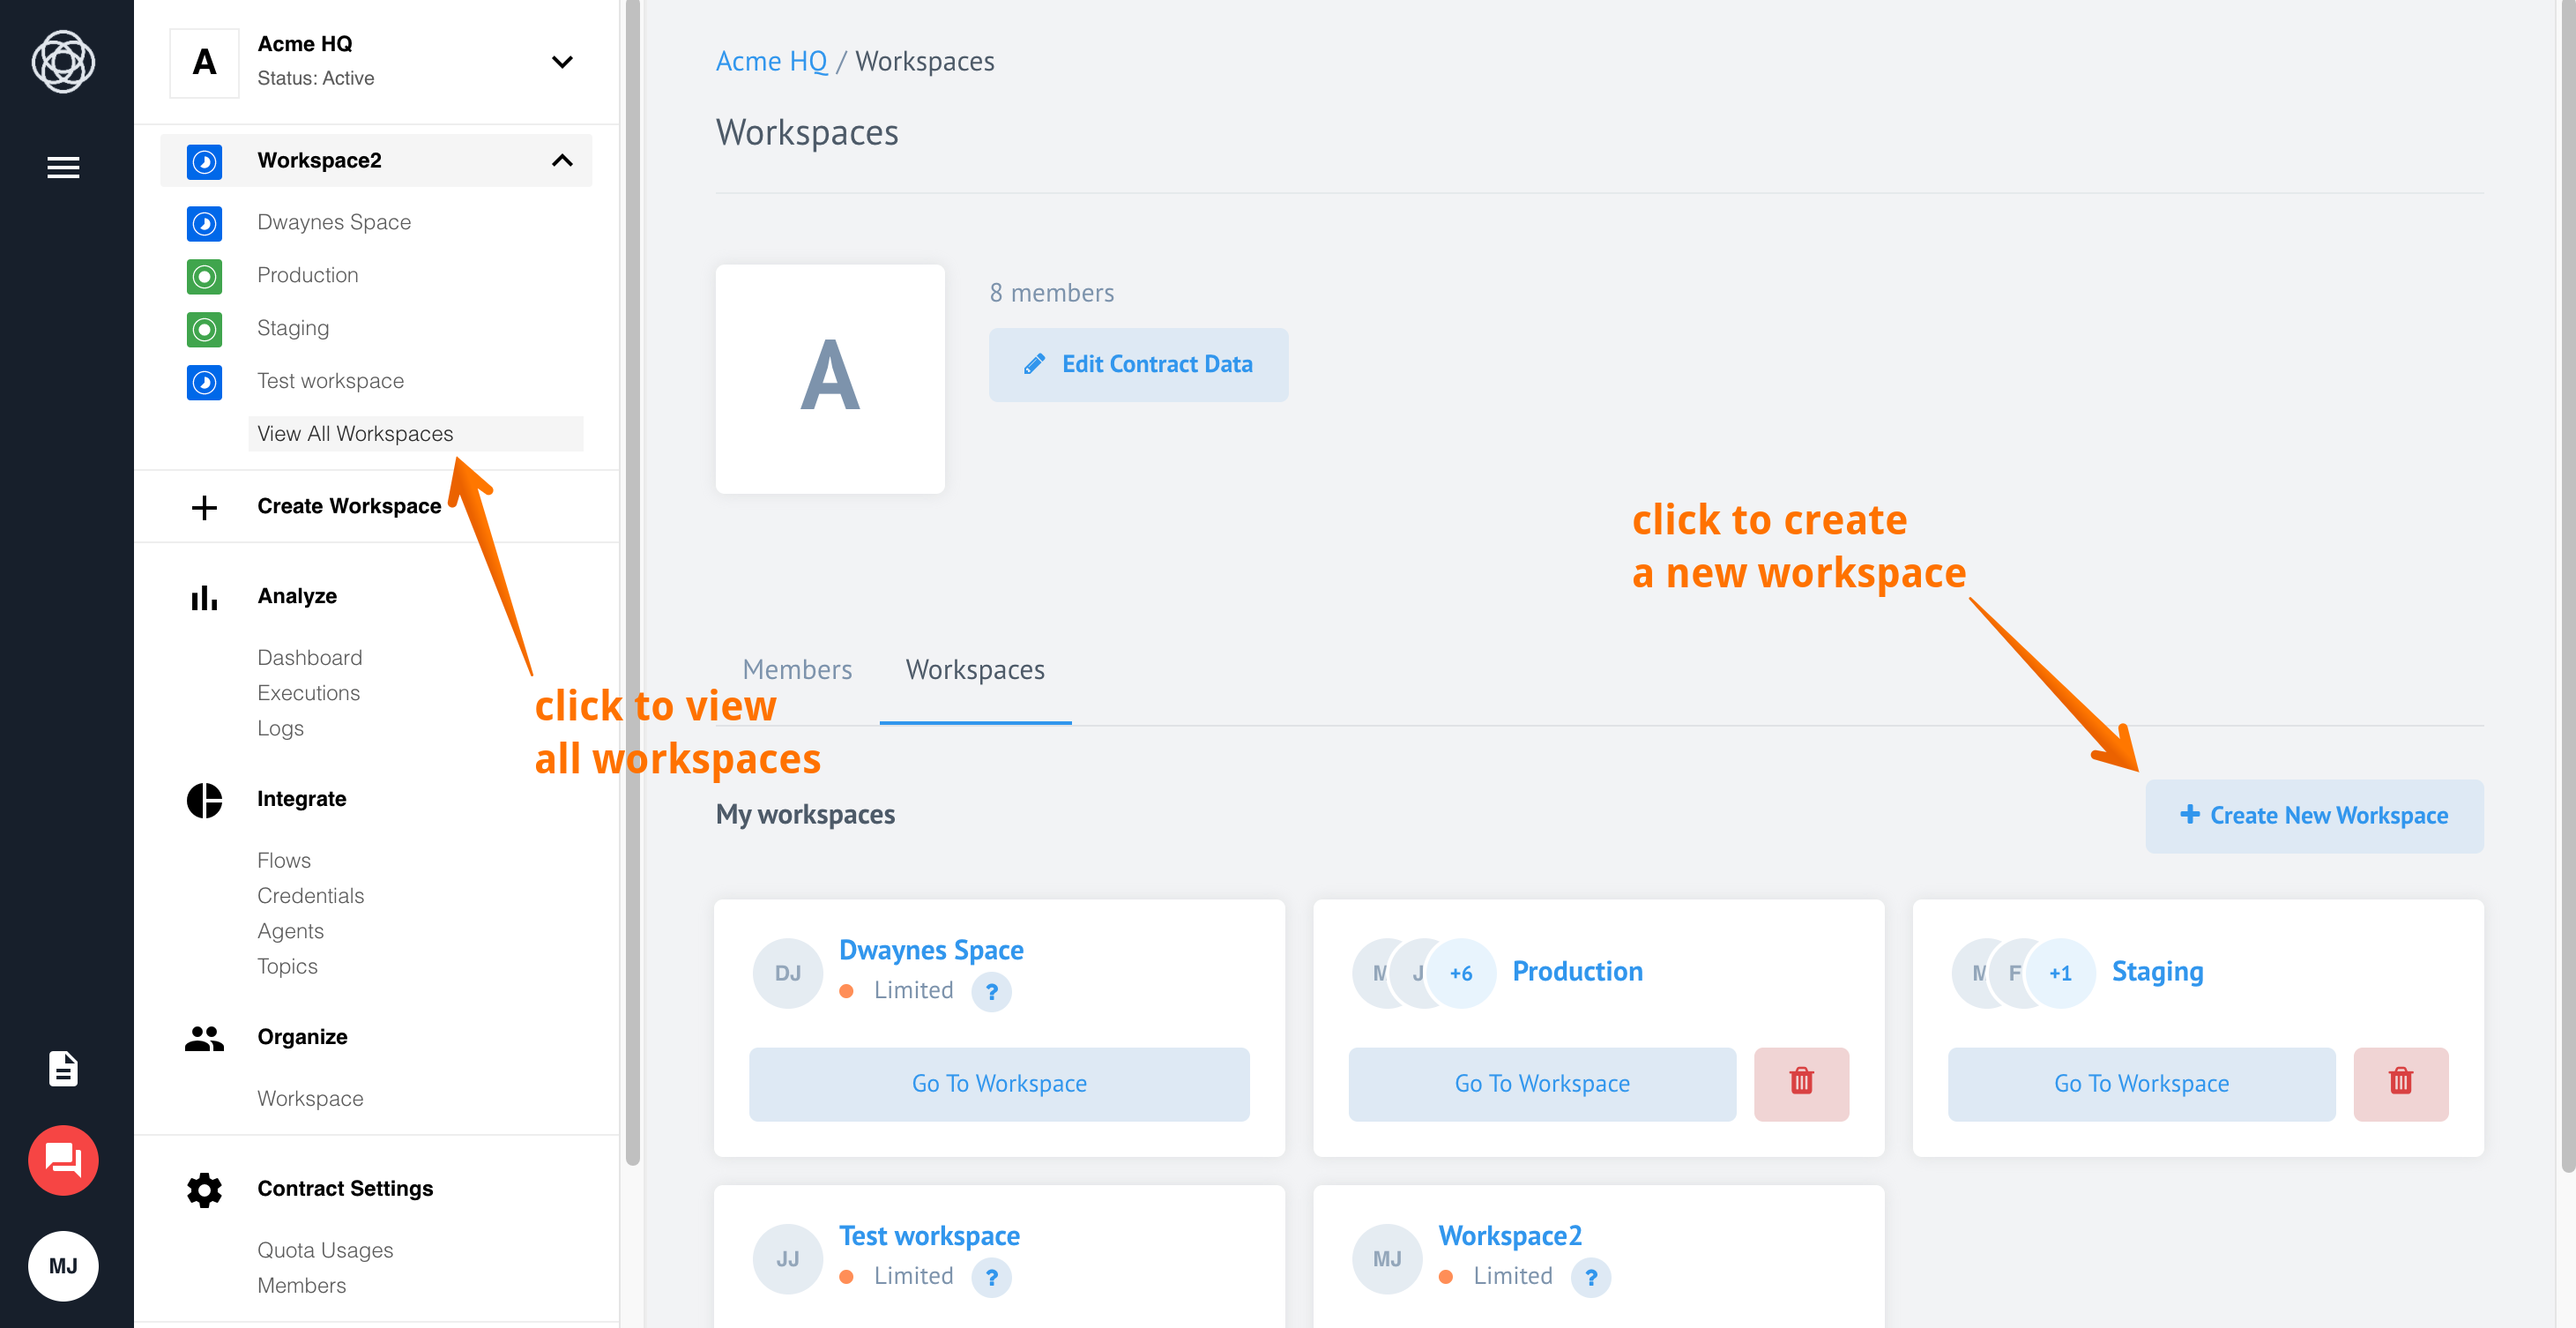
Option 2. You can also create a new workspace in Workspace list. Open the Navigational Menu, expand the list of Workspaces, and click View All Workspaces. Alternatively, you can use Members or Developer Teams menu items, and just switch to Workspaces tab. Then click Create Workspace:
POST https://api.elastic.io/v2/workspaces
Below are request parameters:
Payload Parameter | Required | Description |
---|---|---|
type |
yes | Allowed value: workspace |
attributes.name |
yes | Name of the new workspace |
relationships.contract.data.id |
yes | ID of the contract |
relationships.contract.data.type |
yes | Allowed value: contract |
EXAMPLE:
To create a new workspace called Integrator 2: Judgement Day, we will use the following request:
curl https://api.elastic.io/v2/workspaces \
-X POST \
-u {EMAIL}:{APIKEY} \
-H 'Accept: application/json' \
-H 'Content-Type: application/json' -d '
{
"data":{
"type":"workspace",
"attributes":{
"name":"Integrator 2: Judgement Day"
},
"relationships":{
"contract":{
"data":{
"id":"{CONTRACT_ID}",
"type":"contract"
}
}
}
}
}'
Please note that Workspace name is limited by usable characters and length. It may contain only letters, digits, whitespaces,
-
and_
symbols, and be from 3 up to 40 symbols long.
With the right permissions a workspace member can perform workspace management via the UI or the API.
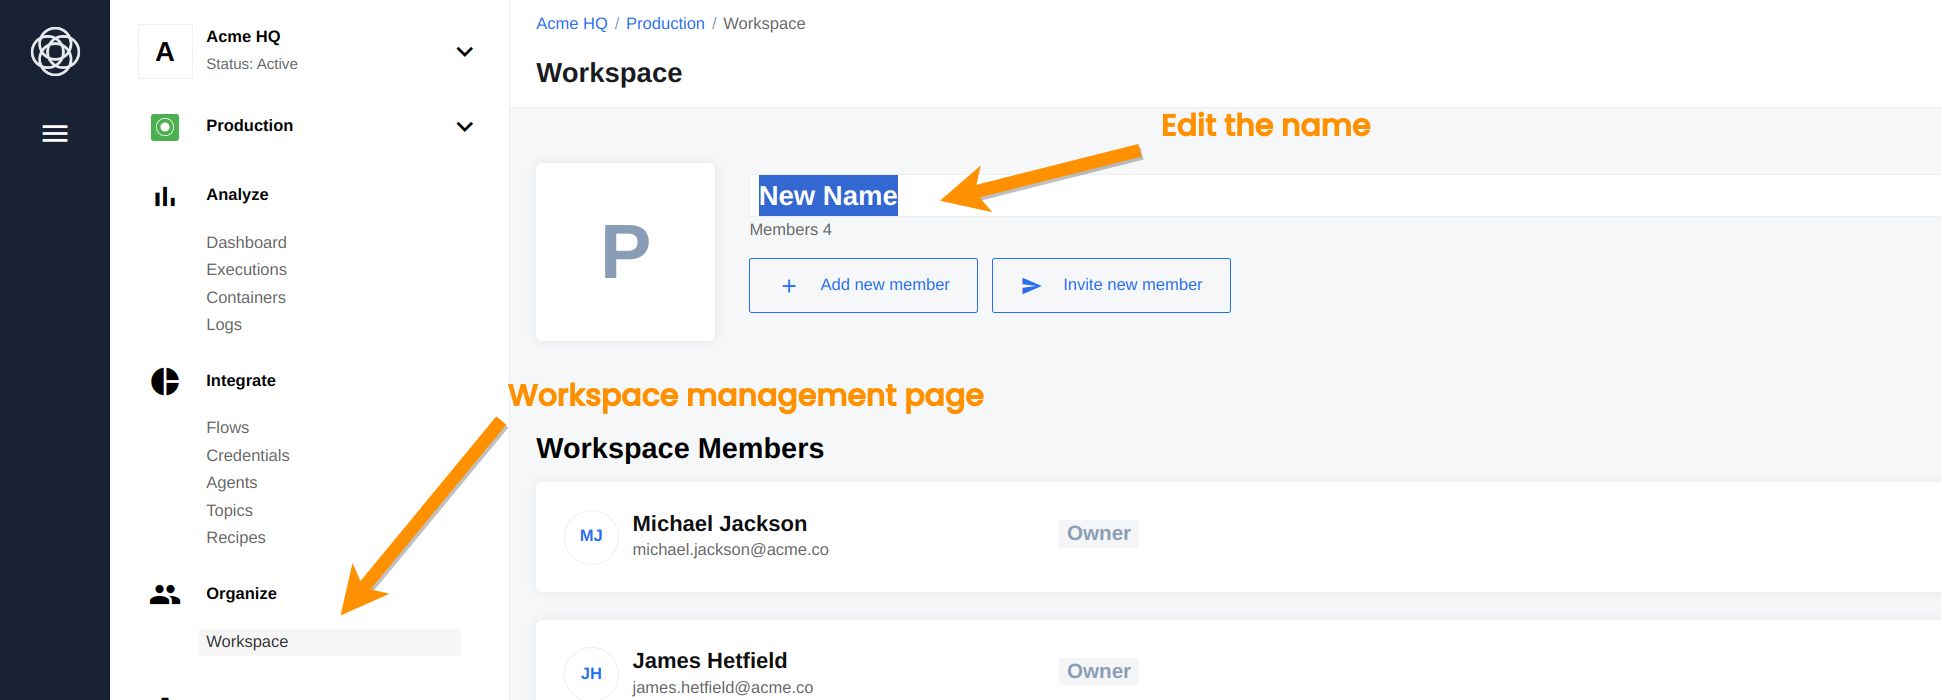
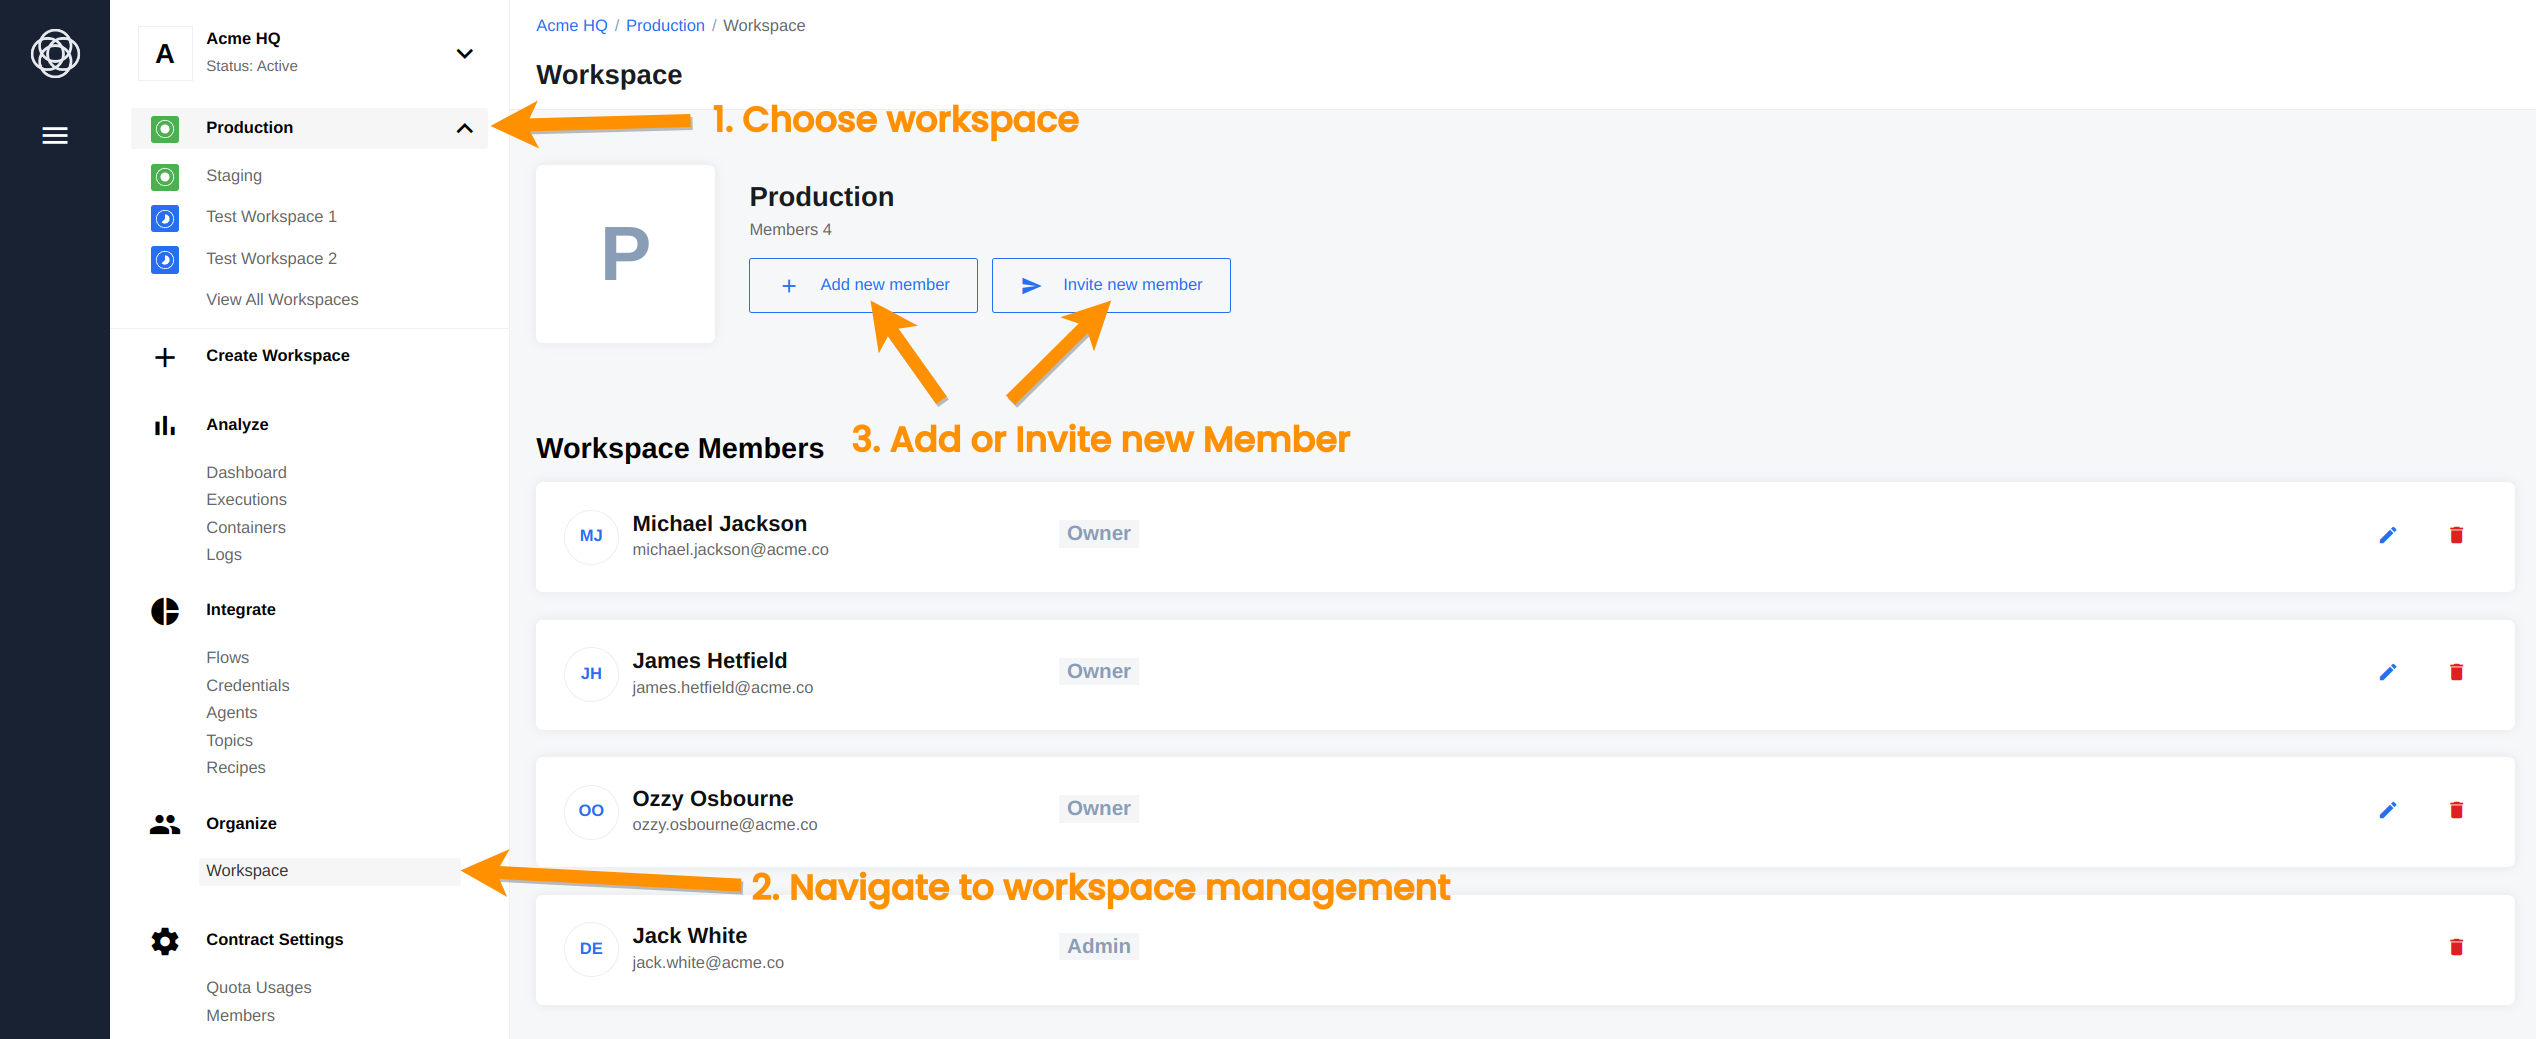
includes adding or inviting new members, managing their Workspace user roles, removing members, renaming and deleting the workspace. All these actions are done in Workspace page, accessed via the Navigational Menu. First, choose a Workspace you want to manage (1), then click Workspace in the Organize section of the menu (2):
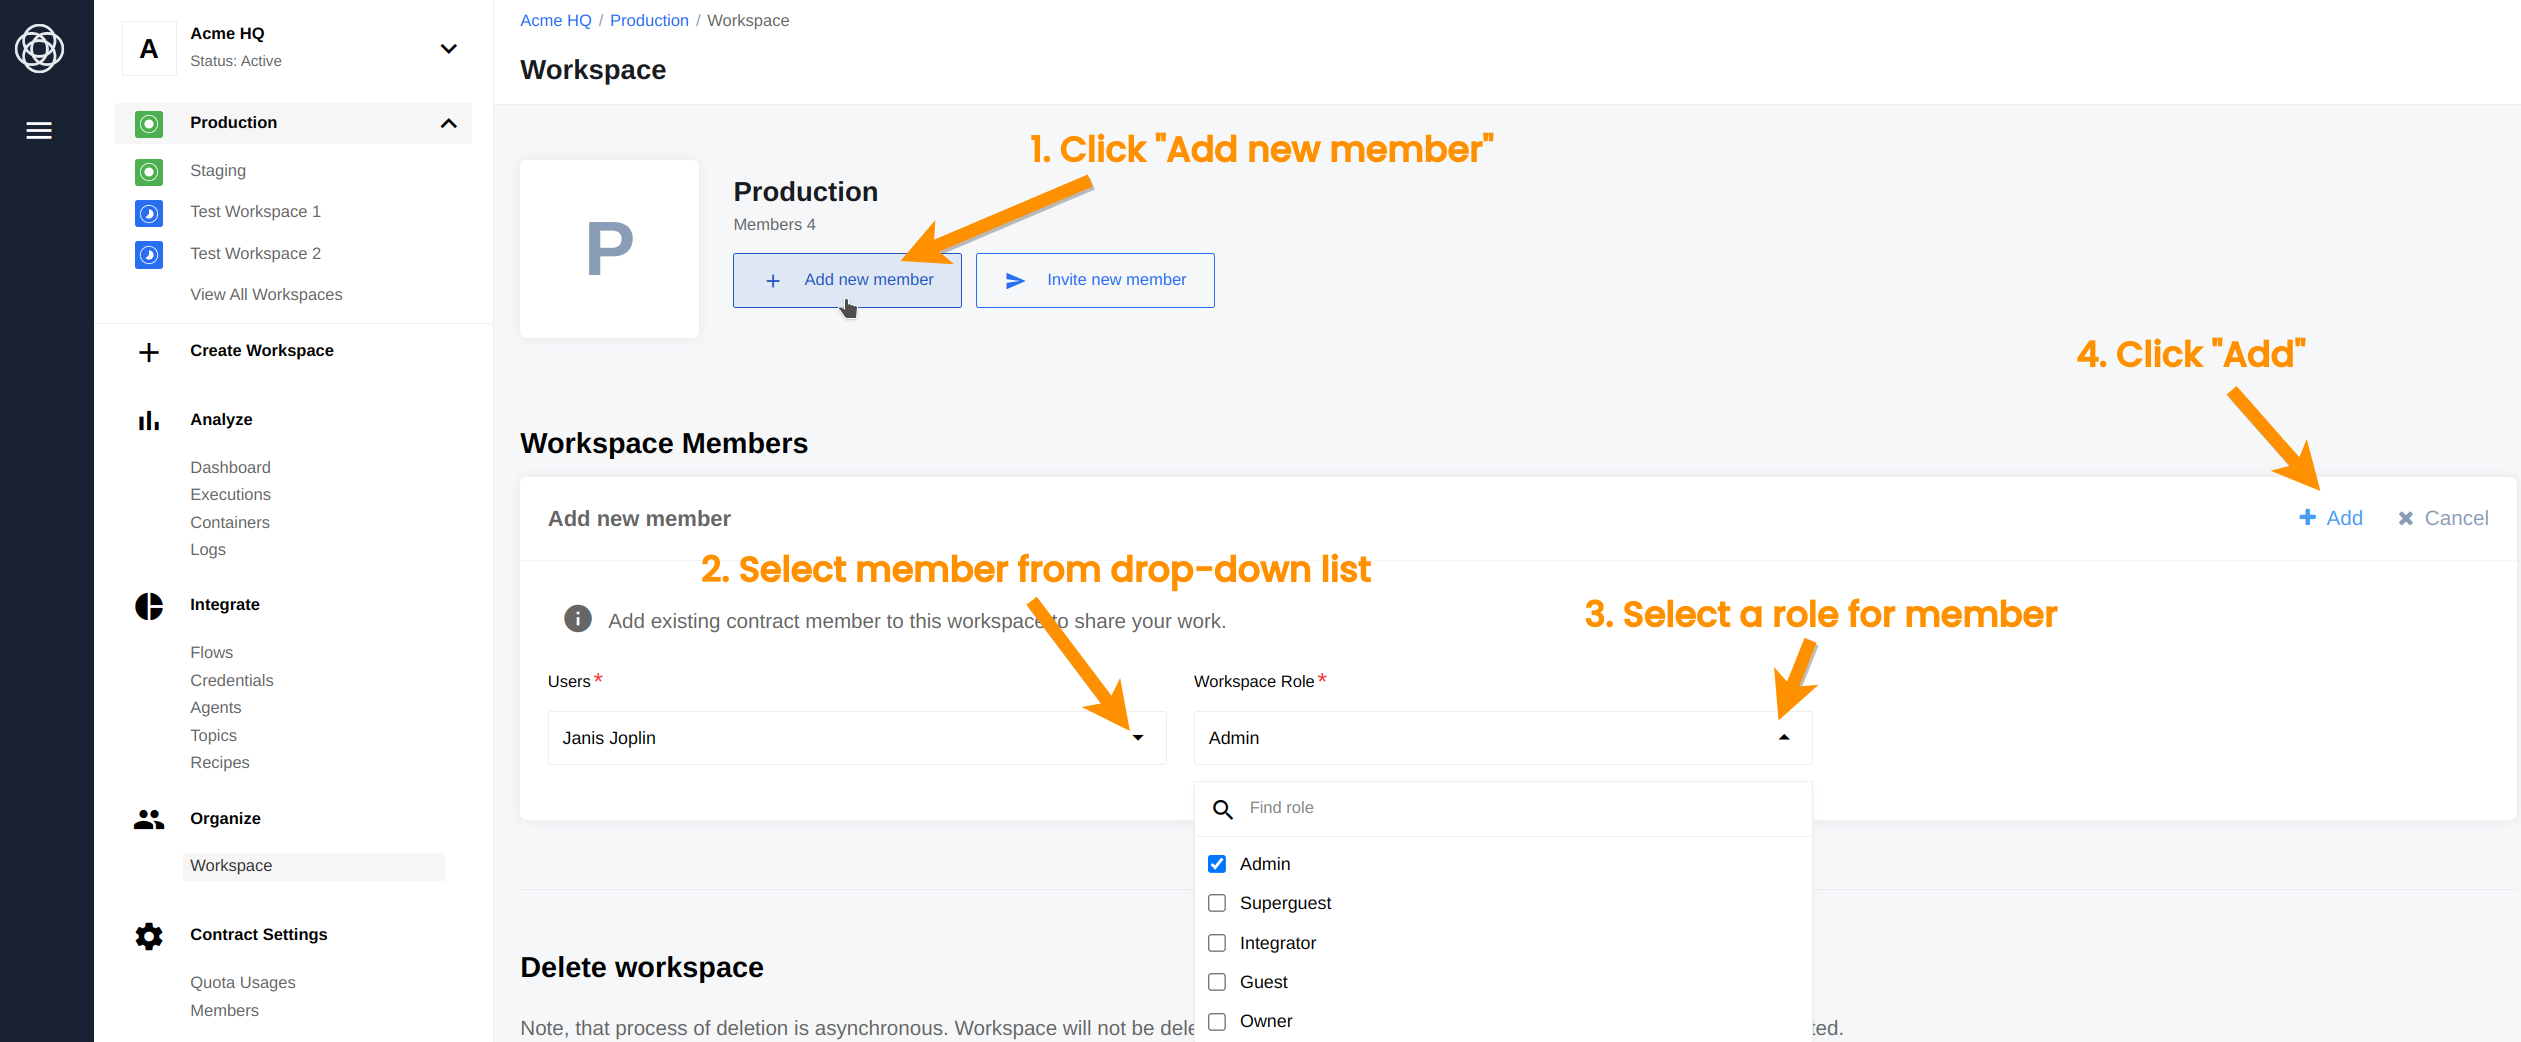
To add new members to the workspace, click Add new member button (1), select the member (2), define workspace role (3), and click Add (4):
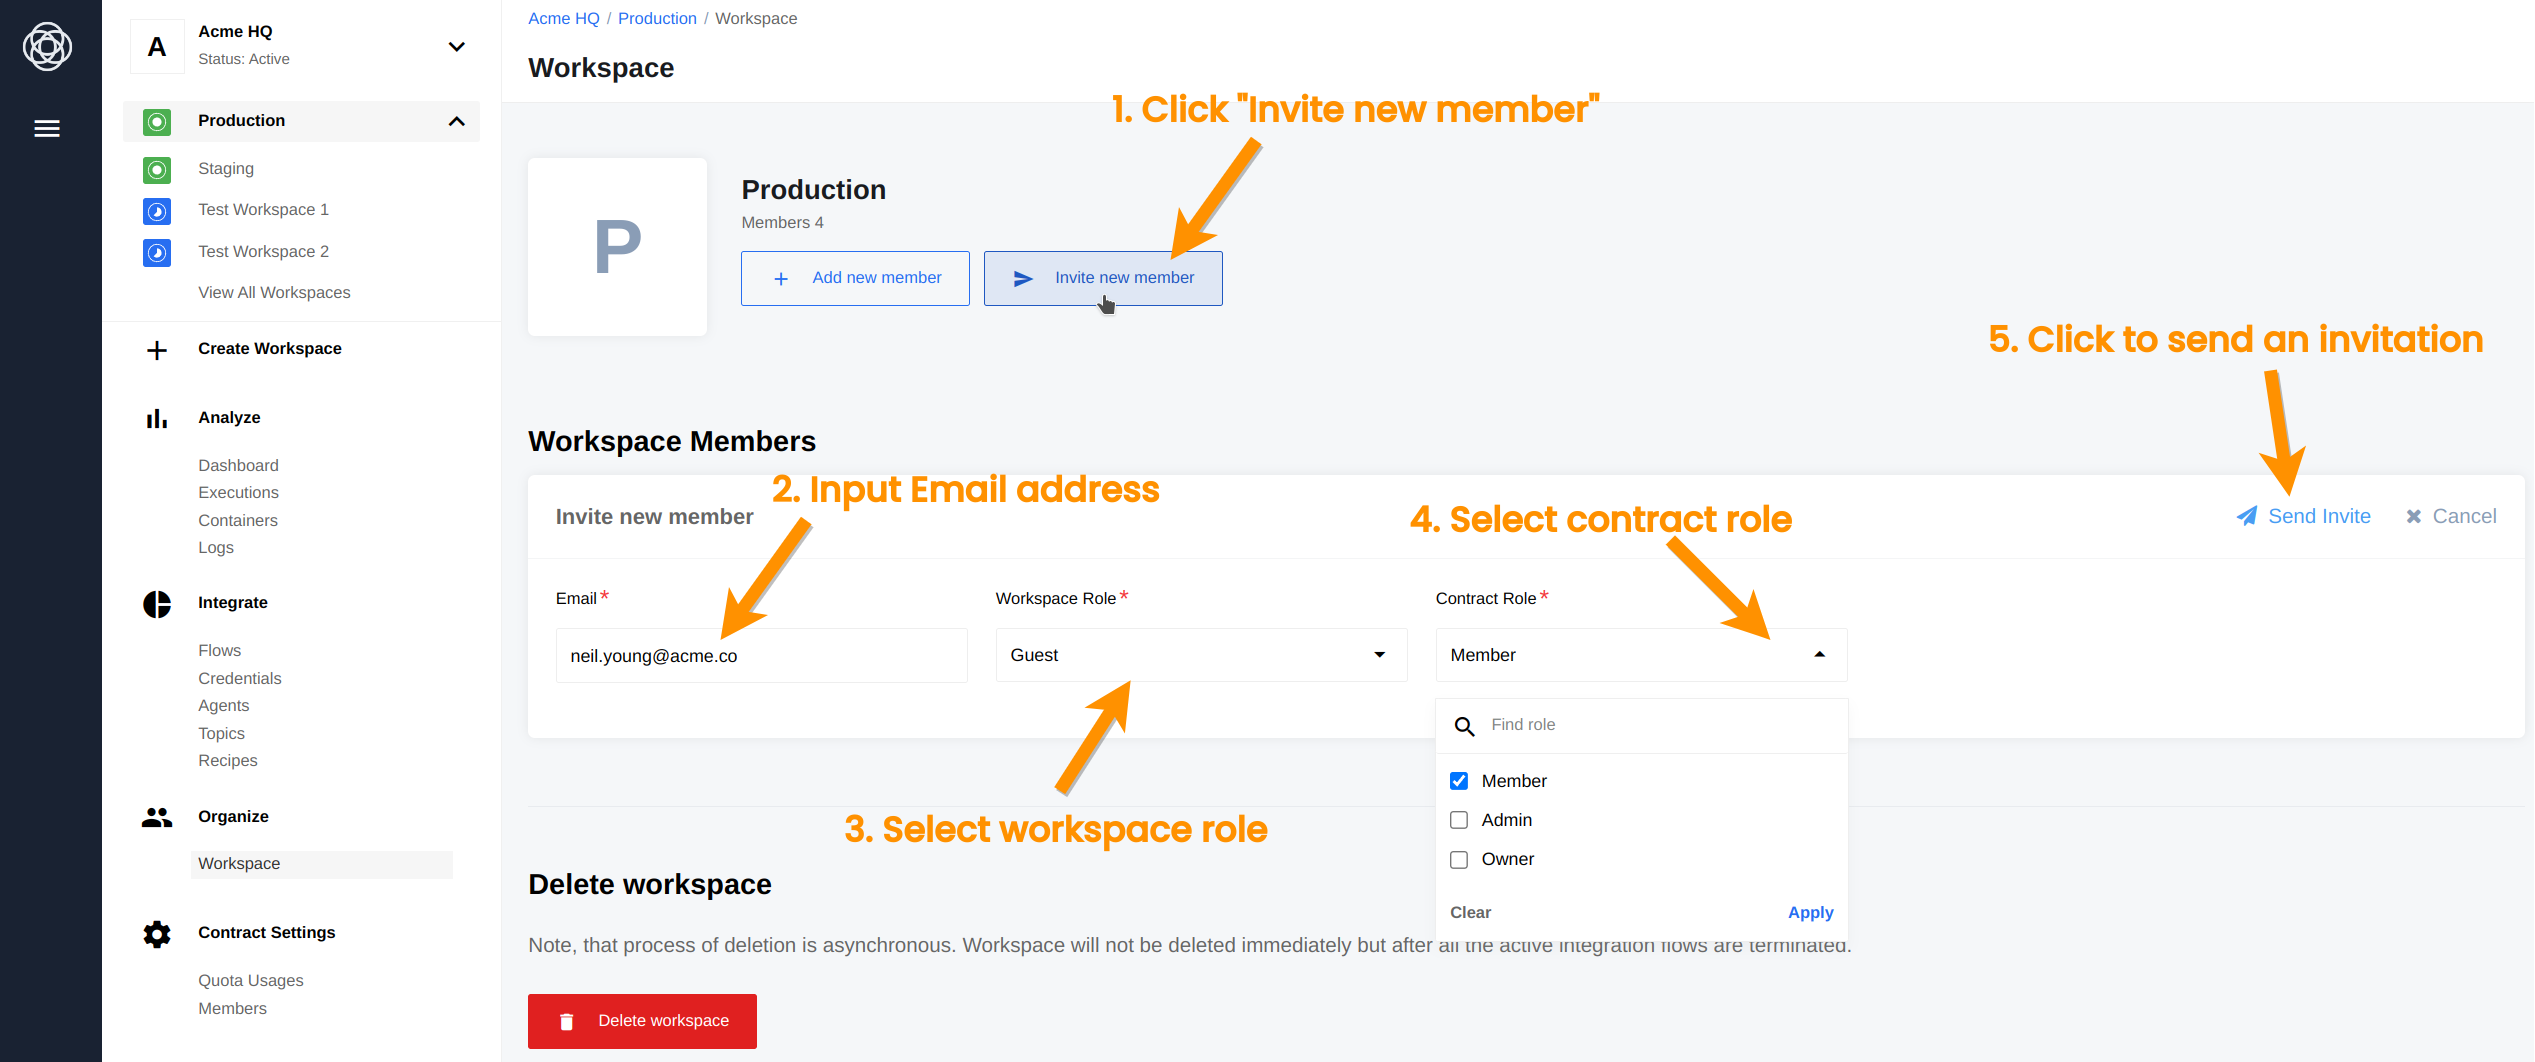
To invite a new member into the Contract, go to Members in the Navigational Menu (1), and click Invite new member (2). Then fill in user email address (3) and define Contract role (4). Optionally (5), you can specify invitee’s Workspace (6) and workspace role (7), and click Send Invite (8):
Note that only contract members with the corresponding contract permission will have the option to invite new members to the workspace. You can learn how to assign member roles here.
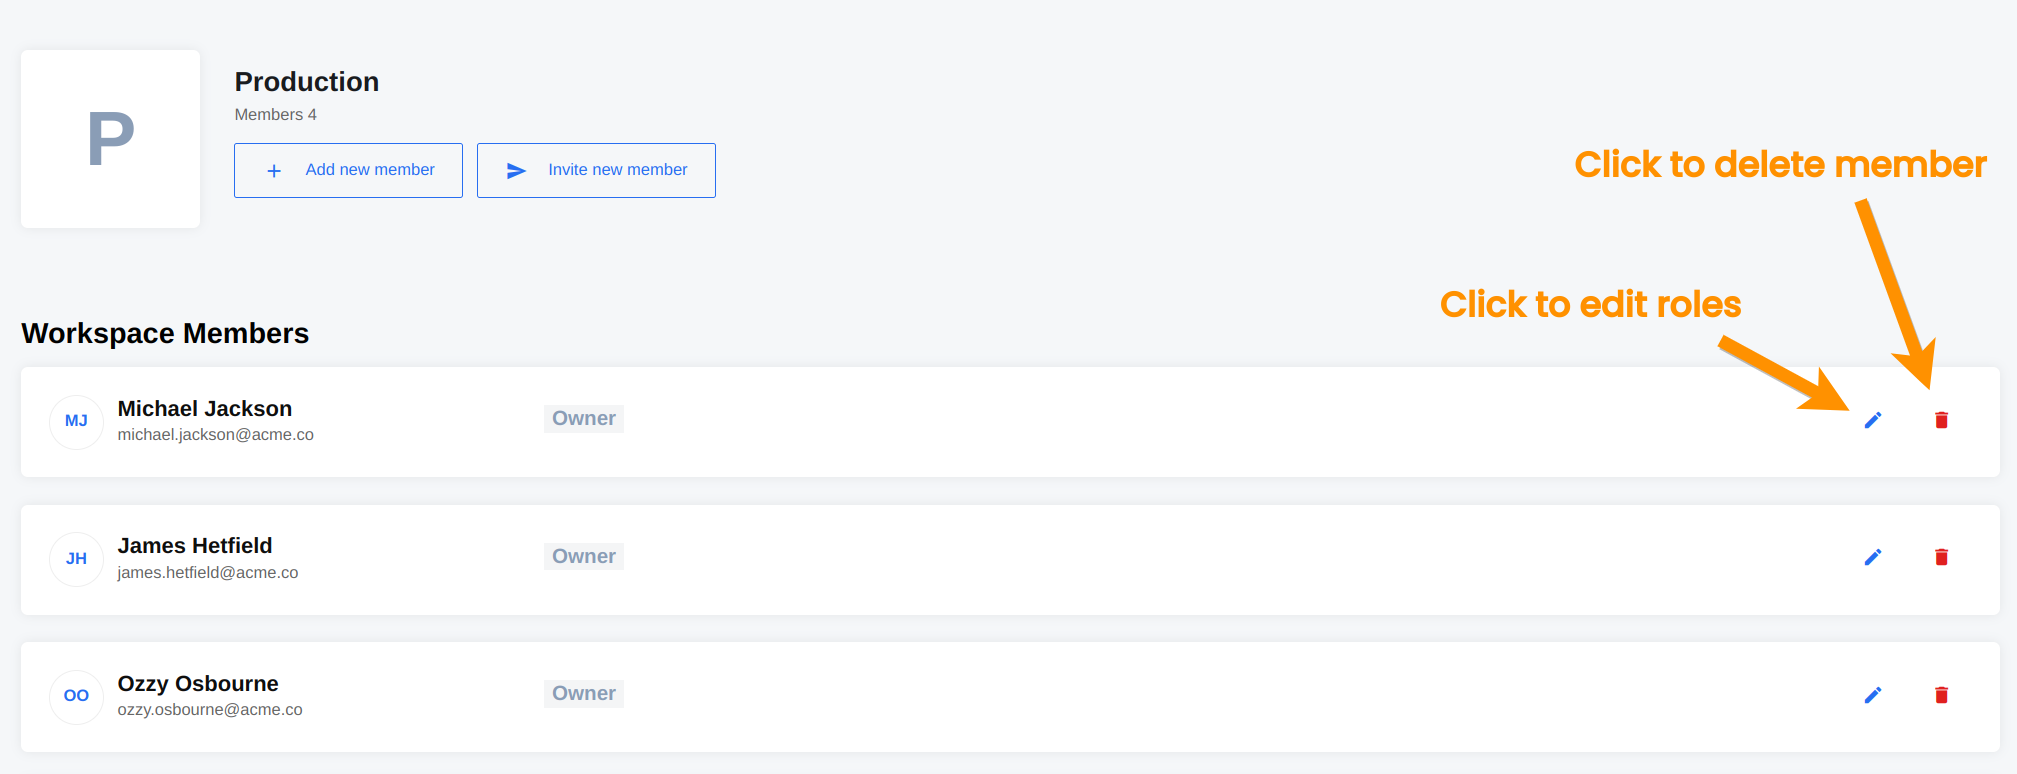
To remove members from a workspace, click the corresponding icon on the user list:
To rename a workspace, click Workspace in the menu (1), and then click Workspace name (2):
To delete a workspace, click Delete workspace on the same page:
includes adding new members, managing their workspace user roles, removing members, renaming the workspace, and deleting the workspace.
To add a new member via the API, use the following request:
POST https://api.elastic.io/v2/workspaces/{WORKSPACE_ID}/members
Below are request parameters:
Payload Parameter | Required | Description |
---|---|---|
id |
yes | ID of an already registered user, who will be added as a member of the workspace |
type |
yes | Allowed value: member . |
attributes.roles[] |
yes | New member roles. |
EXAMPLE:
To add a user with the ID Elvis with King and Immortal roles we will use the following request:
curl https://api.elastic.io/v2/workspaces/{WORKSPACE_ID}/members/ \
-X POST \
-u {EMAIL}:{APIKEY} \
-H 'Accept: application/json' \
-H 'Content-Type: application/json' -d '
{
"data": {
"type": "member",
"id": "{Elvis}",
"attributes": {
"roles": [
"{King}",
"{Immortal}"
]
}
}
}'
To update user roles via the API, use the following request:
PATCH https://api.elastic.io/v2/workspaces/{WORKSPACE_ID}/members/{USER_ID}/
Below are request parameters:
URL Parameter | Required | Description |
---|---|---|
WORKSPACE_ID |
yes | Workspace ID |
USER_ID |
yes | Target user ID |
Payload Parameter | Required | Description |
---|---|---|
id |
yes | ID of an already registered user, match URL parameter {USER_ID} |
type |
yes | Allowed value: member . |
attributes.roles[] |
yes | Roles. |
EXAMPLE:
To change user roles we will use the following request:
curl https://api.elastic.io/v2/workspaces/{WORKSPACE_ID}/members/{USER_ID}/ \
-X PATCH \
-u {EMAIL}:{APIKEY} \
-H 'Accept: application/json' \
-H 'Content-Type: application/json' -d '
{
"data": {
"type": "member",
"id": "{USER_ID}",
"attributes": {
"roles": [
"{NEW_ROLE}"
]
}
}
}'
To remove a member from the workspace via the API we will use the following request:
DELETE https://api.elastic.io/v2/workspaces/{WORKSPACE_ID}/members/{USER_ID}/
Below are request parameters:
URL Parameter | Description |
---|---|
WORKSPACE_ID |
The ID of the Workspace. |
USER_ID |
The ID of the user, which requires deletion. |
EXAMPLE:
curl https://api.elastic.io/v2/workspaces/{WORKSPACE_ID}/members/{USER_ID}/ \
-X DELETE \
-u {EMAIL}:{APIKEY}
To rename a workspace via the API we will use the following request:
POST https://api.elastic.io/v2/workspaces/{WORKSPACE_ID}
Below are request parameters:
Payload Parameter | Description |
---|---|
type |
The value must be workspace . |
attributes.name |
Name of the workspace. |
EXAMPLE:
curl https://api.elastic.io/v2/workspaces/{WORKSPACE_ID} \
-X PATCH \
-u {EMAIL}:{APIKEY} \
-H 'Accept: application/json' \
-H 'Content-Type: application/json' -d '
{
"data":{
"type":"workspace",
"attributes":{
"name":"New Workspace Name"
}
}
}'
To delete workspace via the API we will use the following request:
DELETE https://api.elastic.io/v2/workspaces/{WORKSPACE_ID} \
Below are request parameters:
URL Parameter | Description |
---|---|
WORKSPACE_ID |
The ID of the Workspace. |
EXAMPLE:
curl -i https://api.elastic.io/v2/workspaces/{WORKSPACE_ID} \
-X DELETE \
-u {EMAIL}:{APIKEY}
An integration flow is a set of components used to synchronize data between multiple applications or services. A workspace member with corresponding permissions can create flows in his contract via the UI or the API.
1. On the dashboard, click Add new flow:
Alternatively, you can click Add New Flow (2) in Flows (1):
2. Your new flow is ready. Be sure to name it (1) and write a description (2), which is optional. Then you can start your work by adding initial trigger (3) and publishing the Flow (4):
POST https://api.elastic.io/v2/flows/
Below are request parameters:
Payload Parameter | Required | Description |
---|---|---|
type |
yes | The value must be flow . |
attributes.name |
yes | Flow name. |
attributes.type |
yes | Flow type. Value may be: ordinary or long_running |
attributes.graph |
yes | Flow graph representing component connections. |
relationships.workspace.data.id |
yes | The ID of the workspace. |
relationships.workspace.data.type |
yes | The value must be workspace . |
EXAMPLE:
curl -X POST https://api.elastic.io/v2/flows \
-u {EMAIL}:{APIKEY} \
-H 'Accept: application/json' \
-H 'Content-Type: application/json' -d '
{
"data":{
"attributes":{
"default_mapper_type":"jsonata",
"type":"ordinary",
"name":"Timer to E-Mail",
"description":null,
"cron":null,
"graph":{
"nodes":[
{
"id":"step_1",
"command":"devTeam1/timer:timer@latest",
"fields":{
"interval":"minute"
}
},
{
"command":"devTeam1/email:send@latest",
"fields":{
},
"id":"step_2"
}
],
"edges":[
{
"config":{
"mapper_type":"jsonata",
"mapper":{
"to":"info@acme.org",
"subject":"Subject",
"textBody":"fireTime"
}
},
"source":"step_1",
"target":"step_2"
}
]
}
},
"type":"flow",
"relationships":{
"workspace":{
"data":{
"id":"59d341e9037f7200184a408b",
"type":"workspace"
}
}
}
}
}'
With the right permissions a workspace member can perform flow management via the UI or the API.
Includes the following actions: toggling type between Realtime and Ordinary, starting and stopping Flows, and deleting flows. All your flows can be found in Flows inside the navigational menu. You can use search and filters to find the required Flow. To manage the Flow, click on the flow’s name:
You will see your flow control page, where you can start, stop, edit, and delete the flow:
Click Settings (1) to access the settings tab where you can toggle Flow type (2):
Flows can be Realtime and Ordinary. You can find more info about these types here.
includes the following actions: toggling type between Realtime and Ordinary, starting and stopping flows, and deleting flows.
To update flow type or name, we will use the following API request:
PATCH https://api.elastic.io/v2/flows/{FLOW_ID}
Below are request parameters:
URL Parameter | Required | Description |
---|---|---|
FLOW_ID |
yes | ID of the flow |
Payload Parameter | Required | Description |
---|---|---|
type |
yes | Allowed value: flow . |
id |
yes | ID of the flow you want to update. |
attributes.name |
no | Flow name. |
attributes.type |
no | Flow type. Value may be: ordinary or long_running . |
attributes.graph |
no | Flow graph representing component connections. |
attributes.cron |
no | Cron expression representing flow timing. |
EXAMPLE:
curl https://api.elastic.io/v2/flows/{FLOW_ID} \
-X PATCH \
-u {EMAIL}:{APIKEY} \
-H 'Accept: application/json' \
-H 'Content-Type: application/json' -d '
{
"data": {
"type": "flow",
"id": "{FLOW_ID}",
"attributes": {
"name": "this is a test task"
}
}
}'
To start or stop a flow we will use the following requests:
POST https://api.elastic.io/v2/flows/{FLOW_ID}/start
POST https://api.elastic.io/v2/flows/{FLOW_ID}/stop
As you can see, the only difference between requests is the corresponding
start
or stop
.
Below are request parameters:
URL Parameter | Required | Description |
---|---|---|
FLOW_ID |
yes | Flow ID. |
EXAMPLE:
curl https://api.elastic.io/v2/flows/{FLOW_ID}/start \
-X POST \
-u {EMAIL}:{APIKEY} \
-H 'Accept: application/json' \
-H 'Content-Type: application/json'
To delete a flow, we will use the following requests:
DELETE https://api.elastic.io/v2/flows/{FLOW_ID}
Below are request parameters:
URL Parameter | Required | Description |
---|---|---|
FLOW_ID |
yes | Flow ID. |
EXAMPLE:
curl https://api.elastic.io/v2/flows/{FLOW_ID} \
-X DELETE \
-u {EMAIL}:{APIKEY}
Credentials contain authorization information that is required by components. Workspace members with corresponding permissions can create credentials via the UI and the API.
1. In the navigational menu, click Credentials (1). Then choose the required component from the list and click it. For example, let’s use All My SMS (2):
2. Click Add New Credential:
3. Choose Local Agent if required (1), fill in the appearing fields (2). When done, verify (3) and save (4) the new Credentials:
4. Alternatively, you can create credentials when adding components to a flow. In Flows (1), choose the required Flow (2):
5. Click Add the initial step or edit flow button, depending on the existence of flow steps. In our case, we choose an existing one:
6. Click Credentials (1) and add new credential (2):
7. Then you get the same menu, as in item 3 of this list. Choose Local Agent if required (1), fill in the appearing fields (2). When done, verify (3) and save (4) the new Credentials:
8. The same can be done in the old mapper. Click credentials tab (1) and add new credential (2):
Then you go through item 7 of this list again.
POST https://api.elastic.io/v2/credentials/
Below are request parameters:
Payload Parameter | Required | Description |
---|---|---|
type |
yes | The value must be credential . |
attributes.name |
no | Credential name. An automatic name will be generated if you ignore this parameter. |
relationships.component.data.id |
yes | ID of the target component. |
relationships.component.data.type |
yes | The value must be component . |
relationships.workspace.data.id |
yes | Workspace ID. |
relationships.workspace.data.type |
yes | The value must be workspace . |
relationships.agent |
no | Agent relation object. |
relationships.agent.data.id |
no | Agent ID. |
relationships.agent.data.type |
no | The value must be agent |
attributes.keys |
no | An object which represents component’s configuration (OAuth keys, etc.) |
EXAMPLE:
curl https://api.elastic.io/v2/credentials/ \
-X POST \
-u {EMAIL}:{APIKEY} \
-H 'Accept: application/json' \
-H 'Content-Type: application/json' -d '
{
"data":{
"type":"credential",
"attributes":{
"name":"credname",
"keys":{
"host":"hostname",
"username":"username",
"password":"pass"
}
},
"relationships":{
"component":{
"data":{
"id":"56793fb4d8057406000000f7",
"type":"component"
}
},
"workspace":{
"data":{
"id":"59d341e9037f7200184a408b",
"type":"workspace"
}
}
}
}
}'
A member with the right permissions can manage credentials – update or delete them via the UI or the API:
To edit credentials, choose the required credential from the list in Credentials:
Here you can edit or delete Credentials:
To edit Credentials, make the required changes (1), then verify (2), and save (3) after verification:
To update credentials, we will use the following request:
PATCH https://api.elastic.io/v2/credentials/{CREDENTIAL_ID}/
Below are request parameters:
Payload Parameter | Required | Description |
---|---|---|
id |
yes | The value must be the same as the URL parameter CREDENTIAL_ID |
type |
yes | The value must be credential . |
attributes.name |
no | Credential name. Will not change if you choose to ignore this parameter. |
attributes.keys |
no | An object which represents component’s configuration. Will not change if you choose to ignore this parameter. Please note, that keys object is overwritten entirely. |
relationships.agent |
no | The agent relation object. Will not change if you choose to ignore this parameter. |
relationships.agent.data.id |
no | Agent ID. |
relationships.agent.data.type |
no | The value must be agent . |
EXAMPLE:
curl https://api.elastic.io/v2/credentials/{CREDENTIAL_ID}/ \
-u {EMAIL}:{APIKEY} \
-X PATCH \
-H 'Accept: application/json' \
-H 'Content-Type: application/json' -d '
{
"data": {
"id": "585430d3f02852a8a9fac45e",
"type": "credential",
"attributes": {
"keys": {
"key1": "updated value"
}
},
"relationships": {
"agent": {
"data": {
"id": "59a410d76b670400182f190e",
"type": "agent"
}
}
}
}
}'
To delete credentials, we will use the following request:
DELETE https://api.elastic.io/v2/credentials/{CREDENTIAL_ID}/
Below are request parameters:
URL Parameter | Required | Description |
---|---|---|
CREDENTIAL_ID |
yes | Credential ID. |
EXAMPLE:
curl https://api.elastic.io/v2/credentials/{CREDENTIAL_ID}/ \
-X DELETE \
-u {EMAIL}:{APIKEY}
The UI automatically shows you lists of entities (workspaces, users, flows, etc.) in corresponding tabs if you have the corresponding permissions. To see these entities via the API, we will use the following requests. Note, that they will only work for members with the corresponding permissions.
1. To get workspace by ID:
GET https://api.elastic.io/v2/workspaces/{WORKSPACE_ID}/
Below are request parameters:
URL Parameter | Required | Description |
---|---|---|
FLOW_ID |
yes | Flow ID. |
include |
no | Include or full resource objects in response for related entities, or not. Allowed values: members and/or invites . |
EXAMPLE:
curl https://api.elastic.io/v2/workspaces/{WORKSPACE_ID}?include=members,invites \
-u {EMAIL}:{APIKEY} \
-H 'Accept: application/json'
2. To get user’s workspaces:
GET https://api.elastic.io/v2/workspaces?contract_id={CONTRACT_ID}
Below are request parameters:
URL Parameter | Required | Description |
---|---|---|
CONTRACT_ID |
yes | Contract ID. |
EXAMPLE:
curl https://api.elastic.io/v2/workspaces?contract_id={CONTRACT_ID} \
-u {EMAIL}:{APIKEY} \
-H 'Accept: application/json'
3. To get workspace member list:
GET https://api.elastic.io/v2/workspaces/{WORKSPACE_ID}/members/
Below are request parameters:
URL Parameter | Required | Description |
---|---|---|
WORKSPACE_ID |
yes | Workspace ID. |
4. To retrieve all flows in the workspace:
GET https://api.elastic.io/v2/flows/
Below are request parameters:
URL Parameter | Required | Description |
---|---|---|
WORKSPACE_ID |
yes | Workspace ID. |
page[size] |
no | Amount of items per list page. Default value is 50 |
page[number] |
no | Number of page you want to display. Default value is 1 . |
filter[has_draft] |
no | Filter flows only with or without a draft. Value may be true or false . |
filter[status] |
no | Filter by status . Value may be: active or inactive . |
filter[type] |
no | Filter by flow type . Value may be ordinary or long_running . |
filter[user] |
no | Filter by user . Must be the ID of the user who created the flow. User can be found in relationships of the flow. |
sort |
no | Sort flows list by certain field. Value may be created_at , updated_at or name . Prefix field name with - for reversed order (example: sort=-updated_at ) . Default sort is by ID. |
search |
no | Search flows by a word or a phrase contained in the description or in the name . Behavior is similar to operator LIKE in SQL. Case insensitive. Leading/following spaces are trimmed. |
EXAMPLES:
curl 'https://api.elastic.io/v2/flows?workspace_id=59d341e9037f7200184a408b&page[size]=20&page[number]=1' \
-g -u {EMAIL}:{APIKEY}
curl 'https://api.elastic.io/v2/flows?workspace_id=59d341e9037f7200184a408b&filter[status]=active' \
-g -u {EMAIL}:{APIKEY}
curl 'https://api.elastic.io/v2/flows?workspace_id=59d341e9037f7200184a408b&search=webhook' \
-g -u {EMAIL}:{APIKEY}
curl 'https://api.elastic.io/v2/flows?workspace_id=59d341e9037f7200184a408b&sort=-updated_at' \
-g -u {EMAIL}:{APIKEY}
5. To retrieve a flow by ID:
GET https://api.elastic.io/v2/flows/{FLOW_ID}
Below are request parameters:
URL Parameter | Required | Description |
---|---|---|
FLOW_ID |
yes | Flow ID. |
EXAMPLE:
curl https://api.elastic.io/v2/flows/{FLOW_ID} \
-u {EMAIL}:{APIKEY}
6. To retrieve all credentials:
GET https://api.elastic.io/v2/credentials?workspace_id={WORKSPACE_ID}/
Below are request parameters:
URL Parameter | Required | Description |
---|---|---|
WORKSPACE_ID |
yes | Workspace ID. |
filter[component] |
no | Retrieve credentials that belong only to the given component ID. |
EXAMPLE:
curl https://api.elastic.io/v2/credentials/?filter[component]={COMPONENT_ID}&workspace_id={WORKSPACE_ID} \
-u {EMAIL}:{APIKEY} \
-H 'Accept: application/json'
7. Retrieve a credential by ID:
GET https://api.elastic.io/v2/credentials/{CREDENTIAL_ID}/
Below are request parameters:
URL Parameter | Required | Description |
---|---|---|
CREDENTIAL_ID |
yes | Credential ID. |
EXAMPLE:
curl https://api.elastic.io/v2/credentials/{CREDENTIAL_ID}/ \
-u {EMAIL}:{APIKEY} \
-H 'Accept: application/json'