Managing Flows
This document provides information on Flow management, namely the following actions:
- Start, Stop, Edit, Suspend, Delete
- Restoring Deleted Flow
- Filtering, Sorting Flows
- Copy Flow within the same Workspace, switch between Real-time and Ordinary
- Editable delay for container shutdown in Ordinary Flows
- Subscribe to Errors
- Schedule via CRON expressions
- Flow Versioning
- Parallel Processing
- Reset Snapshot
- Flow step logging level setup
All actions are available to users with the corresponding permissions.
Start, Stop, Edit, Suspend, Delete
These basic actions may be done via the UI, and via the API. Note that when you start a Flow, the latest Flow version is used.
Start, Stop, Edit, Suspend, Delete via the UI
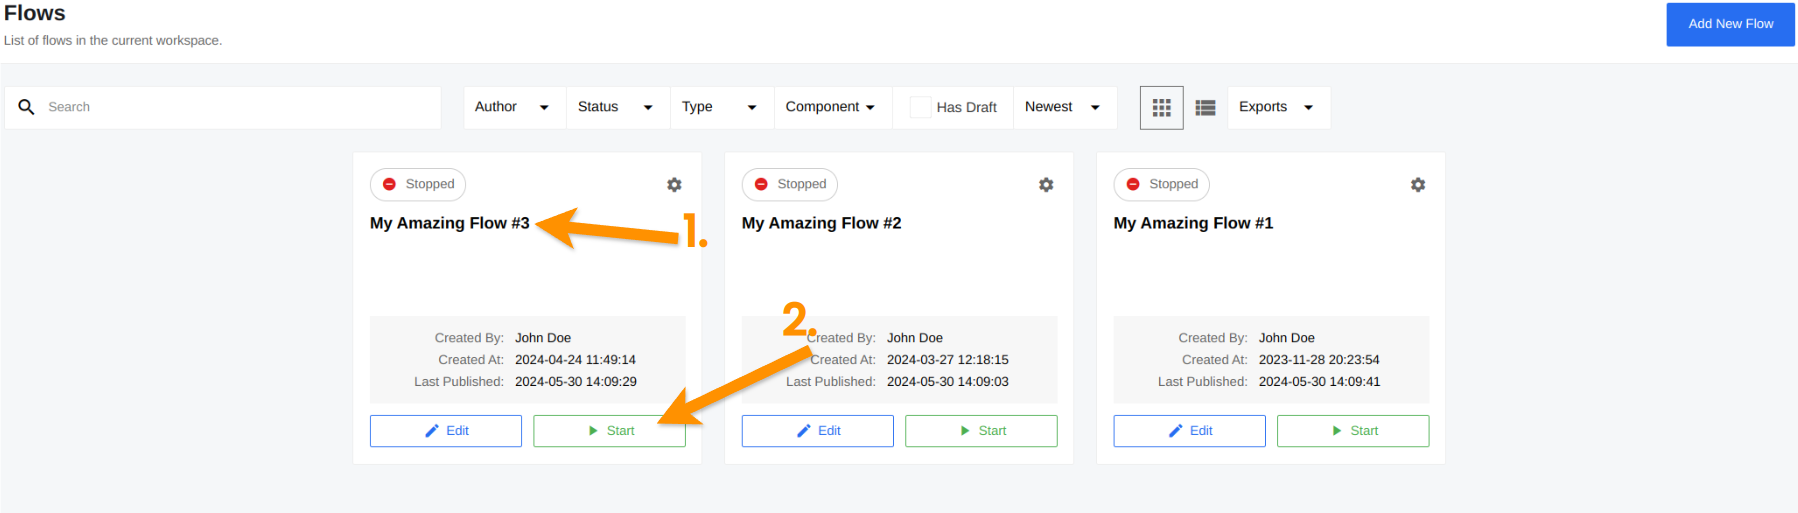
To start, stop, edit, suspend and delete a Flow via the UI, navigate to Flows. Here you can see all your Flows, identify the required stopped Flow by name (1) and start (2) it:
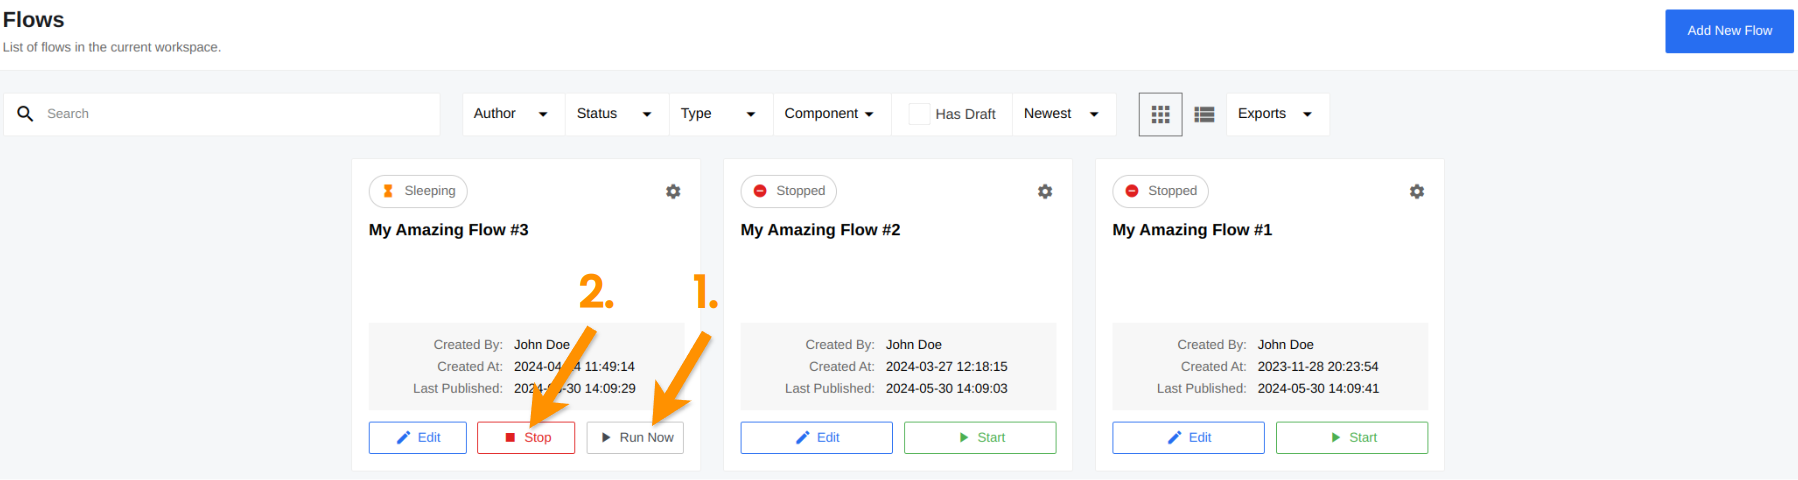
Also you can run Flow on demand (1) or stop (2) a started Flow:
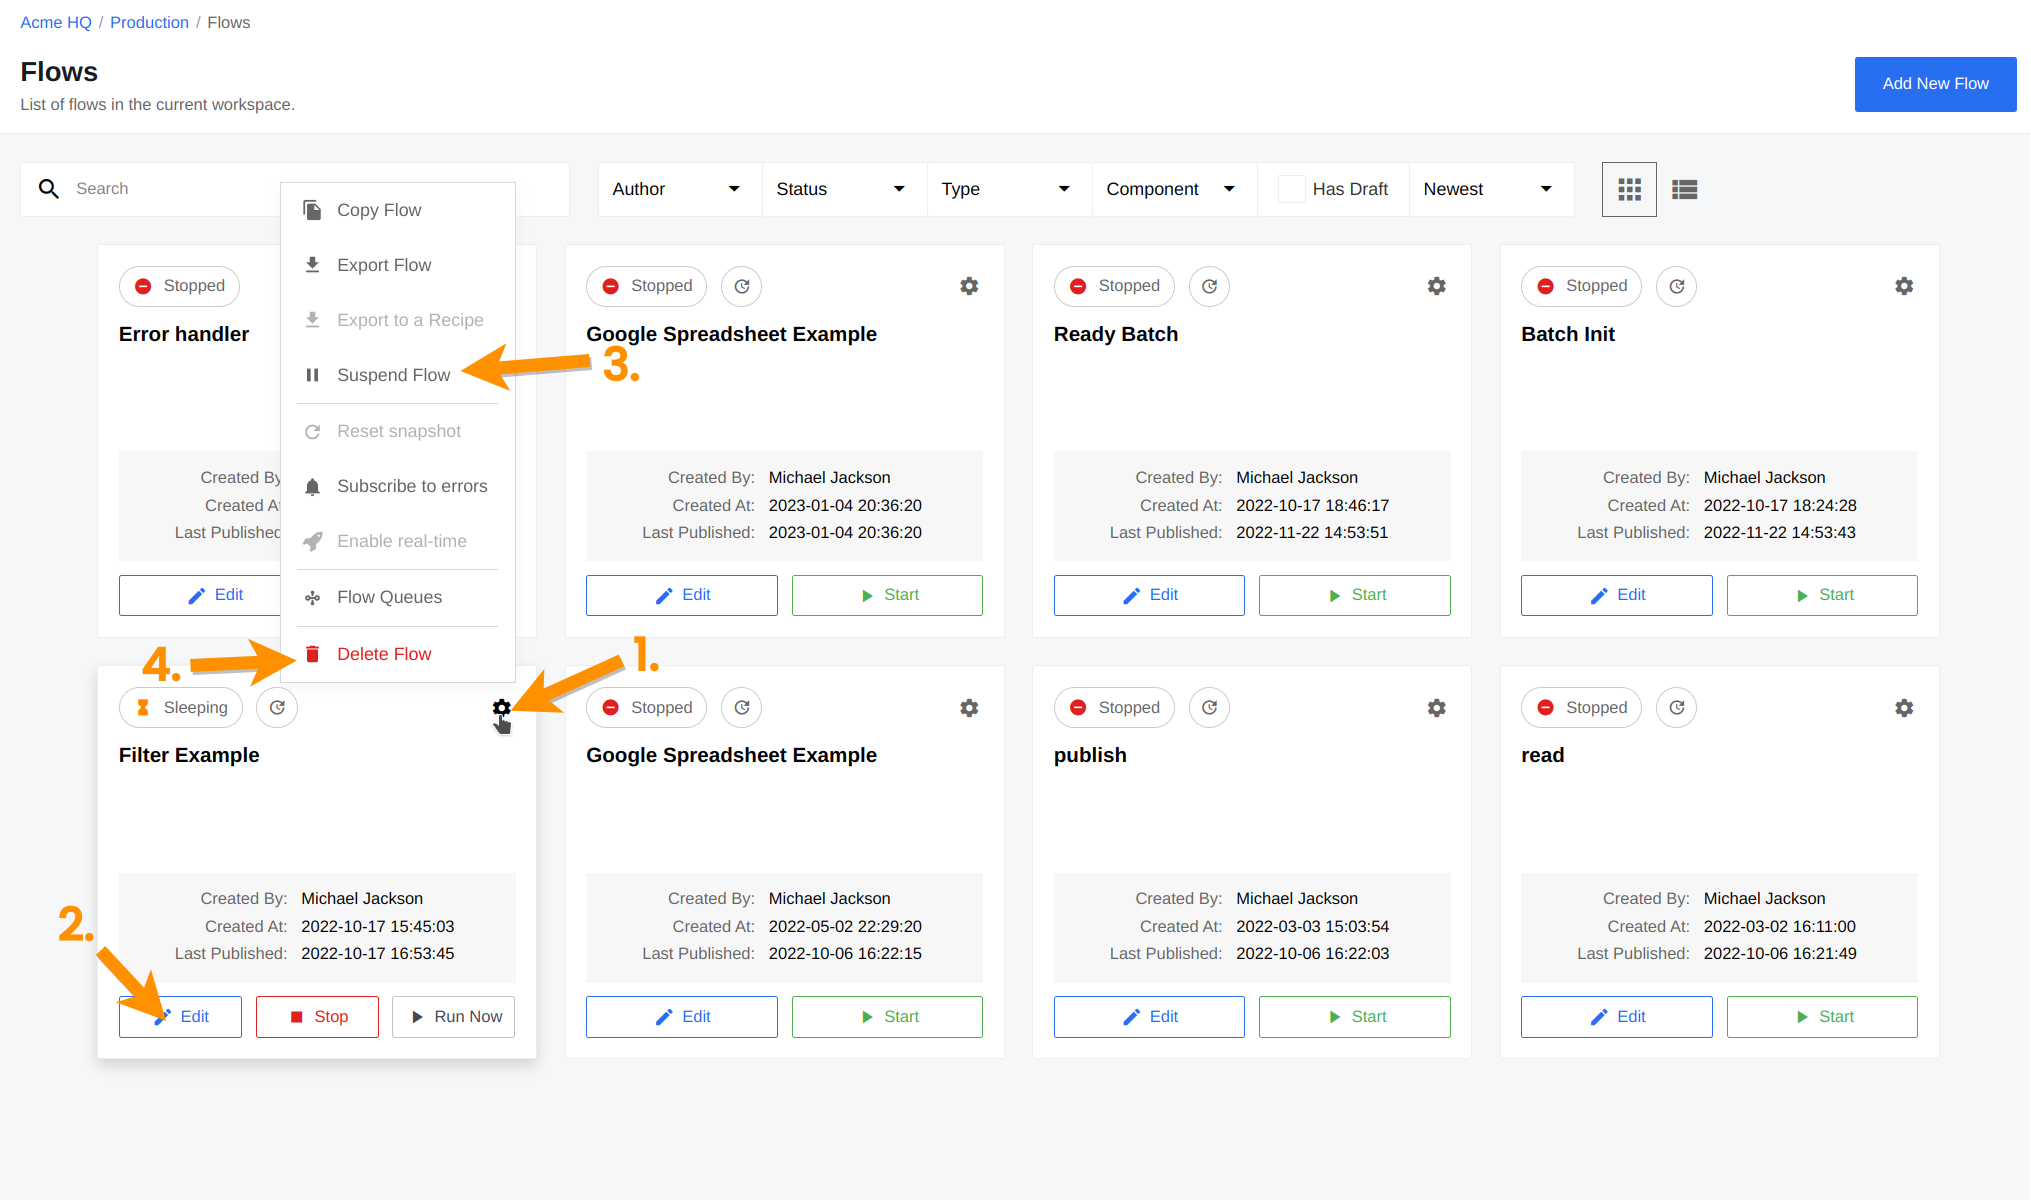
Edit or delete the Flow by opening the settings menu (1) of the selected Flow, and clicking Edit Flow (2), Suspend Flow (3) or Delete Flow (4):
Alternatively, you can navigate to the Flow itself by clicking on its name:
Then click the corresponding buttons to start (1), edit (2) or delete (4) Flow. You can also update all components by clicking (3).

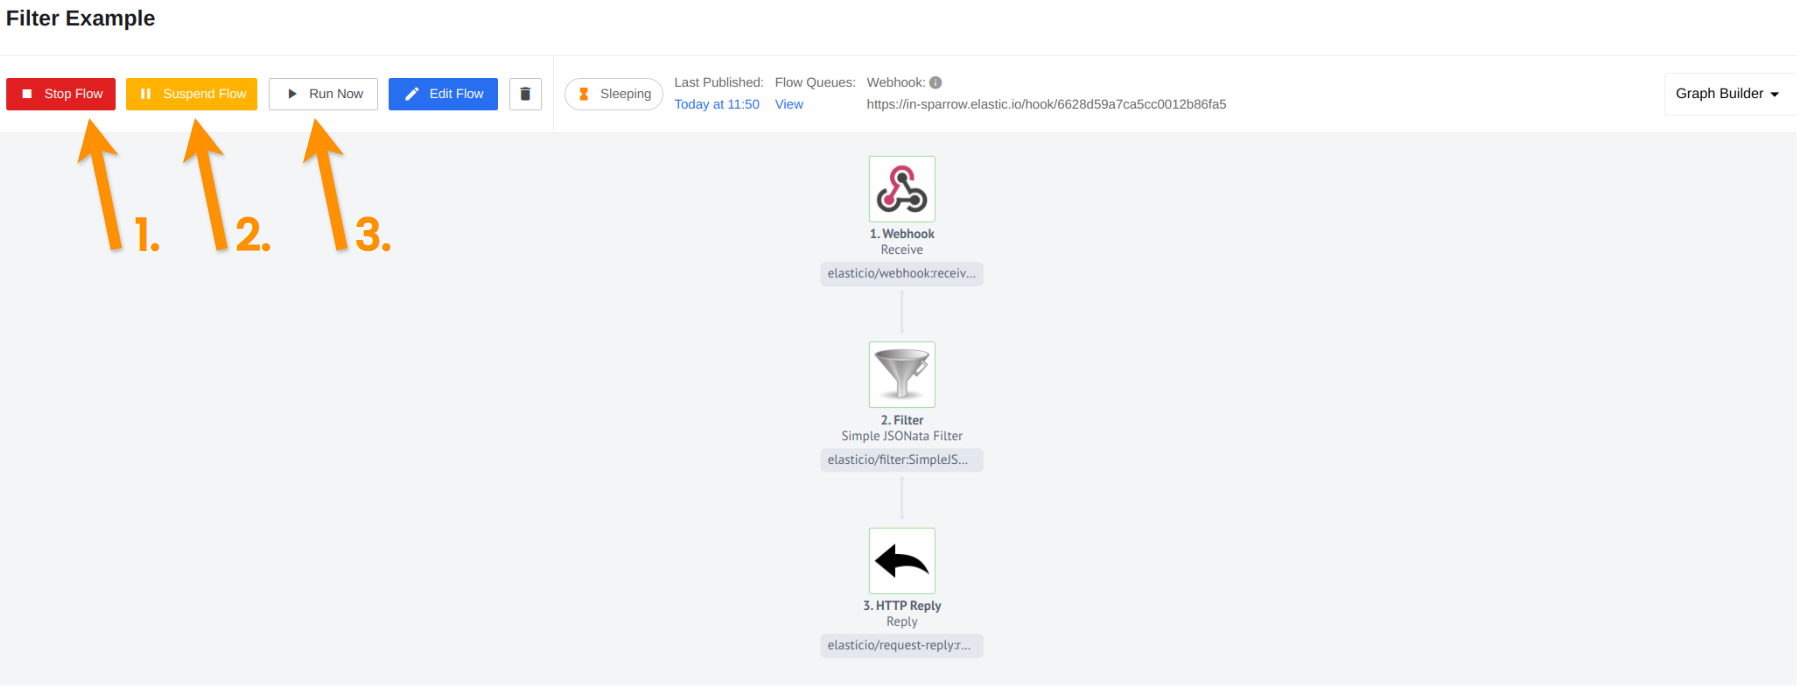
In case you need to stop a running Flow, click the Stop Flow (1) button. Or if you want suspend flow, click Suspend Flow button (2). Also you can immediately start this flow by click Run Now button (3):
It is important to remember, that every time you change a flow, you create a draft of that flow to make the changes. Please note that you can work with a draft not only via UI, but also using API calls. All necessary information on this topic can be found in our API documentation
Start, Stop, Edit, Suspend, Delete via the API
By following the link below, you will learn how to perform the functions described above using API Calls:
4. Suspend a Flow via the API.
5. Edit a Flow to some extent via the API.
Restoring Deleted Flow
If you accidentally delete a Flow you need, you can restore it for some time after deletion.
The amount of time during which Flow can be restored is set by the installation environment variable. By default, this parameter is equivalent to 48 hours.
If you have Tenant-Admin rights, you can use these two endpoints to find and restore access to Flow:
If you do not have Tenant-Admin rights, please contact support and describe the flow you need to restore.
Filtering, Sorting Flows
The Flows tab provides a wide range of managment tools: Searching, Filtering and Sorting Flows in Workspace.
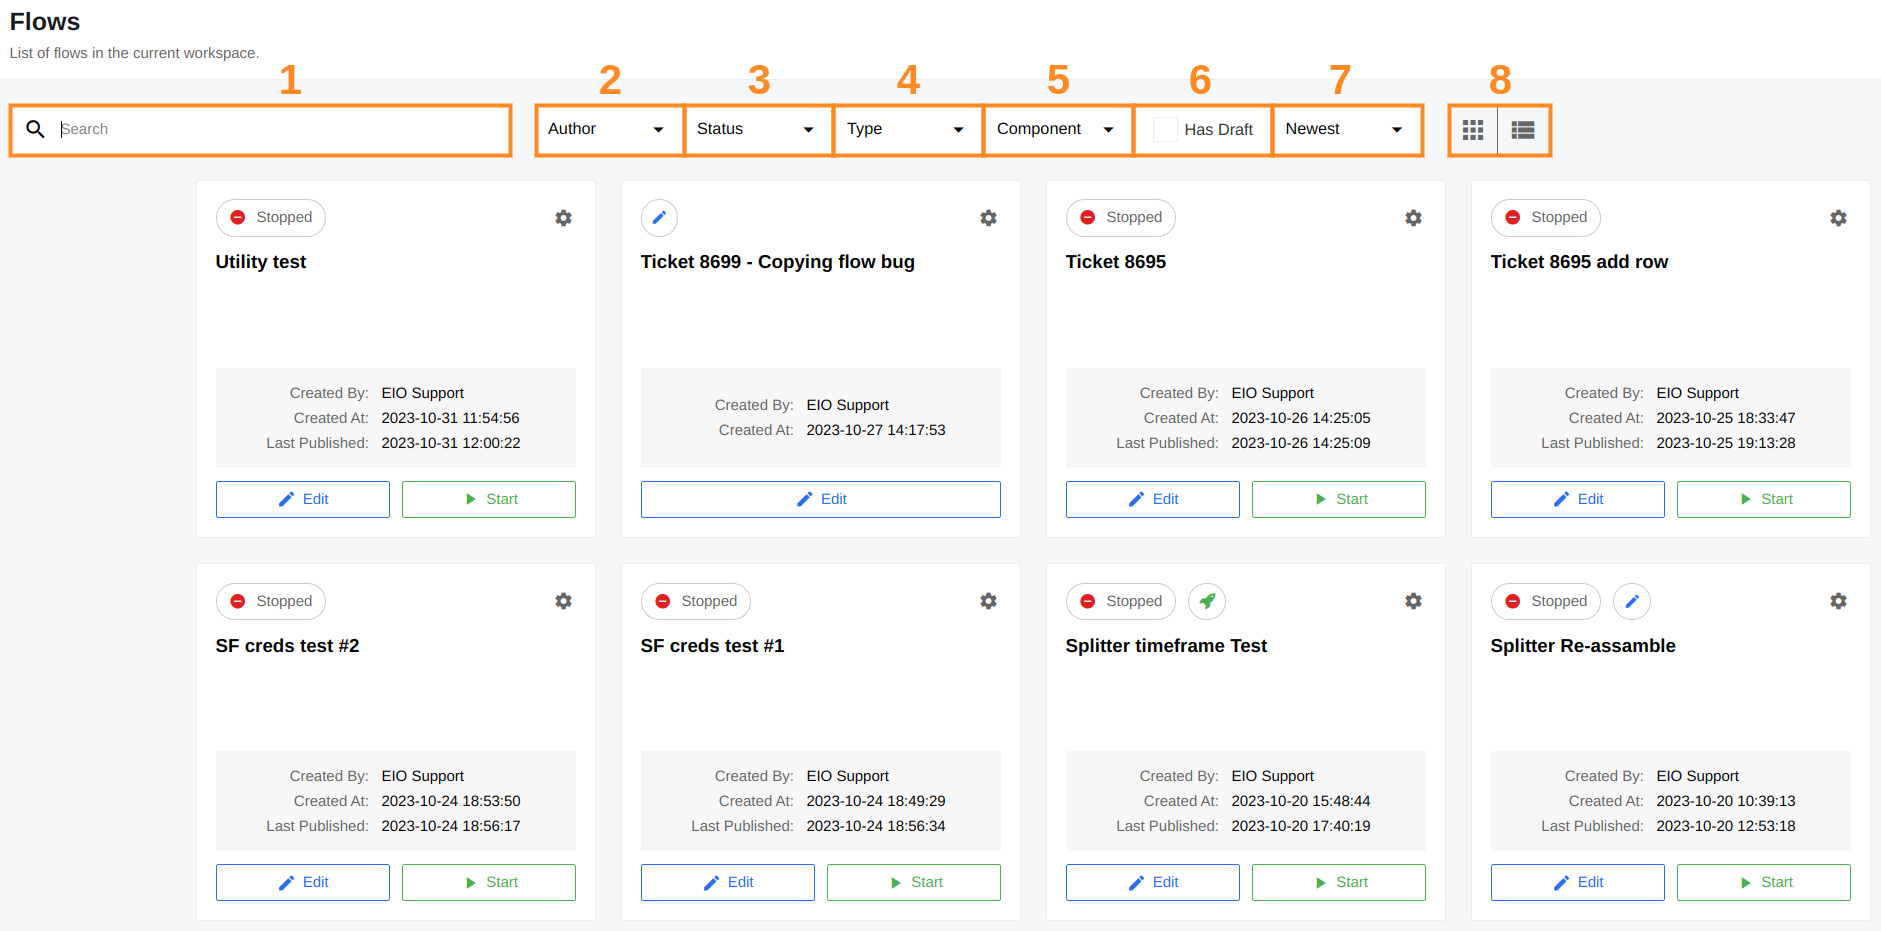
You can:
- Search Flow (1) by name via Search bar
- Filter Flows (2) by Creator via dropdown menu
- Filter Flows (3) by Status: Active, Stopped, Suspended
- Filter Flows (4) by Flow type: Ordinary or Real-Time
- Filter Flows (5) by content of certain components in Flow
- Filter flows (6) via checkbox only Flows having Draft
- Sort Flows (7) by creation date, by update date and alphabetical order and reverse alphabetical order
-
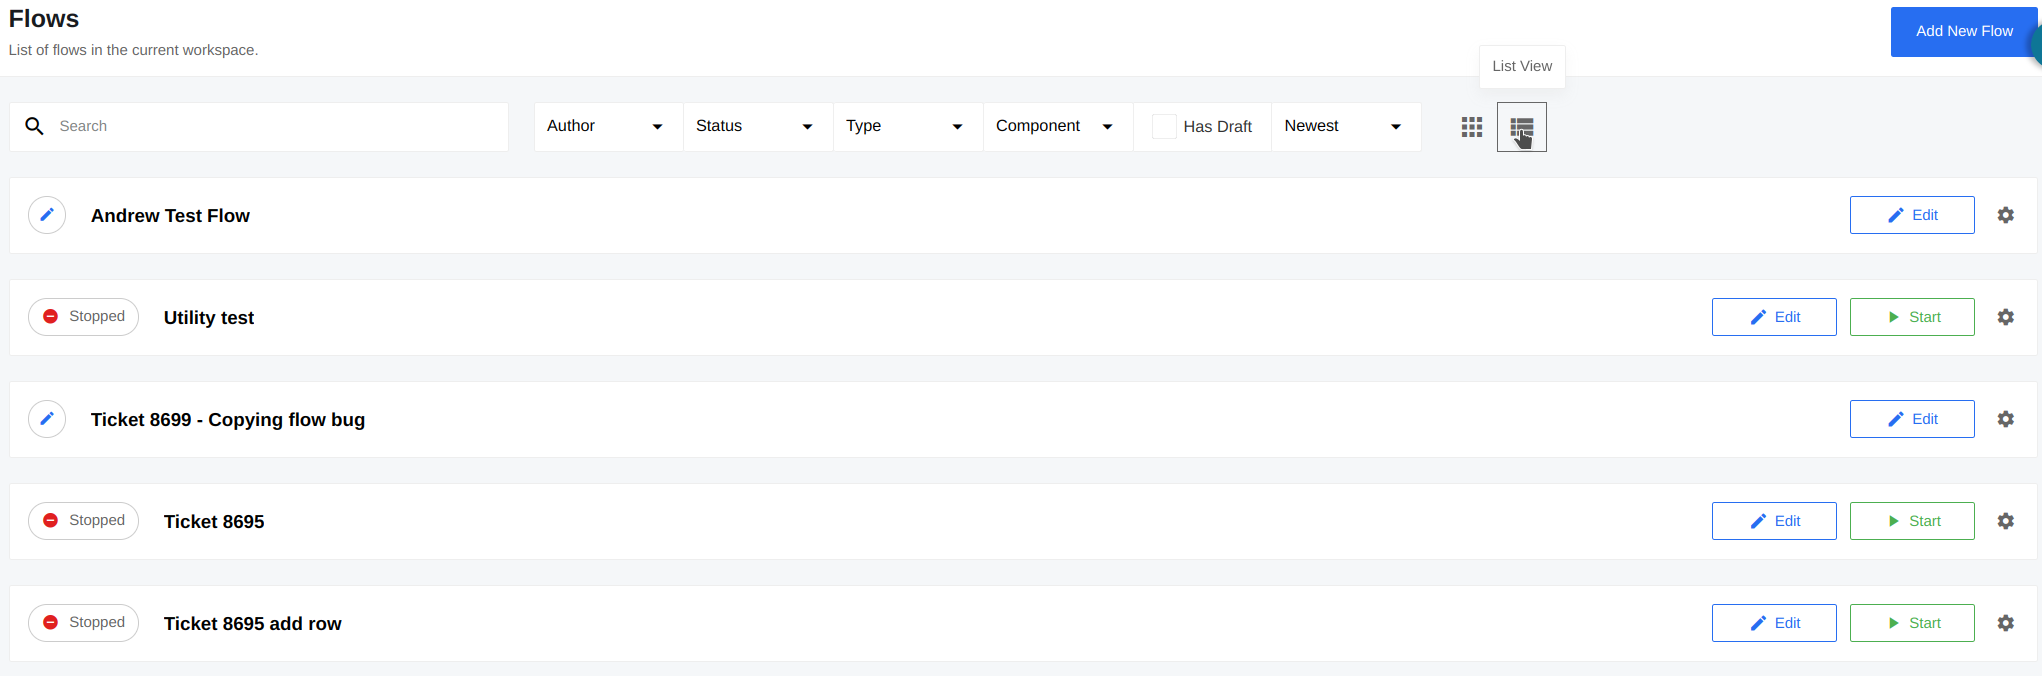
You can also switch (8) between Flow display modes in Grid or a List:
Note: You can observe all active filters in the tooltips that appear below:

- You can Export multiple Flows or Export multiple Flows to Recipes (9).
Copy Flow, Switch Flow Type
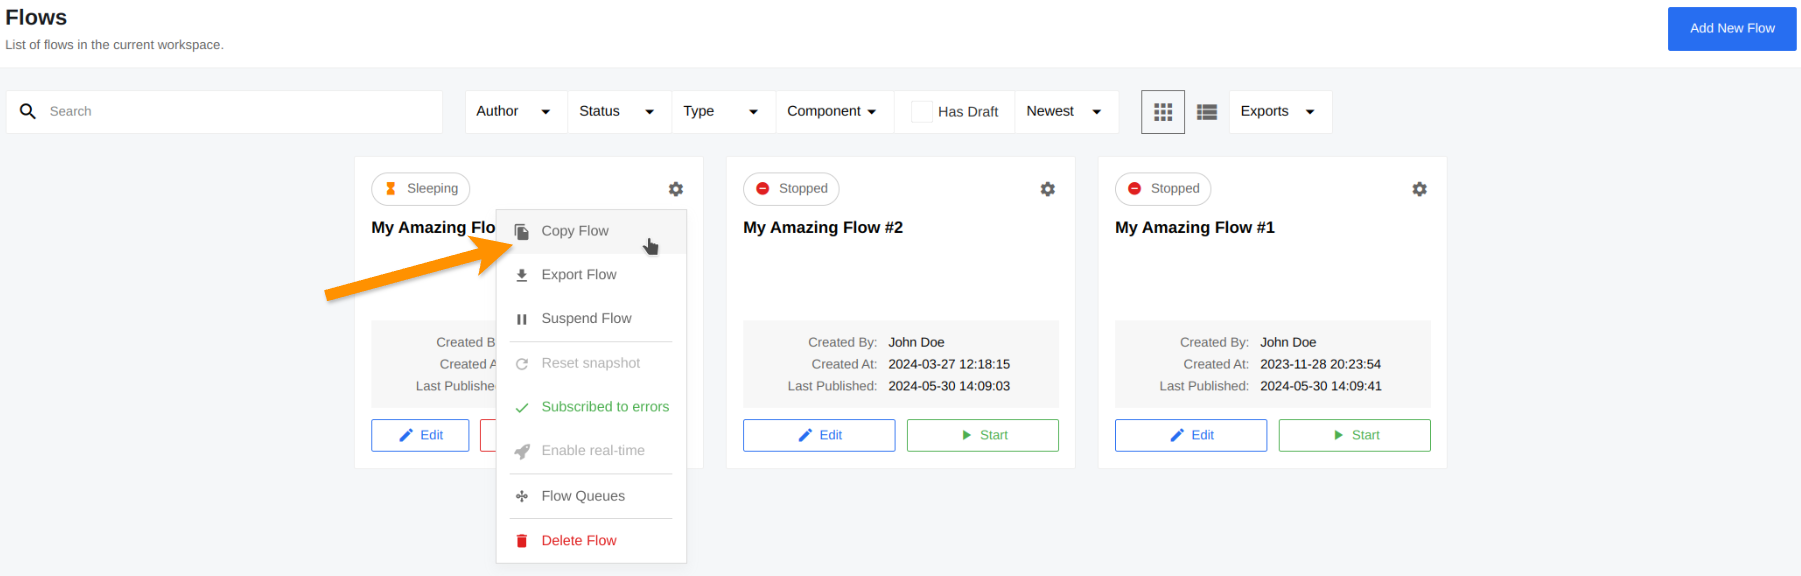
To copy a Flow within the same Workspace, navigate to see your Flows. Then click on the corresponding icon to open the settings menu of the selected Flow:
Alternatively, you can navigate to the Flow itself by clicking on its name:
Then switch to Implement tab (1) and click the command (2) to copy it to clipboard, and create a copy of the Flow via the API:
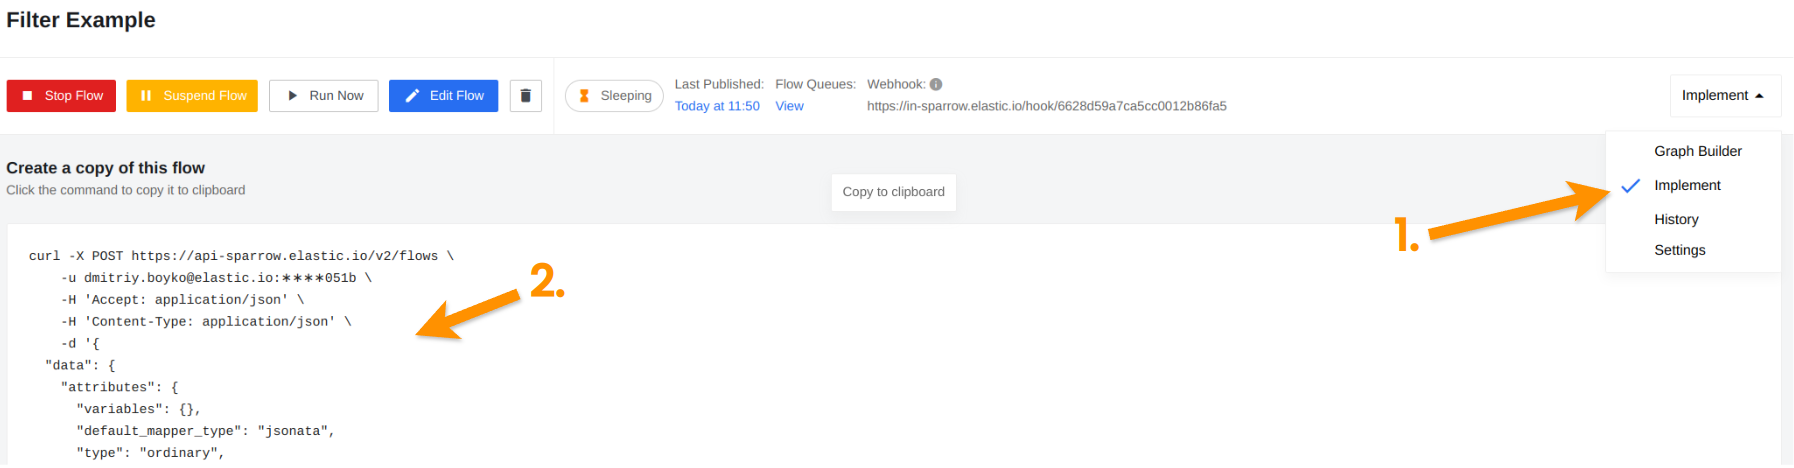
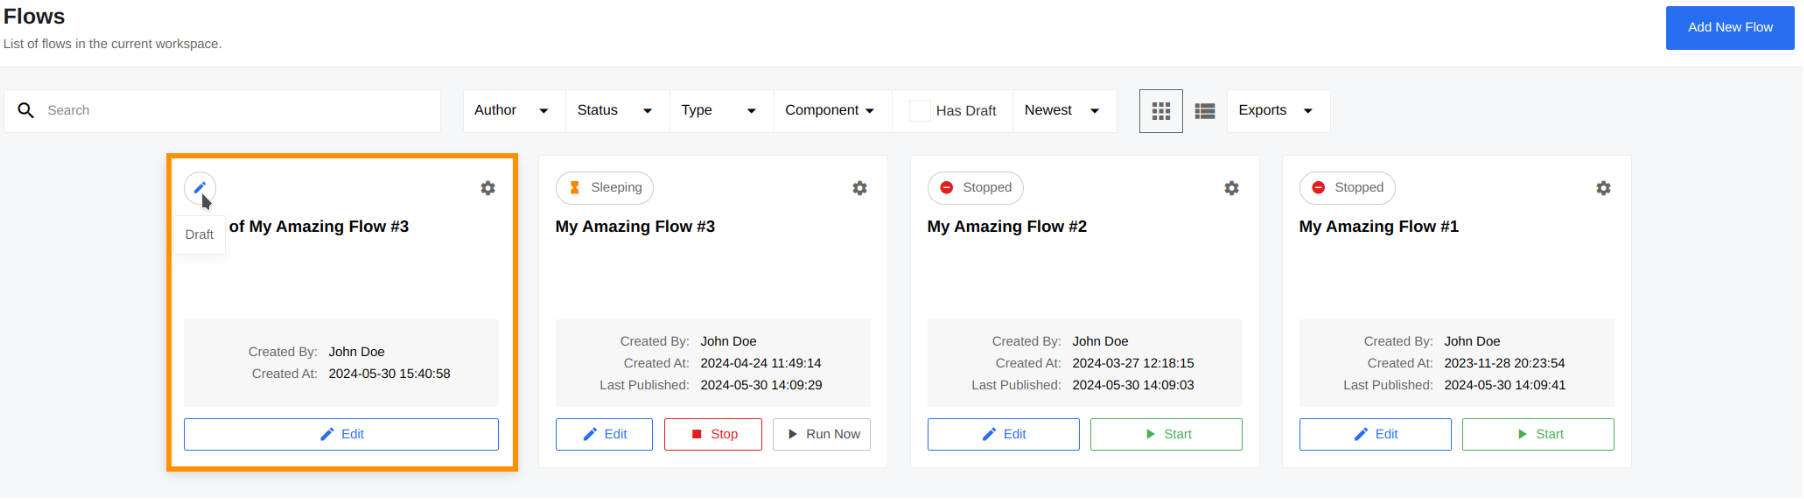
As a result, you get a copy of your Flow:
Note: If you need to publish a Flow not in the current Workspace, you can use the Export Flow(s) feature, which is described in detail here.
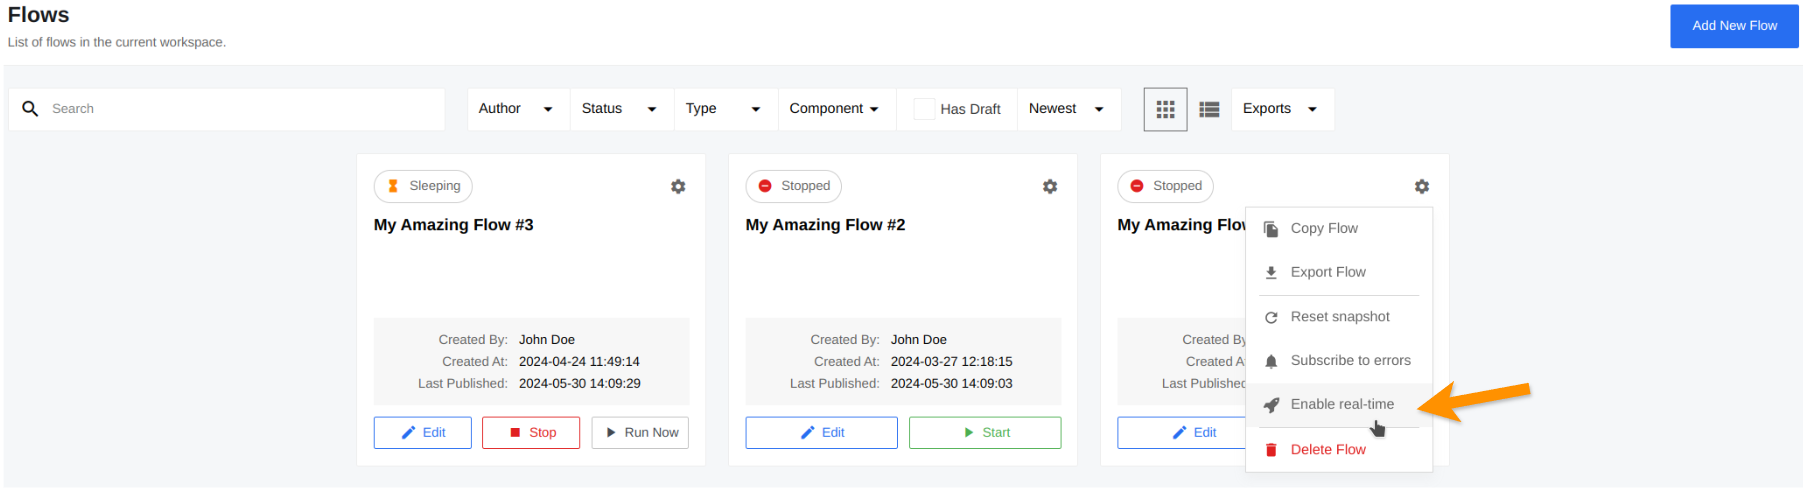
To switch between real-time and ordinary types, navigate to see your Flows. Then click on the corresponding icon to open the settings menu of the selected Flow:
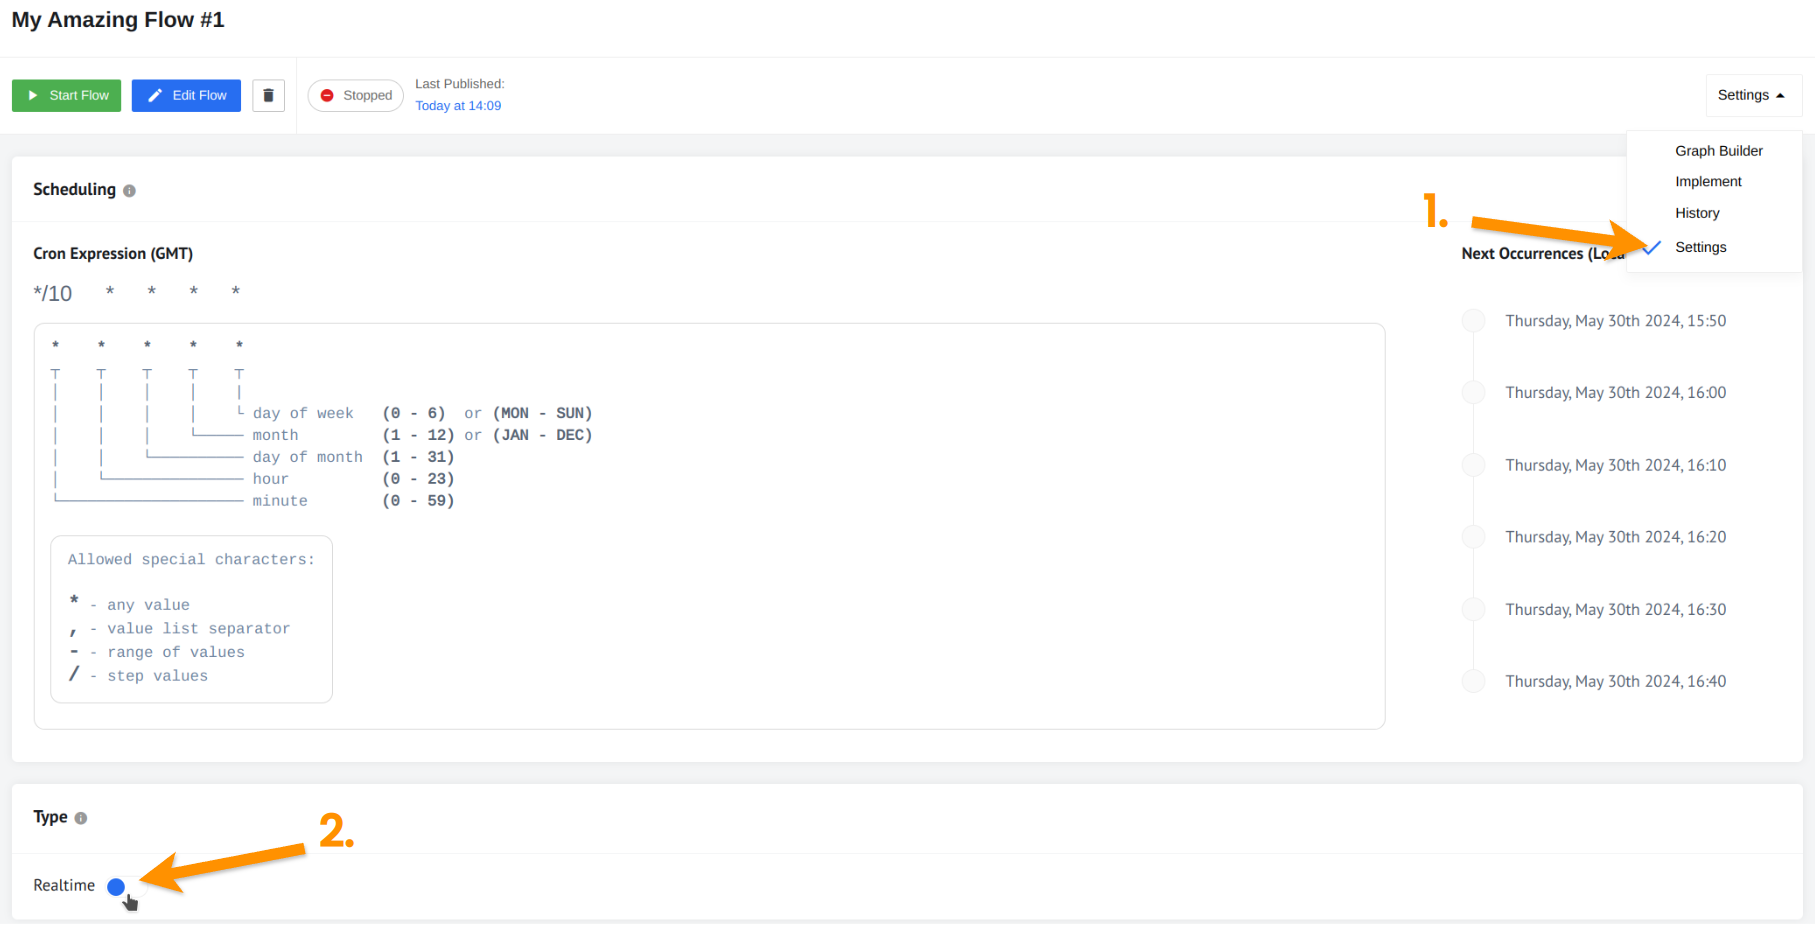
Switching back works the same way. Alternatively, you can navigate to the Flow itself by clicking on its name, switch to Settings tab (1), scroll down and toggle the corresponding switch (2):
Note: you can only switch Flow type if there’s at least one published Flow version, and it is not running.
Editable delay for container shutdown in Ordinary Flows
Editable delay provides the ability to adjust the container shutdown delay for Ordinary Flows, enhancing user control and flexibility within the system.
With the shut_down_timeout_enabled feature flag at the Tenant level, users can control the delay duration for container shutdown on a per-flow basis. The addition of the shut_down_timeout attribute within Flows allows users to define specific shutdown timeframes (0 to 30 minutes) to better suit their workflow requirements.
With restrictions in place for long-running (real-time) flows and a dedicated Shutdown section in the settings menu of the flow designer (based on the feature flag status), users can efficiently manage container shutdown times, enhancing operational control and system performance.

Note: The
shutdown_timeoutdoes not take effect immediately after updating the flow. It can take up to 10 minutes (usually 3-4 minutes) before the Kubernetes pods exhibit an increased drop time.
Subscribe to Errors
You can order the platform to send you emails in case of any errors in your running Flow. The platform will automatically sign you up for errors subscription if you are a Flow creator. With some errors, messaging interval is one email per hour, while with others its one per 24 hours. This interval is hard-coded and cannot be configured. You can always unsubscribe from notifications or subscribe to notifications from Flow of which you are not a creator by the method described below.
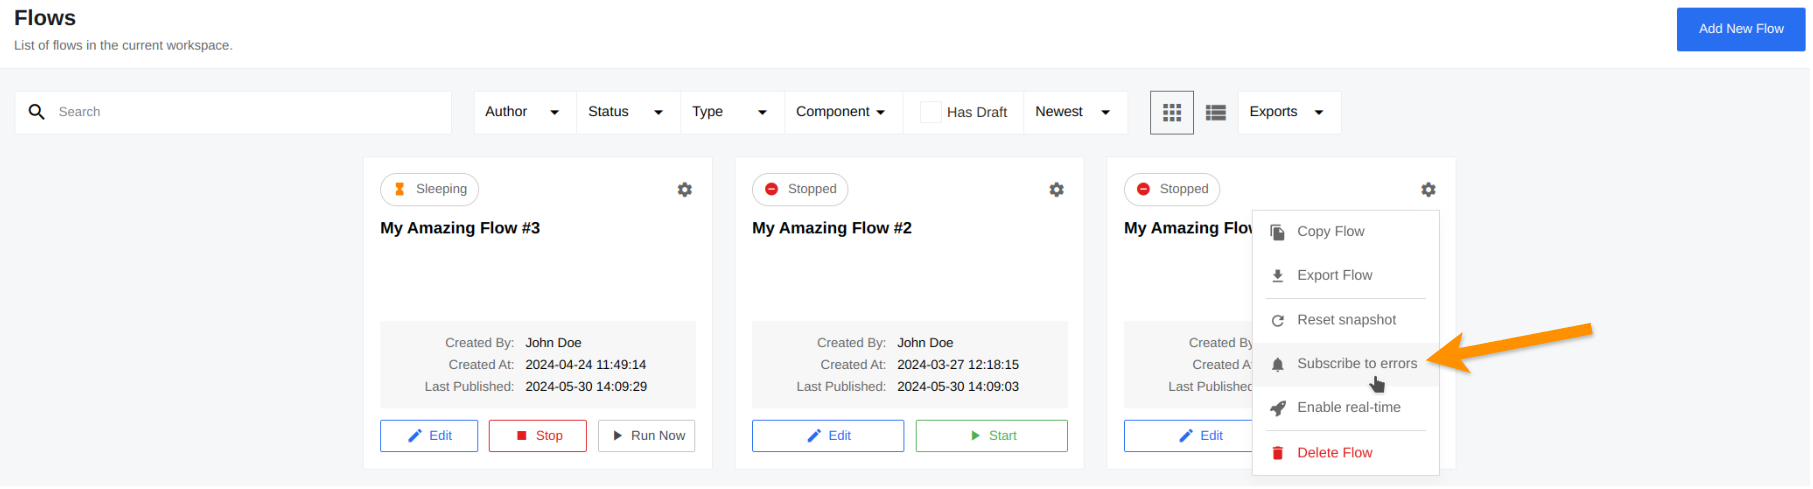
To subscribe to errors, use the settings menu (1) of the corresponding Flow and click Subscribe to Errors (2):
Unsubscribing works the same way.
Note: With the appropriate permissions you can change the default contract behavior by turning off the automatic error subscription feature.
Scheduling
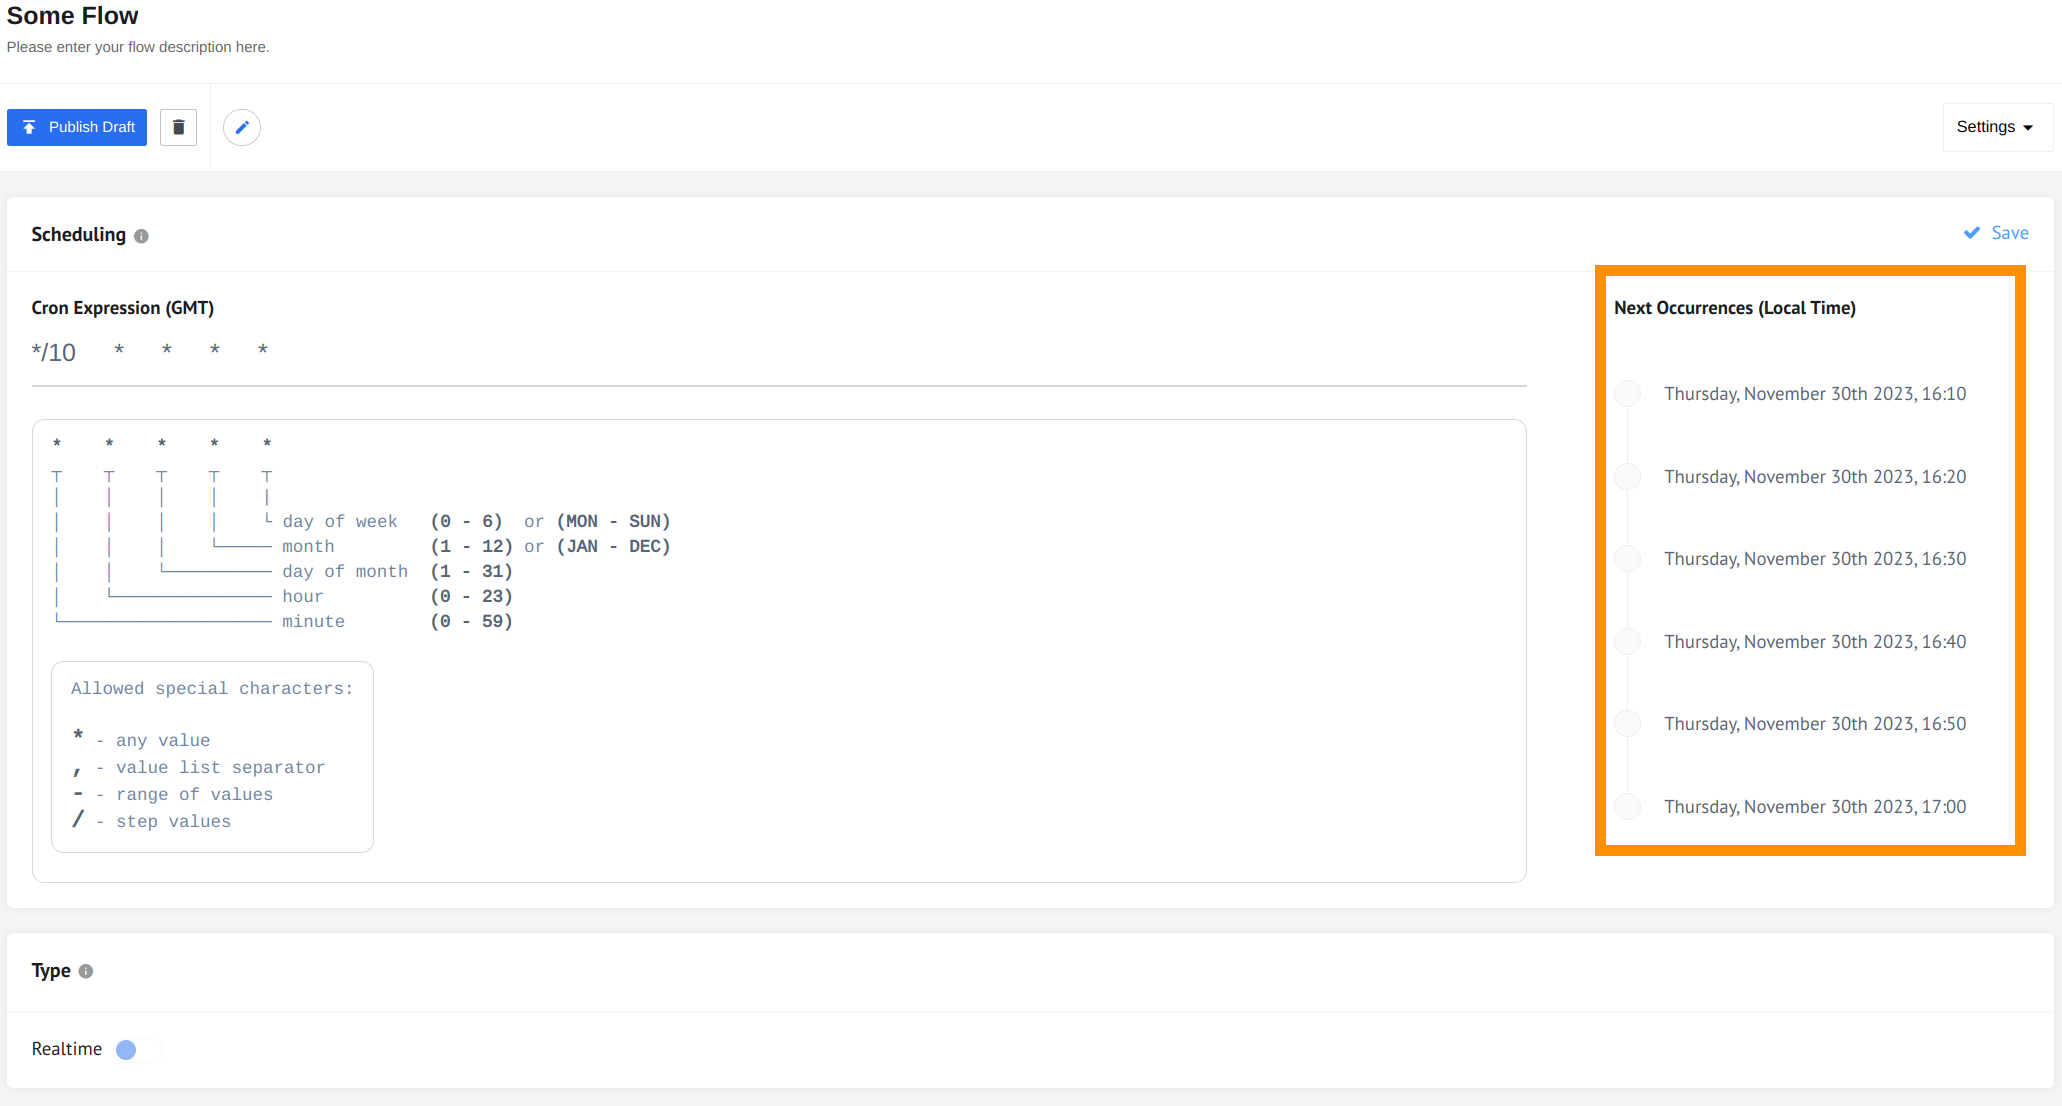
To schedule your Flow via CRON expressions, you need to be in drafting mode. You can turn it on by editing the Flow. While editing the Flow, switch to Settings tab (1), use CRON expression to schedule the Flow (2), and click Save (3):

The default CRON expression is */10 * * * *, meaning “Every 10 minutes”.
Note: The default value of this parameter can be changed by configuring the internal environment variable
SCHEDULER_TASK_POLLING_INTERVAL.
The positions in the expression from left to right represent:
- Minutes (allowed values: from
0to59) - Hours (allowed values: from
0to23) - Days of the month (allowed values: from
1to31) - Months (allowed values: from
1to12or fromJANtoDEC) - Days of the week (allowed values: from
0to6or fromMONtoSUN)
The month and weekday abbreviations are not case-sensitive. Also, the following special characters are in use:
*- wildcard, means any value
EXAMPLE: * * * * * means every minute of every day of every week, etc.
,- value list separator
EXAMPLE: * * * * MON,WED,FRI means every Monday, Wednesday and Friday.
-- defines a range of values
EXAMPLE: * 2-5 * * * means every hour between 2 and 5 AM.
/- specifies repetition steps
EXAMPLE: * * * */2 * means every two months.
Feel free to use the hint below the CRON expression field for reference. Otherwise, you can always click Run Now or use POST https://api.elastic.io/v2/flows/{FLOW_ID}/run-now request to run the Flow on demand.
If the CRON expression was written properly, you’ll see your schedule in the Next Occurrences:
Flow Versioning
The Platform allows you to create different versions of a Flow and switch between them if required. There are two general Flow states in Flow creation process: draft mode and published version. Every time you publish a draft, you create a new Flow version.
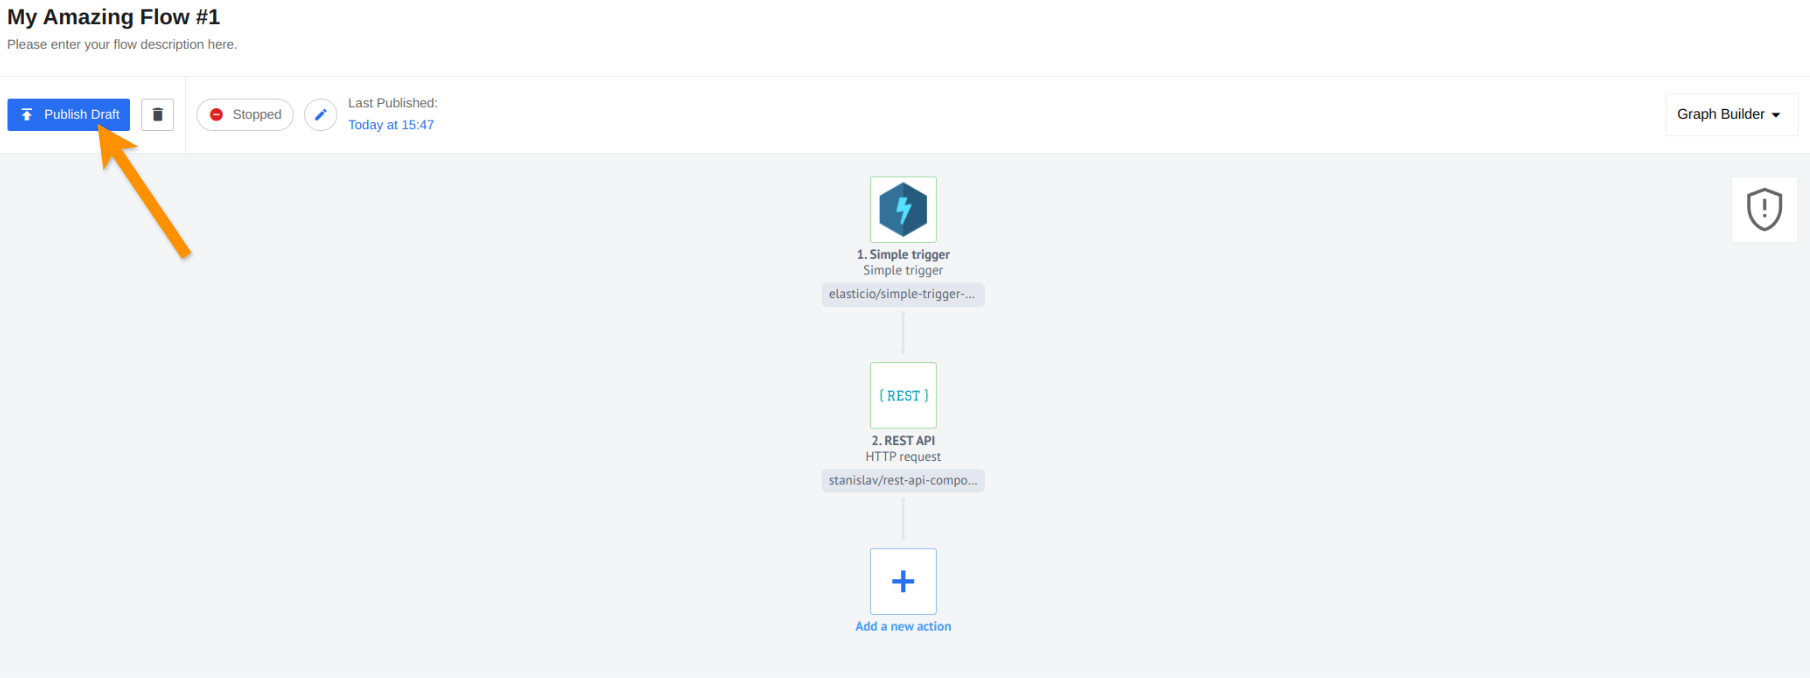
In the draft state you can edit or add steps, verify credentials, retrieve data samples and configure CRON expressions. When everything is ready, you should publish the draft before you can run the Flow. A new draft is created when you create a new Flow, or edit an existing one. If a draft is created for an existing Flow, it does not affect the Flow until it is published. To publish a draft, use the corresponding button:
Note, that you need to finish all the steps for the button to become active.
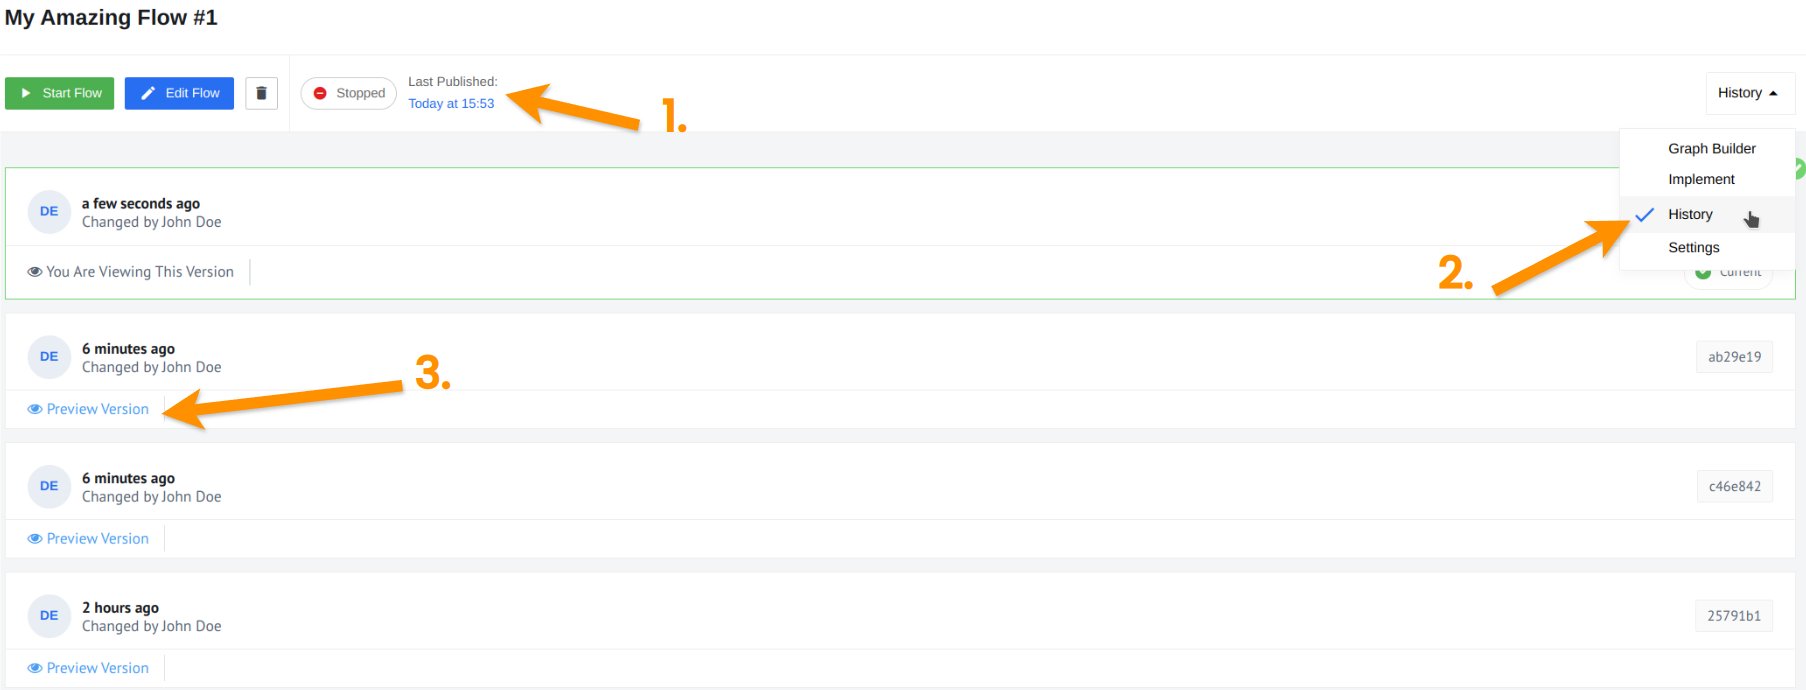
Each published (1) draft is, basically, a separate version of the Flow. All the versions are listed in History tab (2). Once you publish the Flow, you can then revert to the any other published version (3).
Then edit it to create a draft, and publish this draft so it becomes the latest Flow version.
Please note that you can see all versions of a particular flow not only on the platform Ui itself, but also with the corresponding API endpoint
You can work on one draft of a given Flow at a time. If you try to create another one, the Platform will ask you if you want to overwrite the existing one. Remember that a draft can only become a new version of a Flow if you publish it. It is possible to publish drafts of active and stopped Flows. In case you publish a draft of an active Flow, it will stop immediately, and then restart from scratch as a new version.
Parallel Processing
Parallel Processing (also known as a prefetch count) - the number of messages that will be consumed at once, and will be processed in one execution in a parallel-sequential way. It means that at one point in time step will be working on one message but as soon as it is waiting for some IO operation it will start processing another message. The default value is 1, increasing the prefetch count should help for integration flows that have a considerable amount of messages in the queue.
Note: that the processing speed is not linear to the Parallel Processing configuration.
Parallel processing can be configured via the UI and the API.
1. To configure parallel processing via the UI, use Advanced Settings section in Step Summary tab:
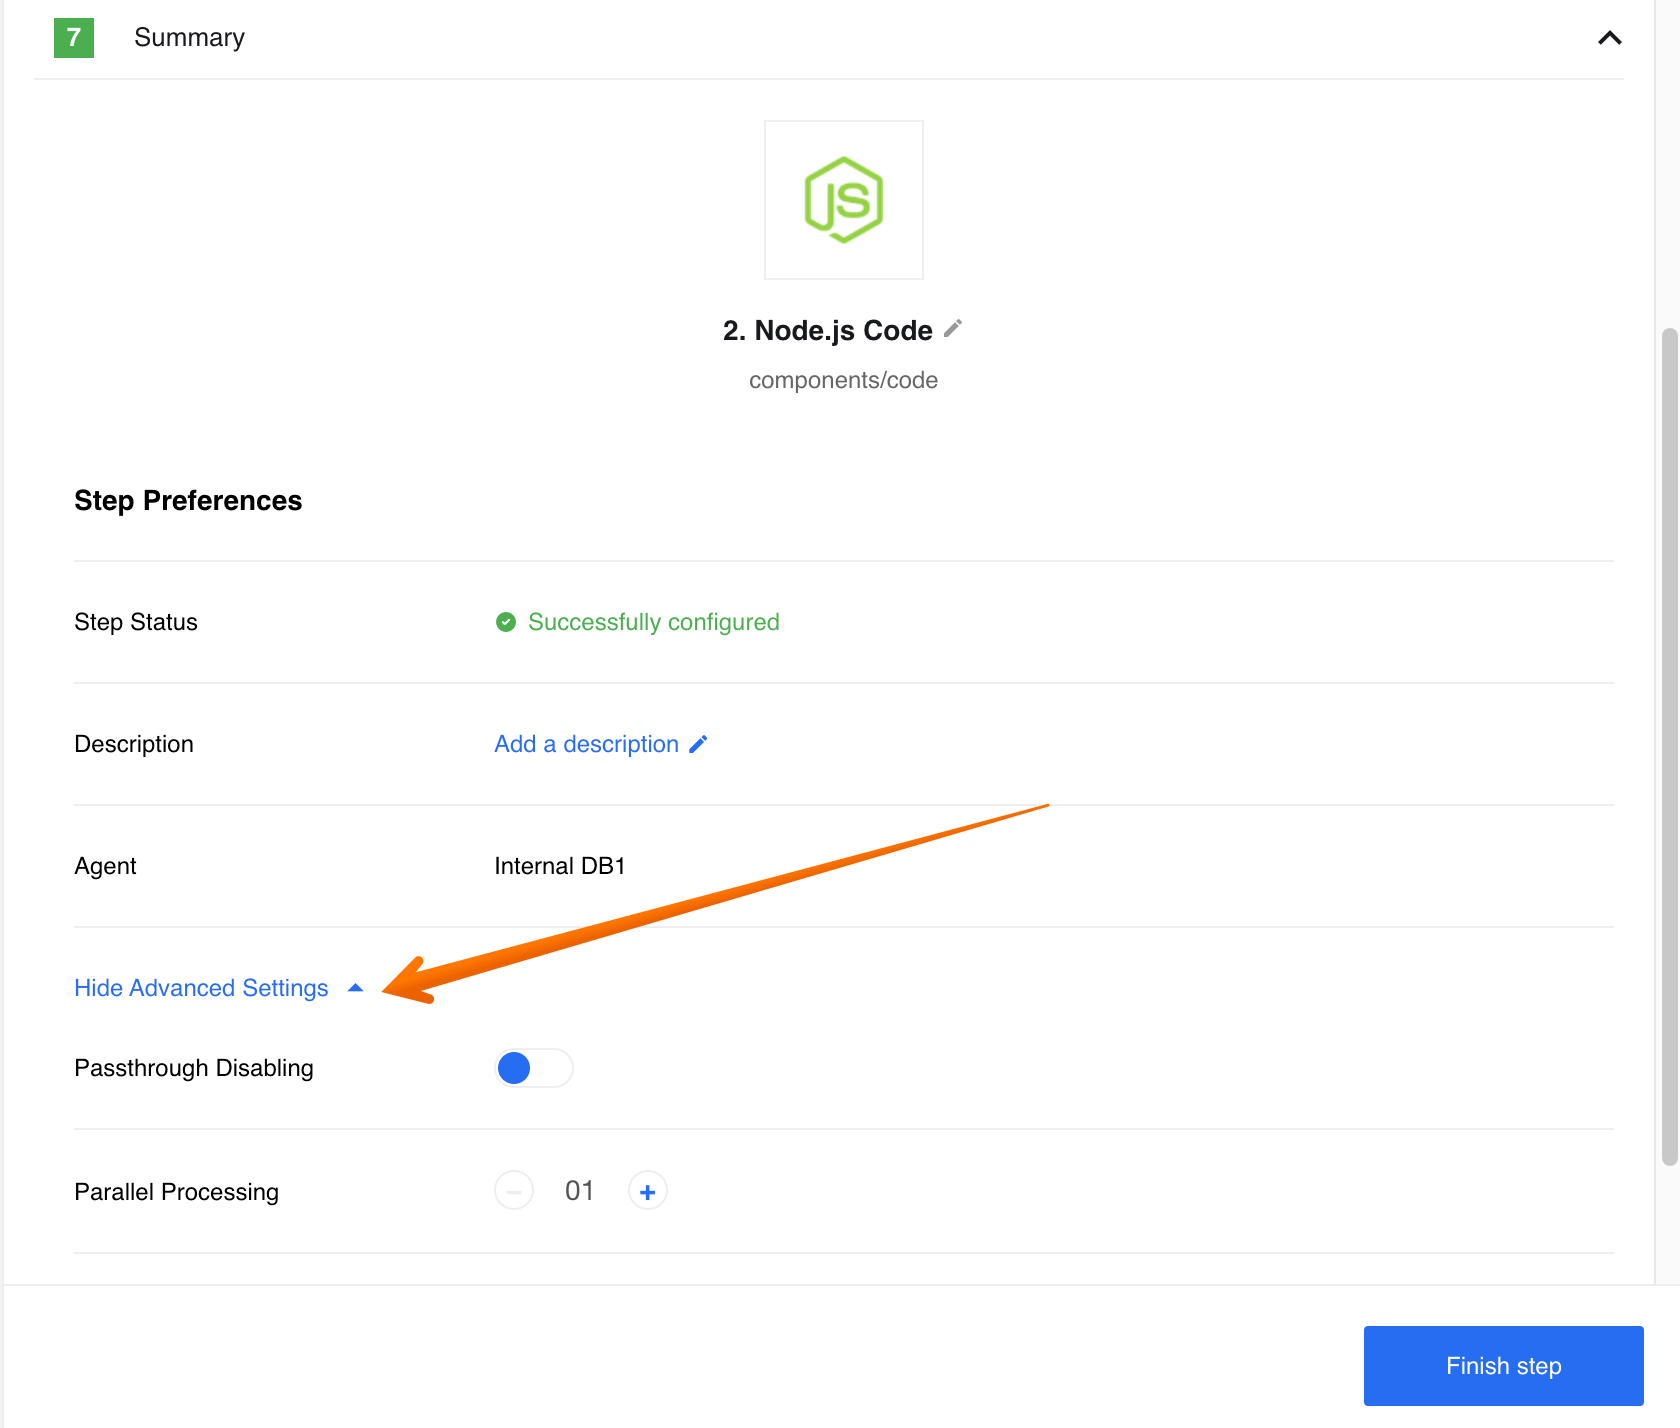
Note: the changes will be applied after clicking the Finish Step button.
2. To configure parallel processing via the API, use prefetch field as a parameter to nodeConfig section of the /v2/flows endpoint. The Mapper-Step gets the same prefetch as the previous Step.
EXAMPLE:
"attributes": {
        "nodes_config": {
            "step_1": {
                "prefetch": 4
            }
        }
    }
}
Reset Snapshot
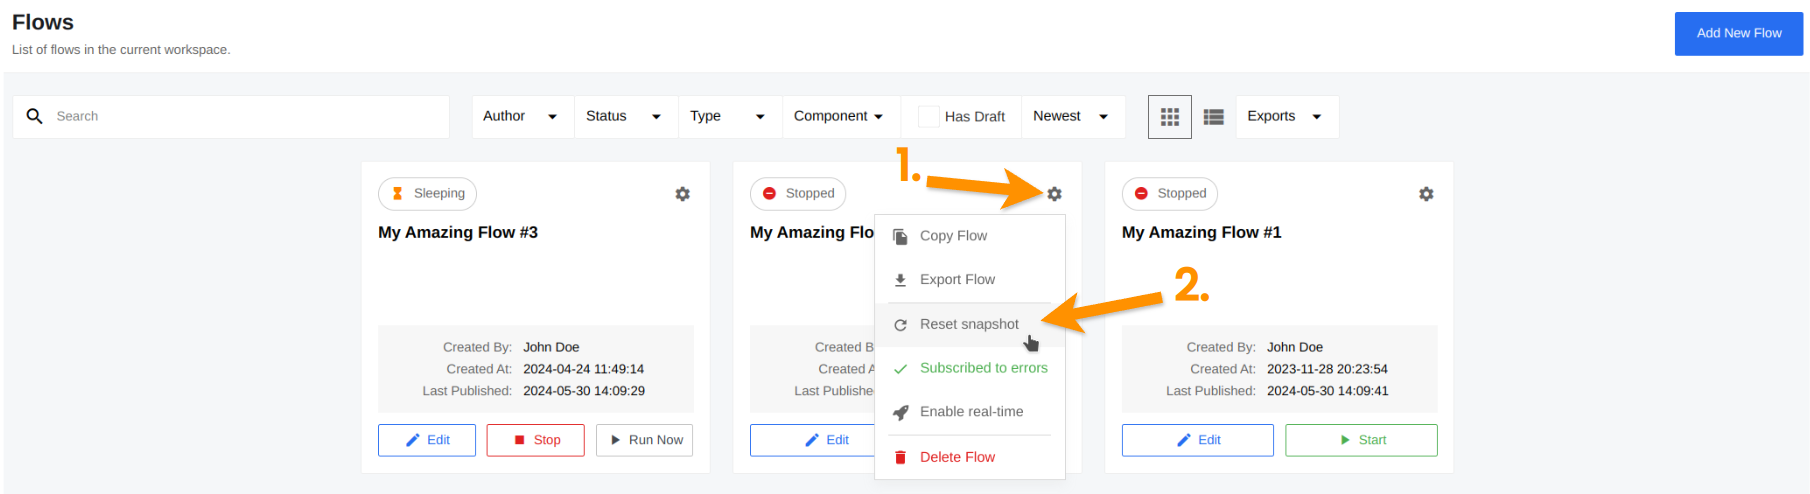
A Snapshot is the data saved by a Component during its execution. When the Component is run next time, it will read the Snapshot to continue the process from the point it finished last time. You can manually reset this Snapshot, so the Component starts from scratch next time. Note that you can only reset Snapshot for a stopped Flow. To do this, click the settings button on the Flow (1), and select Reset Snapshot (2):
This is the only way to delete an existing snapshot via UI. You can also use the appropriate API Call for this.
Flow step logging level setup
As an integrator or component developer we need to dive into the troubleshooting and debugging sessions to identify and iron out some problems in our projects. For this purposes, the detailed logs are invaluable. On the other hand, detailed logs are sometimes unnecessary during the normal operation runs if you tend to exchange sensitive data through your integration projects.
To control the logging level for each of your flow-step use Log Level, accessible from the Advanced Setting part of flow-step Summary. With this setup you can increase or decrease the output logging level of your component from the default Info using the drop-down control shown below.
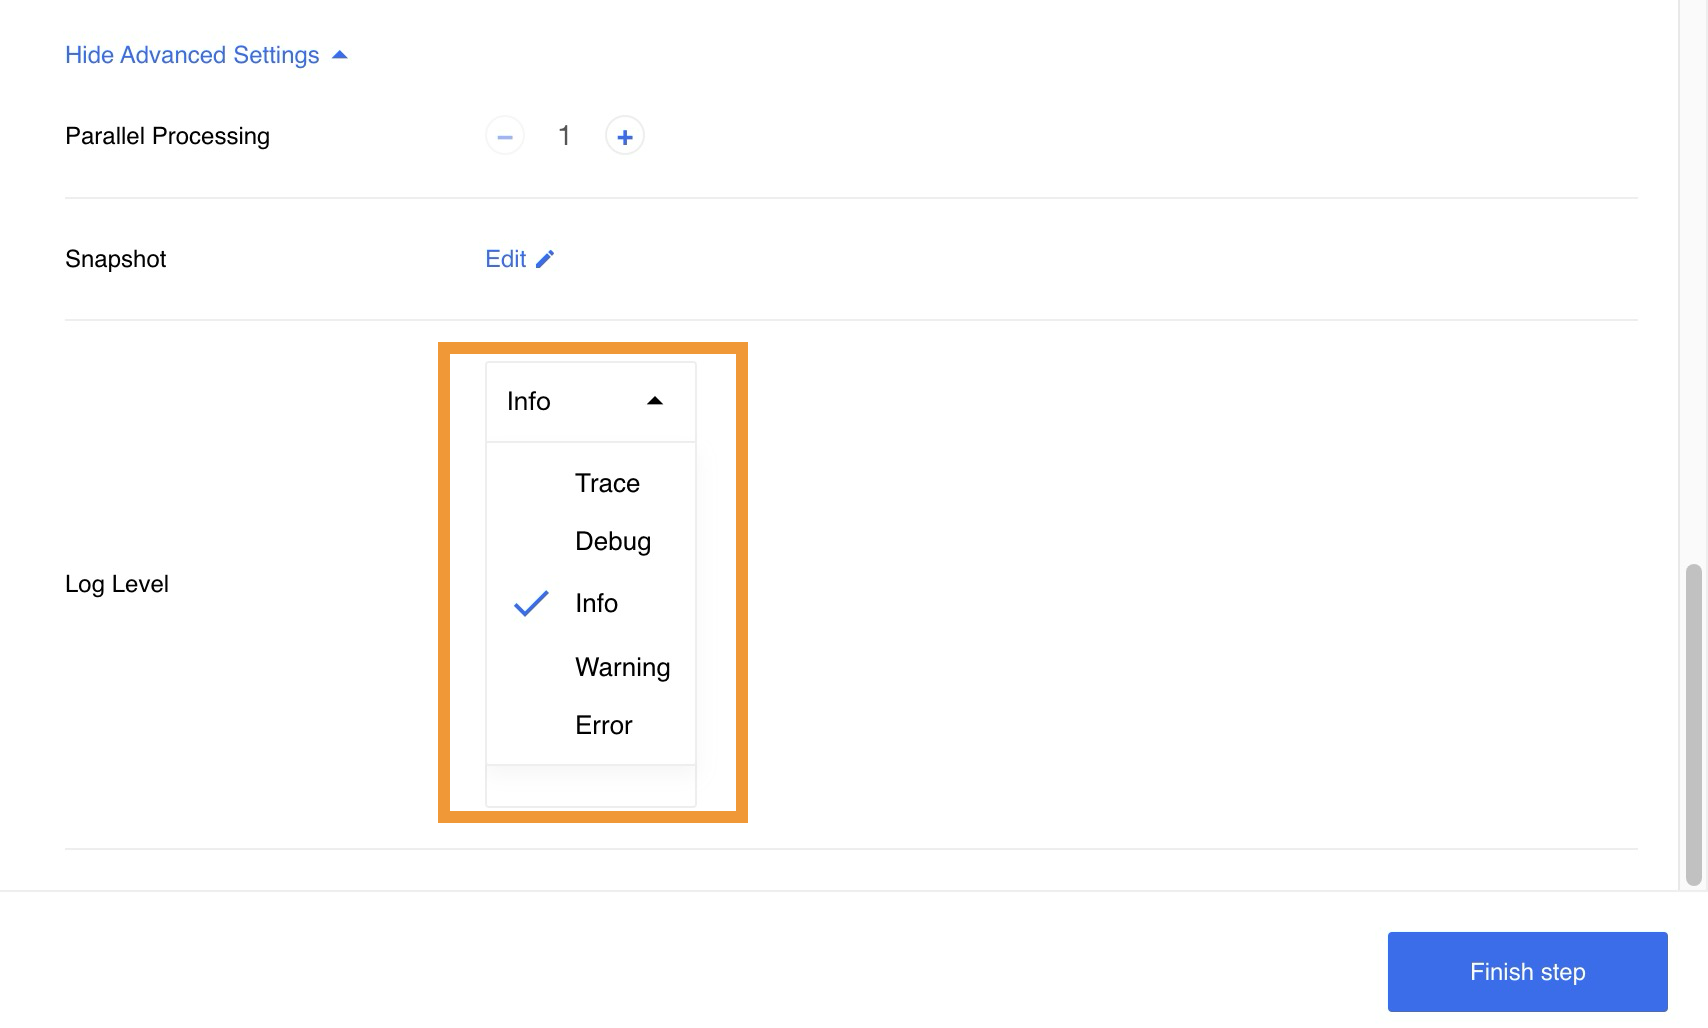
Please Note: To change the logging level of any flow-step, you must create a new draft for your flow, save it and start again.
The available logging levels are Trace, Debug, Info, Warning and Error where the Trace will output everything your component can show. On the other end of this spectrum, the Error level would output only the flow-step errors.
You can set or change the logging level directly using our REST API call. For this
purposes we extended the flow step configuration by adding the log_level parameter:
"attributes": {
  "nodes_config": {
    "step_1": {
      "log_level":"info"
    }
  }
}
Please Note: You can only change the logging level for run-time executions. This setup would not work on one-time executions like retrieve sample and verify credentials.