REST API component
Table of Contents
Description
The REST API is designed so that you can connect and request almost any REST API without having to create a separate component.
There are countless API’s and not all have separate components. In this case, you can simply take the REST API component, configure the request for your API and use it as if this component was made specifically for the API you selected.
Triggers and actions are implemented in the component using the HTTP request. This component function is based on the API call. In a nutshell, an API call is a process that takes place when you send a request after setting up your API with the correct endpoints. Your information is transferred, processed, and feedback is returned back.
Please Note: We highly recommend using only the second version of the component The REST API v1 component has been deprecated and is no longer supported. We highly recommend migrating to the actual version of componet. REST API v2 component offers improved functionality and ongoing maintenance. If you still using REST API v1 component please update your codebase to utilize the REST API v2 component as soon as possible to ensure compatibility with future updates and benefit from the latest features.
Technical Notes
Technical questions may arise while working with the component. You can find out about what changes have occurred with the component during its existence in Technical Notes page. If you need detailed information about deprecated functions of a component (for example, you are working with a long-established flow) please read Deprecated functions page.
Quick Start
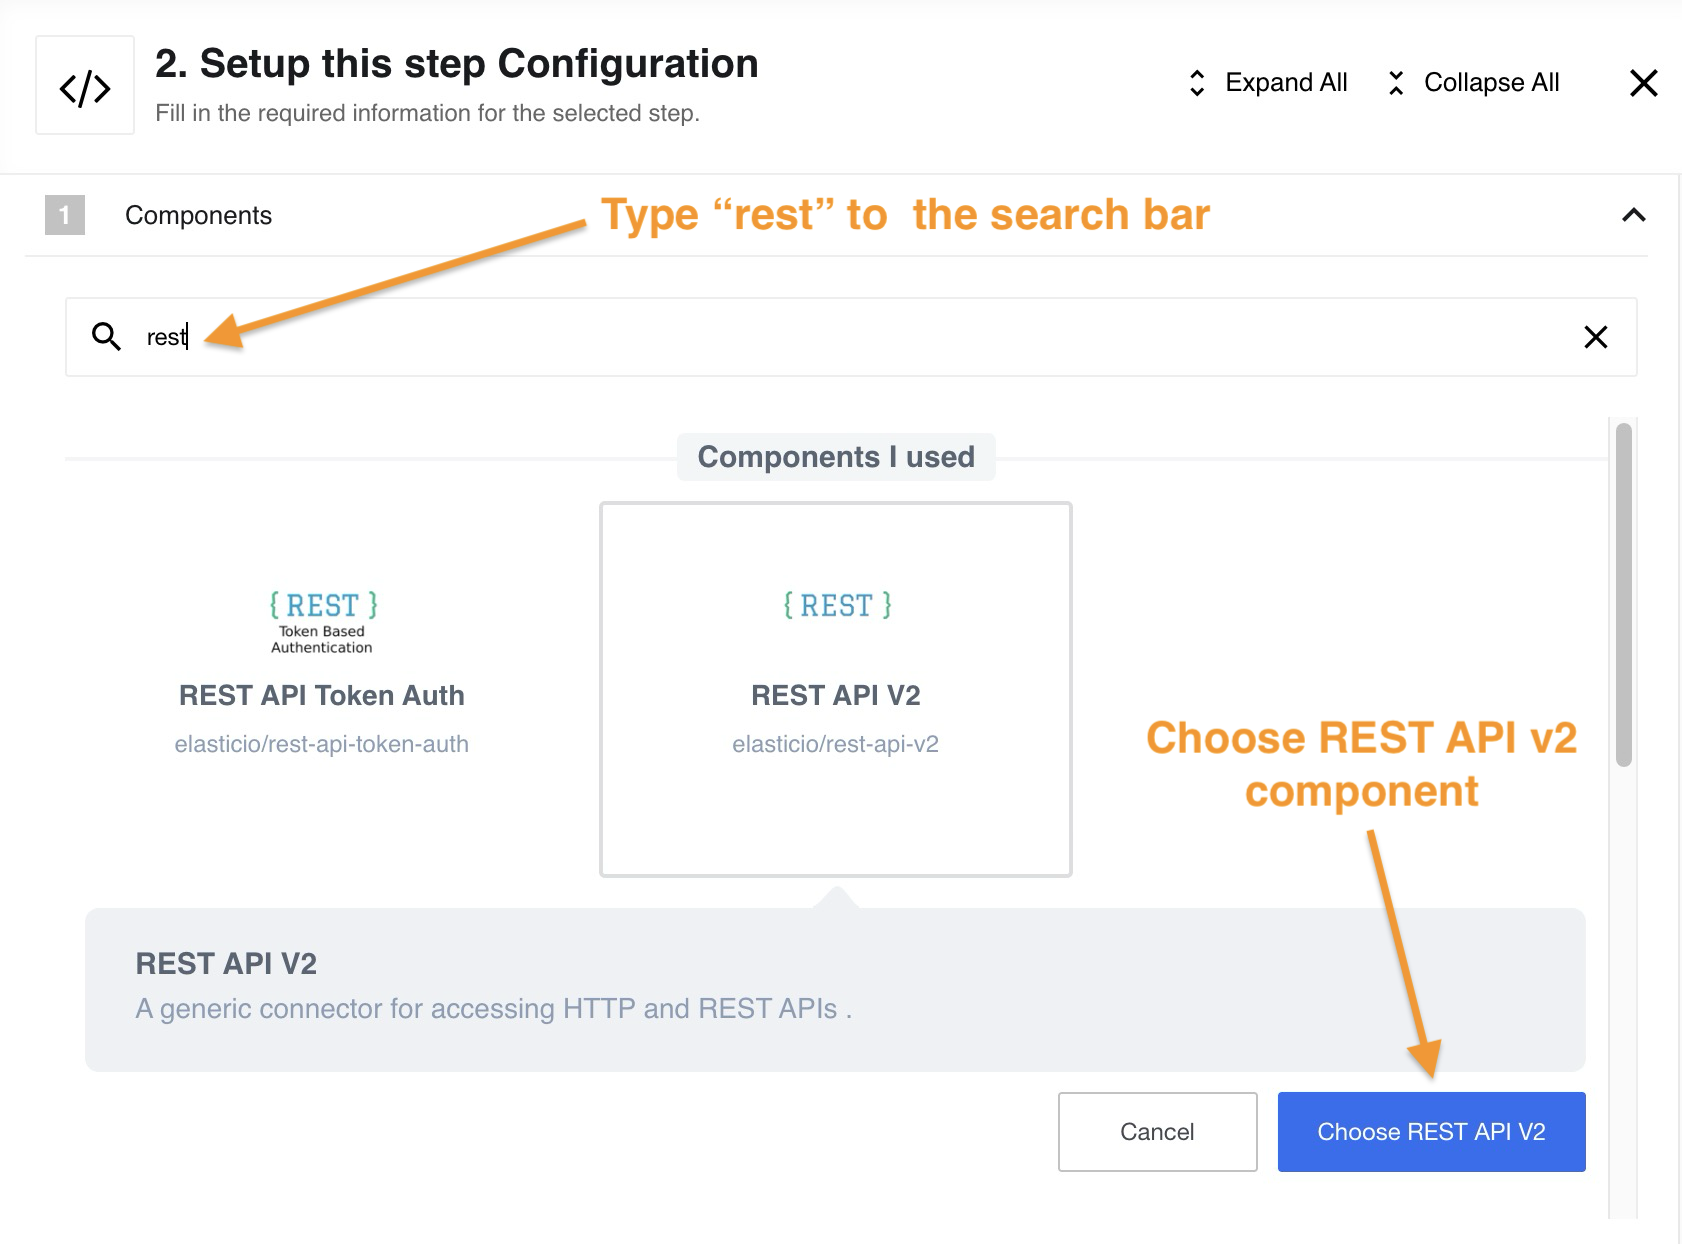
The best way to understand a REST API component is to see it in action. We’ll start with a simple example. First of all, you need to create a flow and find the component in the list:
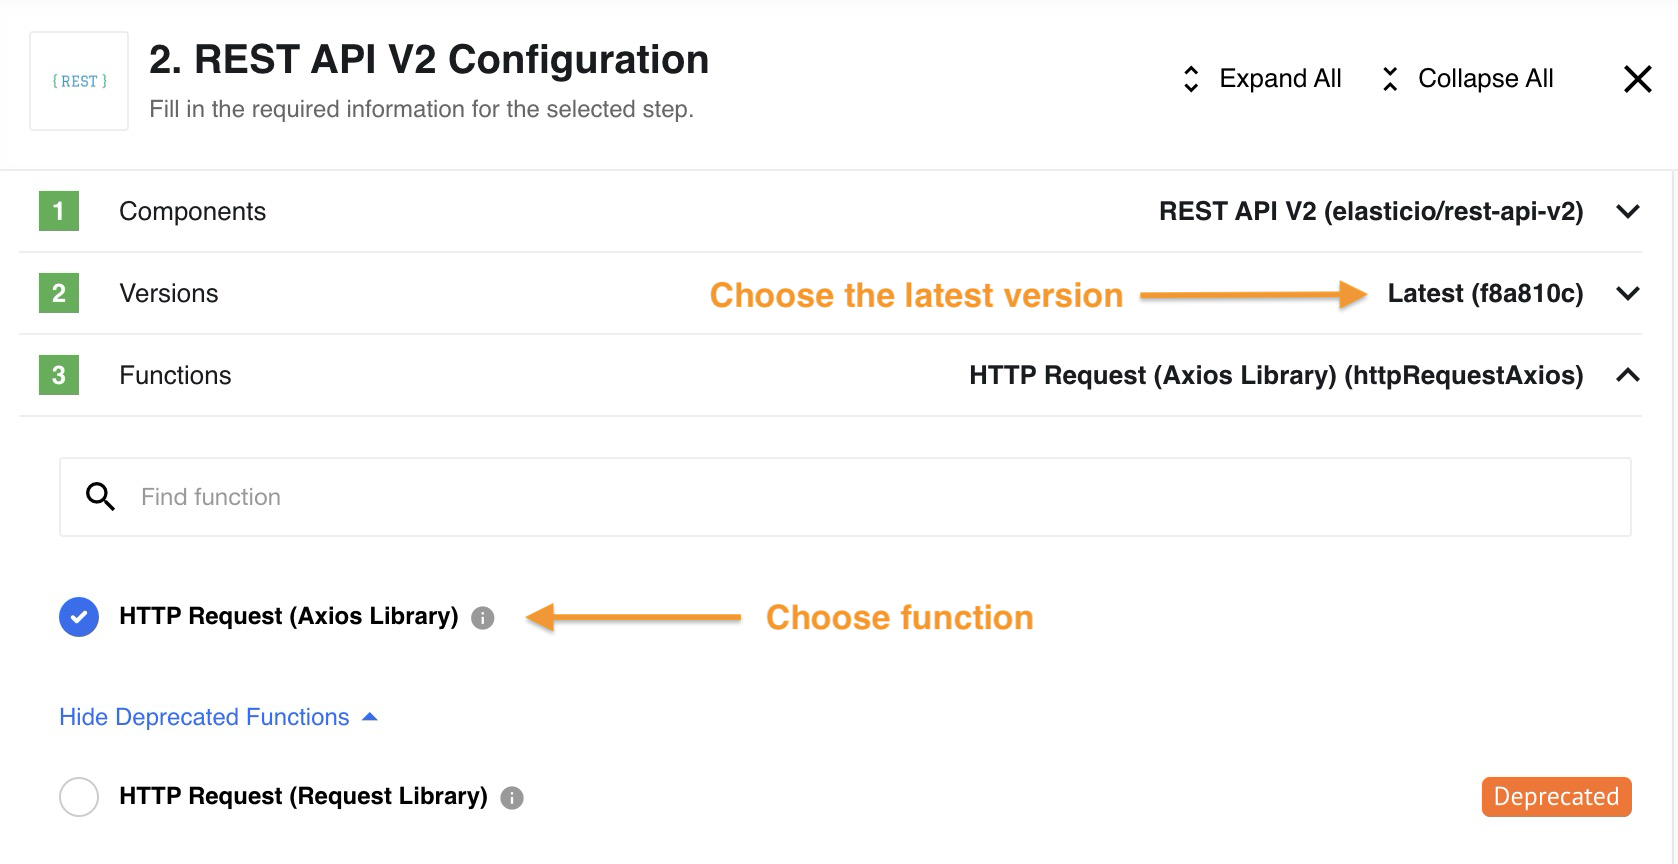
Since the Request library is deprecated, select HTTP Request (Axios Library) function in the component.
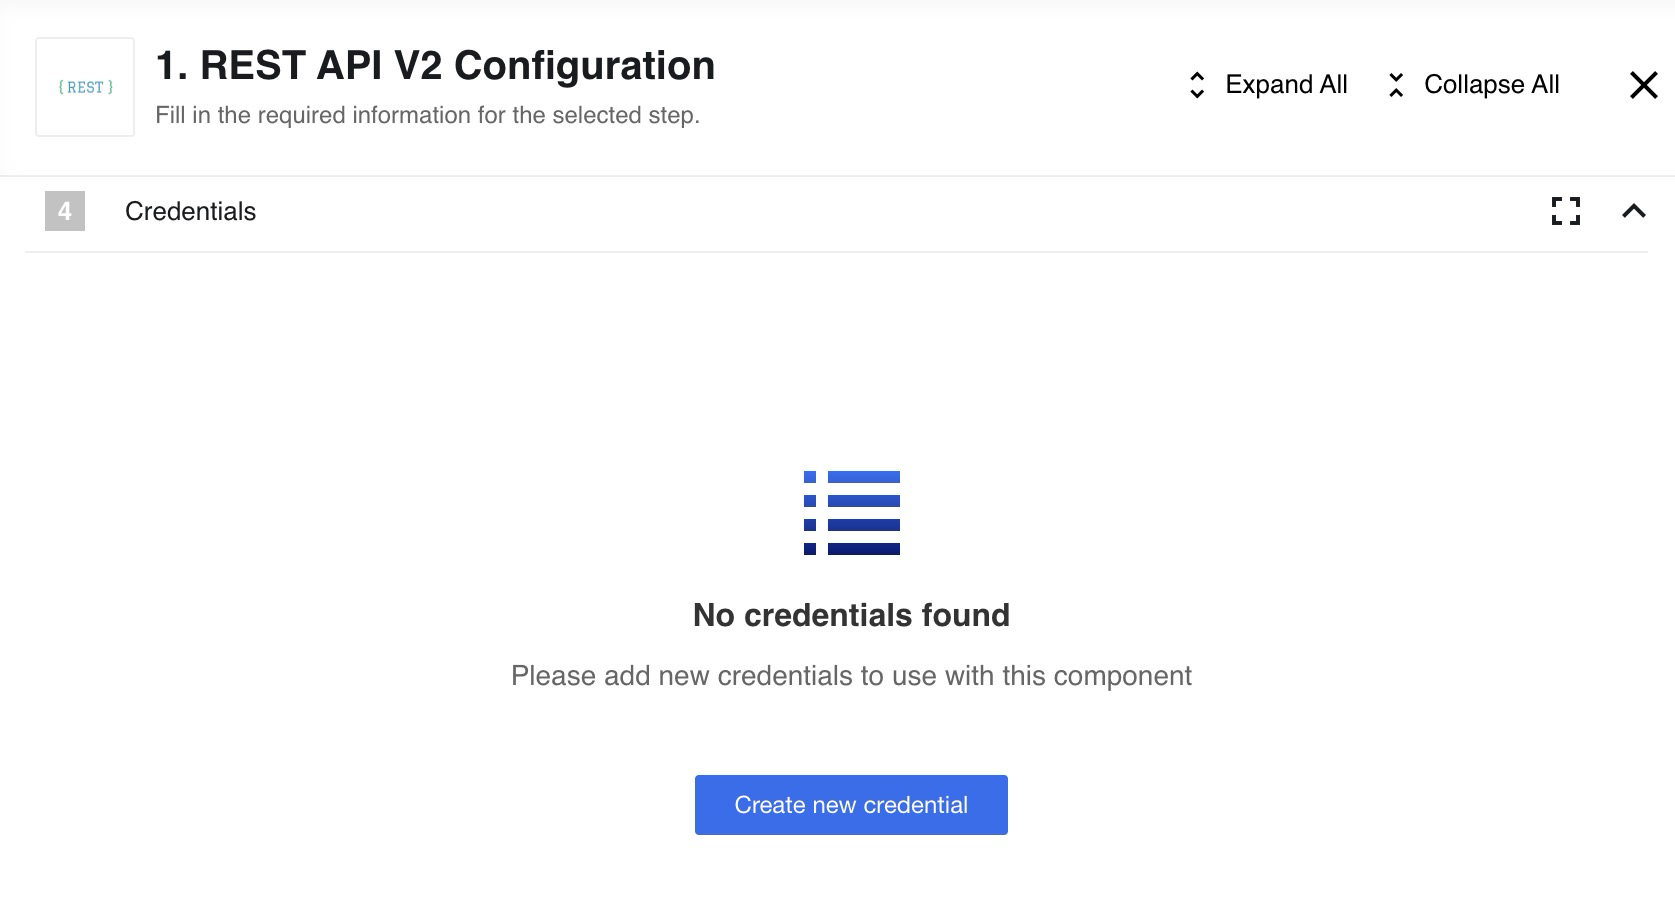
The next step is to configure the credentials. Choose Create new credential button in the credentials section:
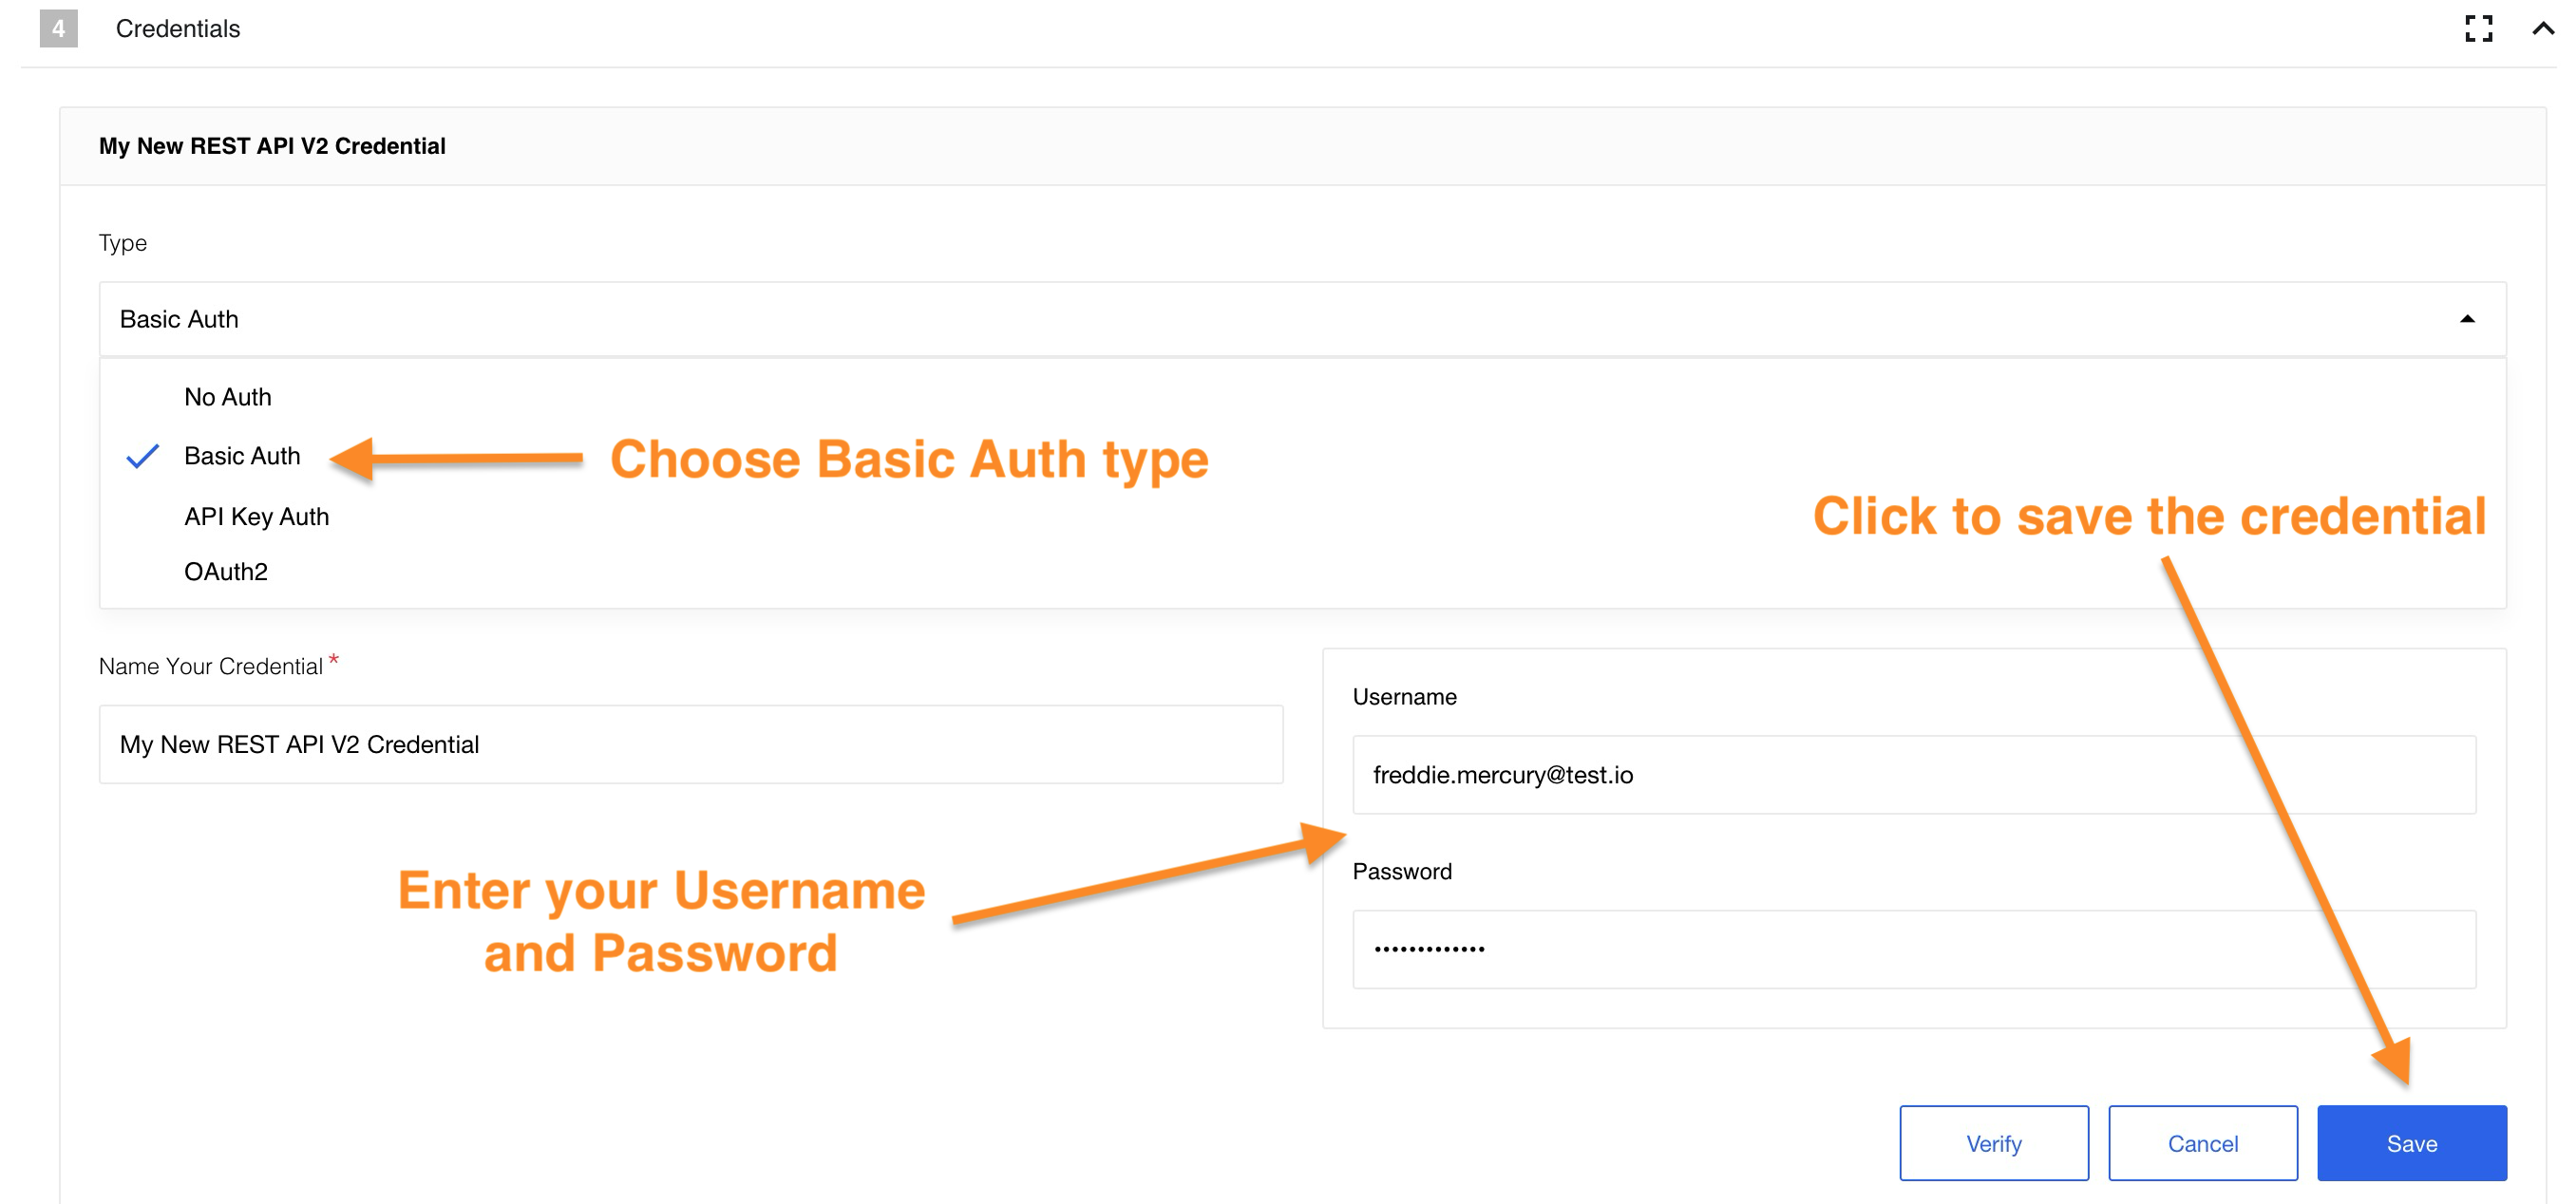
 We’ll use the Basic Auth type. In this case your Username is your
 E-mail, and your Password is your API key:
Please Note: For information on other methods of authorization please read the Authorization methods page.
Now we need to configure the input. In our case, we use the GET request, which returns information upon request using the URL. We could use the platform API as URL example. As a result, we should get information about us as a user of the platform.
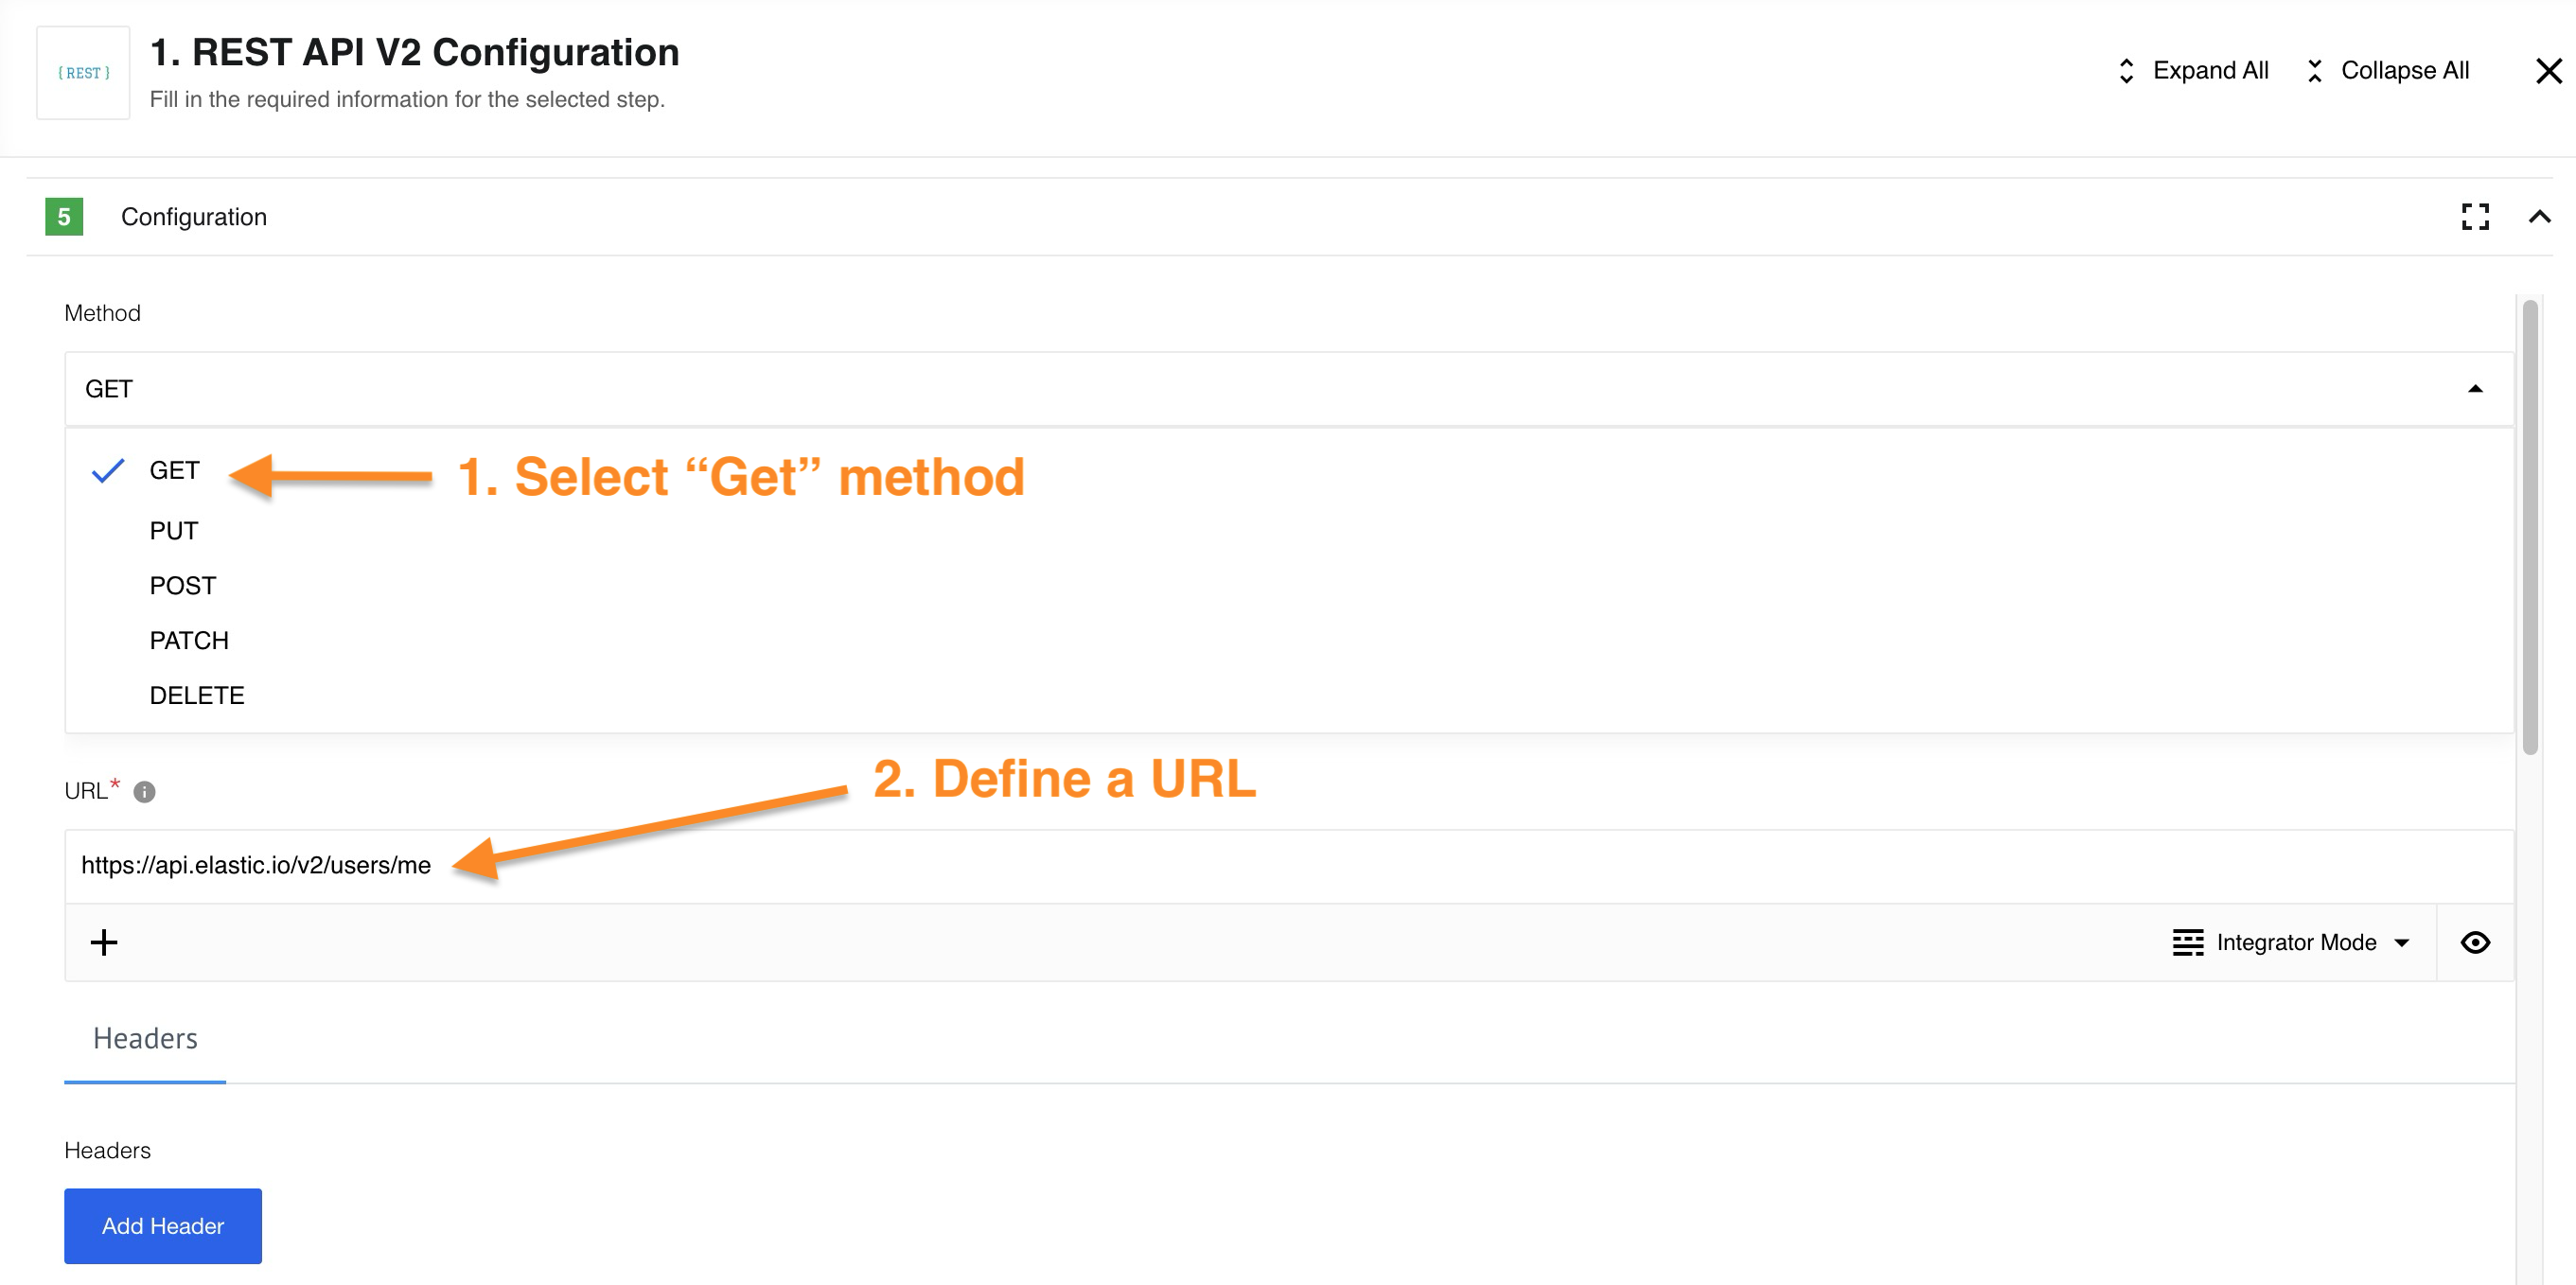
Please Note: For information on HTTP request function and all
GET/PUT/POST/PATCH/DELETErequests please read the HTTP request.
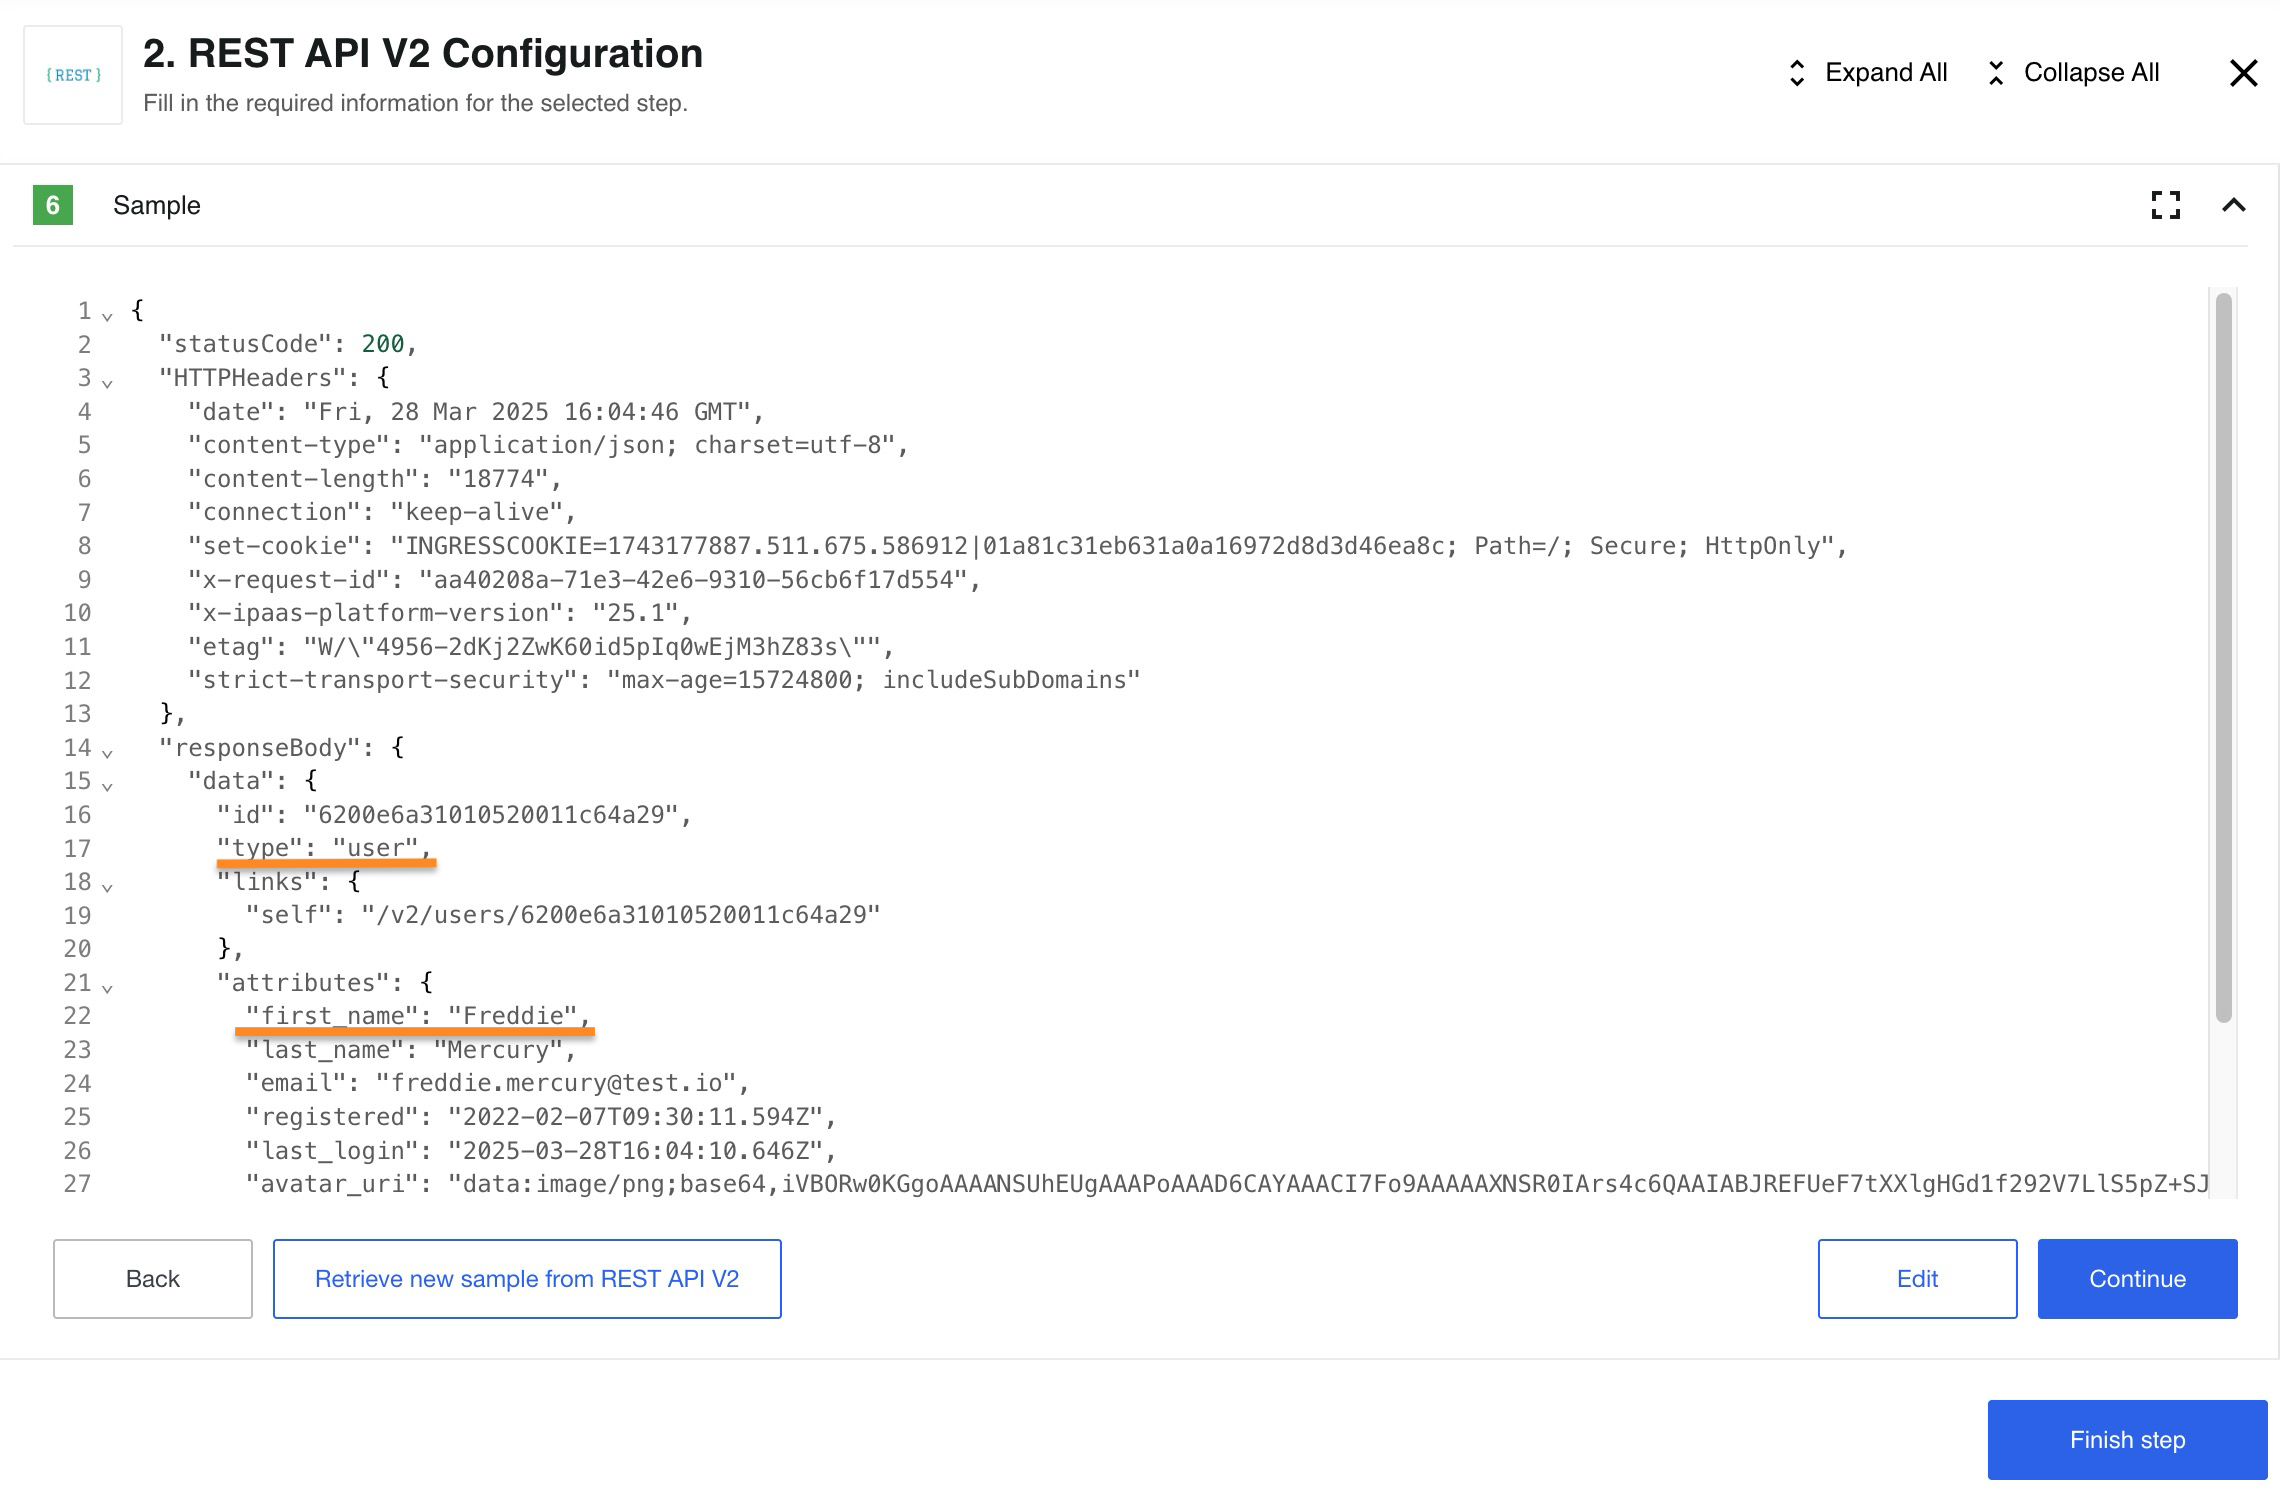
After retrieving a Sample, we will receive information about our own profile as expected.
We’re done. Our simplest flow using the REST API component did its job. If you want to see more complex examples using other components in conjunction with REST API component please read our Usage example.
Credentials
REST API component supports 4 authorization types:
No Auth- use this method to work with any open REST APIBasic Auth- use it to provide login credentials like username/passwordAPI Key Auth- use it to provideAPI Keyto access the resourceOAuth2- use it to provideOauth2credentials to access the resource. Currently it is implementedAuthorization codeOAuth2 flow.
For more information please read the Authorization methods page.
Actions
HTTP Request (Axios Library)
Configuration Fields
- Method (dropdown, required): The HTTP verb to use in the request, which can be one of
GET,POST,PUT,DELETE, orPATCH. - URL (string, required) - The URL of the REST API resource.
- Headers tab: This includes the
Add Headerbutton, which is used to add custom headers to your request. Each header consists of two fields: the first is used as the header key, and the second is used as the header value. - Body tab (available only if
Methodis notGET) has the following fields:- Content Type (string, required): The type of data that you are going to send.
- Body (object/string/dynamic fields, required) - Based on the provided
Content Type, the component will generate the appropriate fields:- If
multipart/form-dataorapplication/x-www-form-urlencodedis selected, there will be anAdd Partbutton used to add parts to your request; each part consists of a key and a value. - For other cases, a single input field for the body will be generated, allowing you to input an object (using a JSONata expression) or text (if you need to send XML).
- If
- Error Handling Policy (dropdown, optional, default
Retry by component) - The component considers the following codes as errors that can be handled:408,423,429, everything greater than500, andECONNABORTED(timeout). You can select one of the available options:Retry by component- The component will attempt to retry this request.Use rebound functionality- The component will send the incoming message back to the queue; after some time, this message will return (you can find more information about how rebounds work in the platform documentation).Don't retry (throw error)- The component will throw an error directly.Emit error as message (don't throw errors)- The component will send a message with the response received from the server.Important: This option applies only to error codes that the component considers “handled errors” by default (
408,423,429, all codes>= 500, andECONNABORTED).
If you want to treat other codes (for example404or401) as messages instead of errors, you must explicitly list them in the Error Codes to emit as messages field.
- Error Codes for Error Handling Policy (string, optional) - A comma-separated list of codes or ranges. By default, the error handling policy applies when you receive HTTP codes 408, 423, 429, and any codes greater than 500. However, you can override these codes using this field.
- You can specify exact codes:
401, 404, 503. - You can also use ranges:
400-401, 405-410, 502-509. - You can combine them:
403, 404, 500-599.
- You can specify exact codes:
Please Note: You can only include codes above 299 here, and you cannot include 401 if OAuth2 authentication is selected.
-
Error Codes to emit as messages (string, optional) - A comma-separated list of codes or ranges. By default, this list is empty. When specified, the component will emit a message containing the error instead of throwing it upon receiving one of these codes. This feature is useful for handling specific errors gracefully without interrupting the workflow.
- You can specify exact codes:
401, 404, 503. - You can also use ranges:
400-401, 405-410, 502-509. - You can combine them:
403, 404, 500-599.
- You can specify exact codes:
Please Note:
- These codes have higher priority than those specified in the Error Codes for Error Handling Policy and will ignore Error Handling Policy
- You can only include codes above 299 here, and you cannot include 401 if OAuth2 authentication is selected.
-
Maximum Retries (number, optional, default
10) - Set the maximum number of retry attempts. This option is only applicable when theError Handling Policyis set toRetry by component. - Download as Attachment (boolean) - If checked, the component will download response data to internal storage as an attachment, and you will receive a URL to it instead of the response body.
- Upload File (boolean) - If checked, you will be able to upload data via two available methods:
- For body content type
application/octet-stream, provide the URL to the file from internal or external storage directly in the “Body” field as a string. - For body content type
multipart/form-data, specify any key as a string (e.g.,file) and the value as an object (switch the field to “JSONata Mode”), where one of the object keys should beurl, pointing to the file. Available parameters in this case:url(string, required) - The link to the file from internal or external storage.filename(string, optional) - The name of the file.knownLength(number, optional) - The size of the file.
- For body content type
- Do Not Verify SSL Certificate (unsafe) (boolean) - Check this option if you want to disable SSL certificate verification on the server.
- Maximum Redirects (number, optional, default
5) - Defines the maximum number of redirects to follow. If set to 0, no redirects will be followed. - Delay in ms (number, optional, default
0) - Delay the next request after the previous request by the specified milliseconds. The maximum delay is 1140000 (19 minutes), with a default of 0. - Request Timeout (number, optional, default
60000- 60 seconds) - The timeout period in milliseconds while the component waits for a server response. It should be a positive integer between1and1,140,000(19 minutes). - Response Size Limit (number, optional) - The maximum response size in bytes, with a maximum and default of 20MB for regular requests and 100MB for attachments (if
Download as Attachmentis checked). - Request Size Limit (number, optional, default
unlimited) - The maximum size of the HTTP request content in bytes. - Response Encoding (string, optional, default
utf8) - Indicates the encoding to use for decoding responses. In some cases, when you need to extract data from the message, you can usebase64here.
Input Metadata
None
Output Metadata
- statusCode (number, required) - The HTTP status code of the response.
- HTTPHeaders (object, required) - The response headers.
If Download as Attachment is checked:
- attachmentUrl (string, required) - The link to your file stored in internal storage.
If
Download as Attachmentis unchecked: - responseBody (object/string) - The content of the response.
Triggers
HTTP Request (Axios Library)
Refer to the actions section HTTP Request (Axios Library).
Examples of Usage
Uploading Files
To upload a file, ensure that you check the Upload File option in the configuration. You will then have the following options:
Upload Using application/octet-stream
- Add the URL to which you will upload the file.
- Set the Body content type to
application/octet-stream. - In the body, provide the URL to the data source from which you need to retrieve the file.
Upload Using multipart/form-data
- Add the URL to which you will upload the file.
- Set the Body content type to
multipart/form-data. - Press the
Add Partbutton. - Enter a key that describes the field containing the data; a common name is
file. - Switch to
JSONata mode. - Create an object with the key
url—this will be the data source from which you need to retrieve the file.
Sending XML or Text Data
- In
Integrator mode, you can simply place your text or XML inside the body. - Mapping from previous steps is also available.
You can switch to JSONata mode if you need to utilize JSONata expressions.
Sending JSON Data
- In
JSONata mode, you can simply place your JSON inside the body. - Mapping from previous steps and any JSONata expressions are also available.
Known Limitations
1. The component can parse any of JSON and XML content types. They are:
application/jsonapplication/xmltext/xml- etc.
Please note: if content type is not indicated in response header, component will try to parse response as JSON. If it gets parse exception, it returns response as is.
2. Attachments limitations:
-
Maximal possible size for an attachment is 10 MB.
-
Attachments mechanism does not work with Local Agent Installation
3. We suggest not to set Delay value more then time period between two executions of the flow.
Please keep in mind that delay can influence on time of next execution.
For example, the flow has type Ordinary and scheduled to execution for every 1 minute, but the delay is set to 120 sec, so the next execution will be started only after 120 sec, instead of 1 minute.
Click here to learn more about the elastic.io iPaaS