VPN Agent
This document provides basic information on VPN Agent, how to set it up and use it in your integration flow.
VPN Agent
The VPN Agent or the Agent is а VPN tunnel specifically configured to access any local resource in your local environment. It could be any local database or CRM to which you would rather restrict access from outside world but still need to query for a data.
When the Agent is configured the platform and your local resource communicate data using the secure VPN tunnel. All the processing is happening on platform side, your resource serves the role of data source or final destination of data depending on your use case.
Please note that you can manage VPN agents using API calls. You can find all the information you need about it here.
How to setup
To setup the Agent you would need to fulfill the following preconditions:
- You have a running local resource which has a local IP address and port. The IP address should not be
127.0.0.1or instead belocalhost. Please consult the documentation of your resource on how to configure it. - Working VPN client which accepts OpenVPN configurations.
- Optionally: Administrative rights to configure the local network on your host machine in case you have non-standard setup.
Please note that below, you will find a dedicated section specifically for the Windows operating system (OS) family. This section comprehensively covers all the essential details pertaining to setting up the VPN Agent on Windows OS.
Connecting to local database
As an example let us connect the locally running Mongo database with the platform.
Let’s assume our local database is accessible on 192.168.1.7 address and 27017
port (standard MongoDB port).
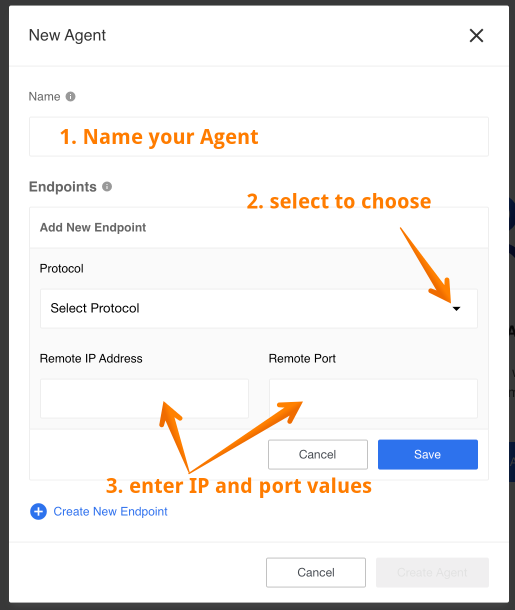
Navigate to left-hand-side menu, Integrate > Agents and press on Create an Agent button if you don’t have any Agents or press on Create New Agent button to add new one. You can also create a VPN agent using this API endpoint.
You will get a new pop-up form to fill in the details. Note you can extend the form by selecting Create New Endpoint.
Let us fill in the needed values:
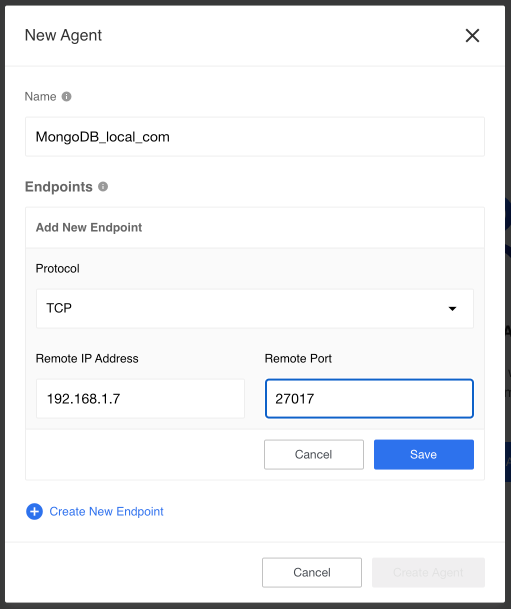
- Give a proper name to remember what is it for. We will use
MongoDB_local_com. - Select from drop-down menu the connection protocol type
TCPorUDP. We useTCPbecause we use MongoDB and it uses TCP protocol. - Enter the IP address and the port. In our case we will add
192.168.1.7and27017.
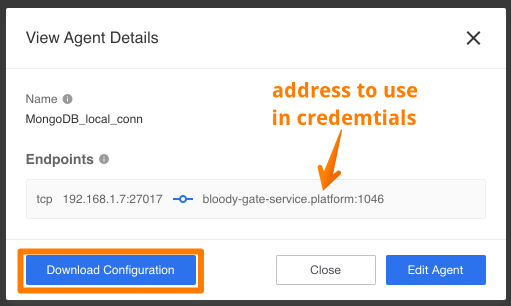
Click Save to save all entry values and submit to the system. After this the form will disappear and a new record appear in the page. Click on newly created record to see the details.
Before going further save the address in Endpoint configuration to use in the
credential configuration stage. In our case it is bloody-gate-service.platform:1046.
In your case you will get the same service with different port number (bloody-gate-service.platform:XXXX).
Press Download Configuration to get configured OpenVPN configuration file
*.ovpn which you must install in your local VPN client and start it.
Congratulations, you have established a secure VPN tunnel between your local resource and the platform. Now time to use this in your integration flow configuration.
VPN Agent - Windows OS Family
This documentation provides instructions for setting up the VPN Agent on the Windows OS family, including Windows Server 2019, Windows Server 2012 R2, and Windows 7 Professional. While the steps mentioned here have been tested on specific versions, they should generally work on older versions as well. Please note that no manual testing has been conducted on the older versions.
Before you begin the installation process, ensure that you have administrator privileges on the machine. Commands executed in the command prompt (cmd) or PowerShell should be run with administrator privileges. The easiest way to do this is by starting the shell as an administrator by right-clicking and selecting “Run as administrator.”
Common Part
-
Install and run the OpenVPN client with the appropriate configuration.
-
The installation process will create a new network connection. You can find this connection’s name (
tunnel interface), IP address (tunnel IP address), network, and netmask (tunnel netin CIDR format, e.g., 172.19.0.0/16) by referring to the Control Panel, using theipconfigcommand in the command prompt, or using theGet-NetIPInterfacecommand in PowerShell. -
Identify the network connection that will be used to connect to your remote system (
typically Ethernet) (outgoing interface). Make a note of its IP address (outgoing IP address).
Windows Server 2019
1. SEnable IP routing by running the following command in PowerShell as an administrator:
Set-NetIPInterface -Forwarding Enabled
To check if IP routing is enabled, run the following command in PowerShell:
Get-NetIPInterface | Select-Object ifIndex, InterfaceAlias, AddressFamily, ConnectionState, Forwarding | Sort-Object -Property IfIndex | Format-Table
2. Enable NAT by running the following command in PowerShell as an administrator:
New-NetNat -Name NAT_NAME -InternalIPInterfaceAddressPrefix <tunnel net>
Replace <tunnel net> with the appropriate value for the tunnel network. To check if NAT was created successfully, run the following command in PowerShell:
Get-NetNat
3. Grant access through the firewall by running the following command in PowerShell as an administrator:
New-NetFirewallRule -DisplayName "Allow Inbound from Tunnel" -Direction Inbound -RemoteAddress <tunnel net>, <outgoing IP address> -Action Allow
Replace <tunnel net> with the tunnel network and <outgoing IP address> with the outgoing IP address. You can also use the Windows Firewall UI or disable the firewall entirely in the Control Panel. However, disabling the firewall poses security risks. To check if the rule was installed successfully, you can use the Windows Firewall UI or run the following command in PowerShell:
Get-NetFirewallRule
Windows Server 2012 R2
1. Enable IP routing by running the following command in PowerShell as an administrator:
Set-NetIPInterface -Forwarding Enabled
To check if IP routing is enabled, run the following command in PowerShell:
Get-NetIPInterface | Select-Object ifIndex, InterfaceAlias, AddressFamily, ConnectionState, Forwarding | Sort-Object -Property IfIndex | Format-Table
2. Enable NAT:
Setting up NAT in Windows Server 2012 R2 is more involved compared to Windows Server 2019. Please refer to the documentation for detailed instructions. This involves installing and configuring the Routing and Remote Access Service (RRAS) using the UI. Add the tunnel interface as Private and the outgoing interface as Public. You can install and enable RRAS using the following PowerShell command:
Install-WindowsFeature Routing -IncludeManagementTools
3. Grant access through the firewall by running the following command in PowerShell as an administrator:
New-NetFirewallRule -DisplayName "Allow Inbound from Tunnel" -Direction Inbound -RemoteAddress <tunnel net>, <outgoing IP address> -Action Allow
Replace <tunnel net> with the tunnel network and <outgoing IP address> with the outgoing IP address. You can also use the Windows Firewall UI or disable the firewall entirely in the Control Panel. However, disabling the firewall poses security risks. To check if the rule was installed successfully, you can use the Windows Firewall UI or run the following command in PowerShell:
Get-NetFirewallRule
Windows 7
1. Enable Routing and Remote Service (RRAS): Go to Control Panel -> Administrative Tools -> Services -> Routing and Remote Access. Set the startup mode to “Automatic,” apply the changes, and start the service.
2. Instead of enabling NAT, configure Internet Connection Sharing (ICS):
- Go to Control Panel -> Network and Internet -> Network and Sharing Center.
- Click on “Change adapter settings.”
- Right-click on the
outgoing interfaceand select “Properties.” - In the “Properties” window, navigate to the “Sharing” tab.
- Enable the checkbox “Allow other network users to connect through this computer’s Internet connection.”
- Select the
tunnel interfaceunder “Home networking connection.”
Notice: It might be necessary to disconnect and reconnect the OpenVPN client after making this setting change.
3. Grant access through the firewall:
- Go to Control Panel -> System and Security -> Windows Firewall -> Advanced Settings -> New Rule.
- Create an “Inbound” rule that allows all traffic for all programs, protocols, and ports where remote IP addresses are from the
tunnel net(e.g., 172.19.0.0/16). - Alternatively, you can disable the firewall entirely by going to Control Panel -> System and Security -> Windows Firewall -> Turn Windows Firewall on or off. However, disabling the firewall poses security risks.
Please keep in mind the security implications when modifying firewall settings.
Using VPN Agent
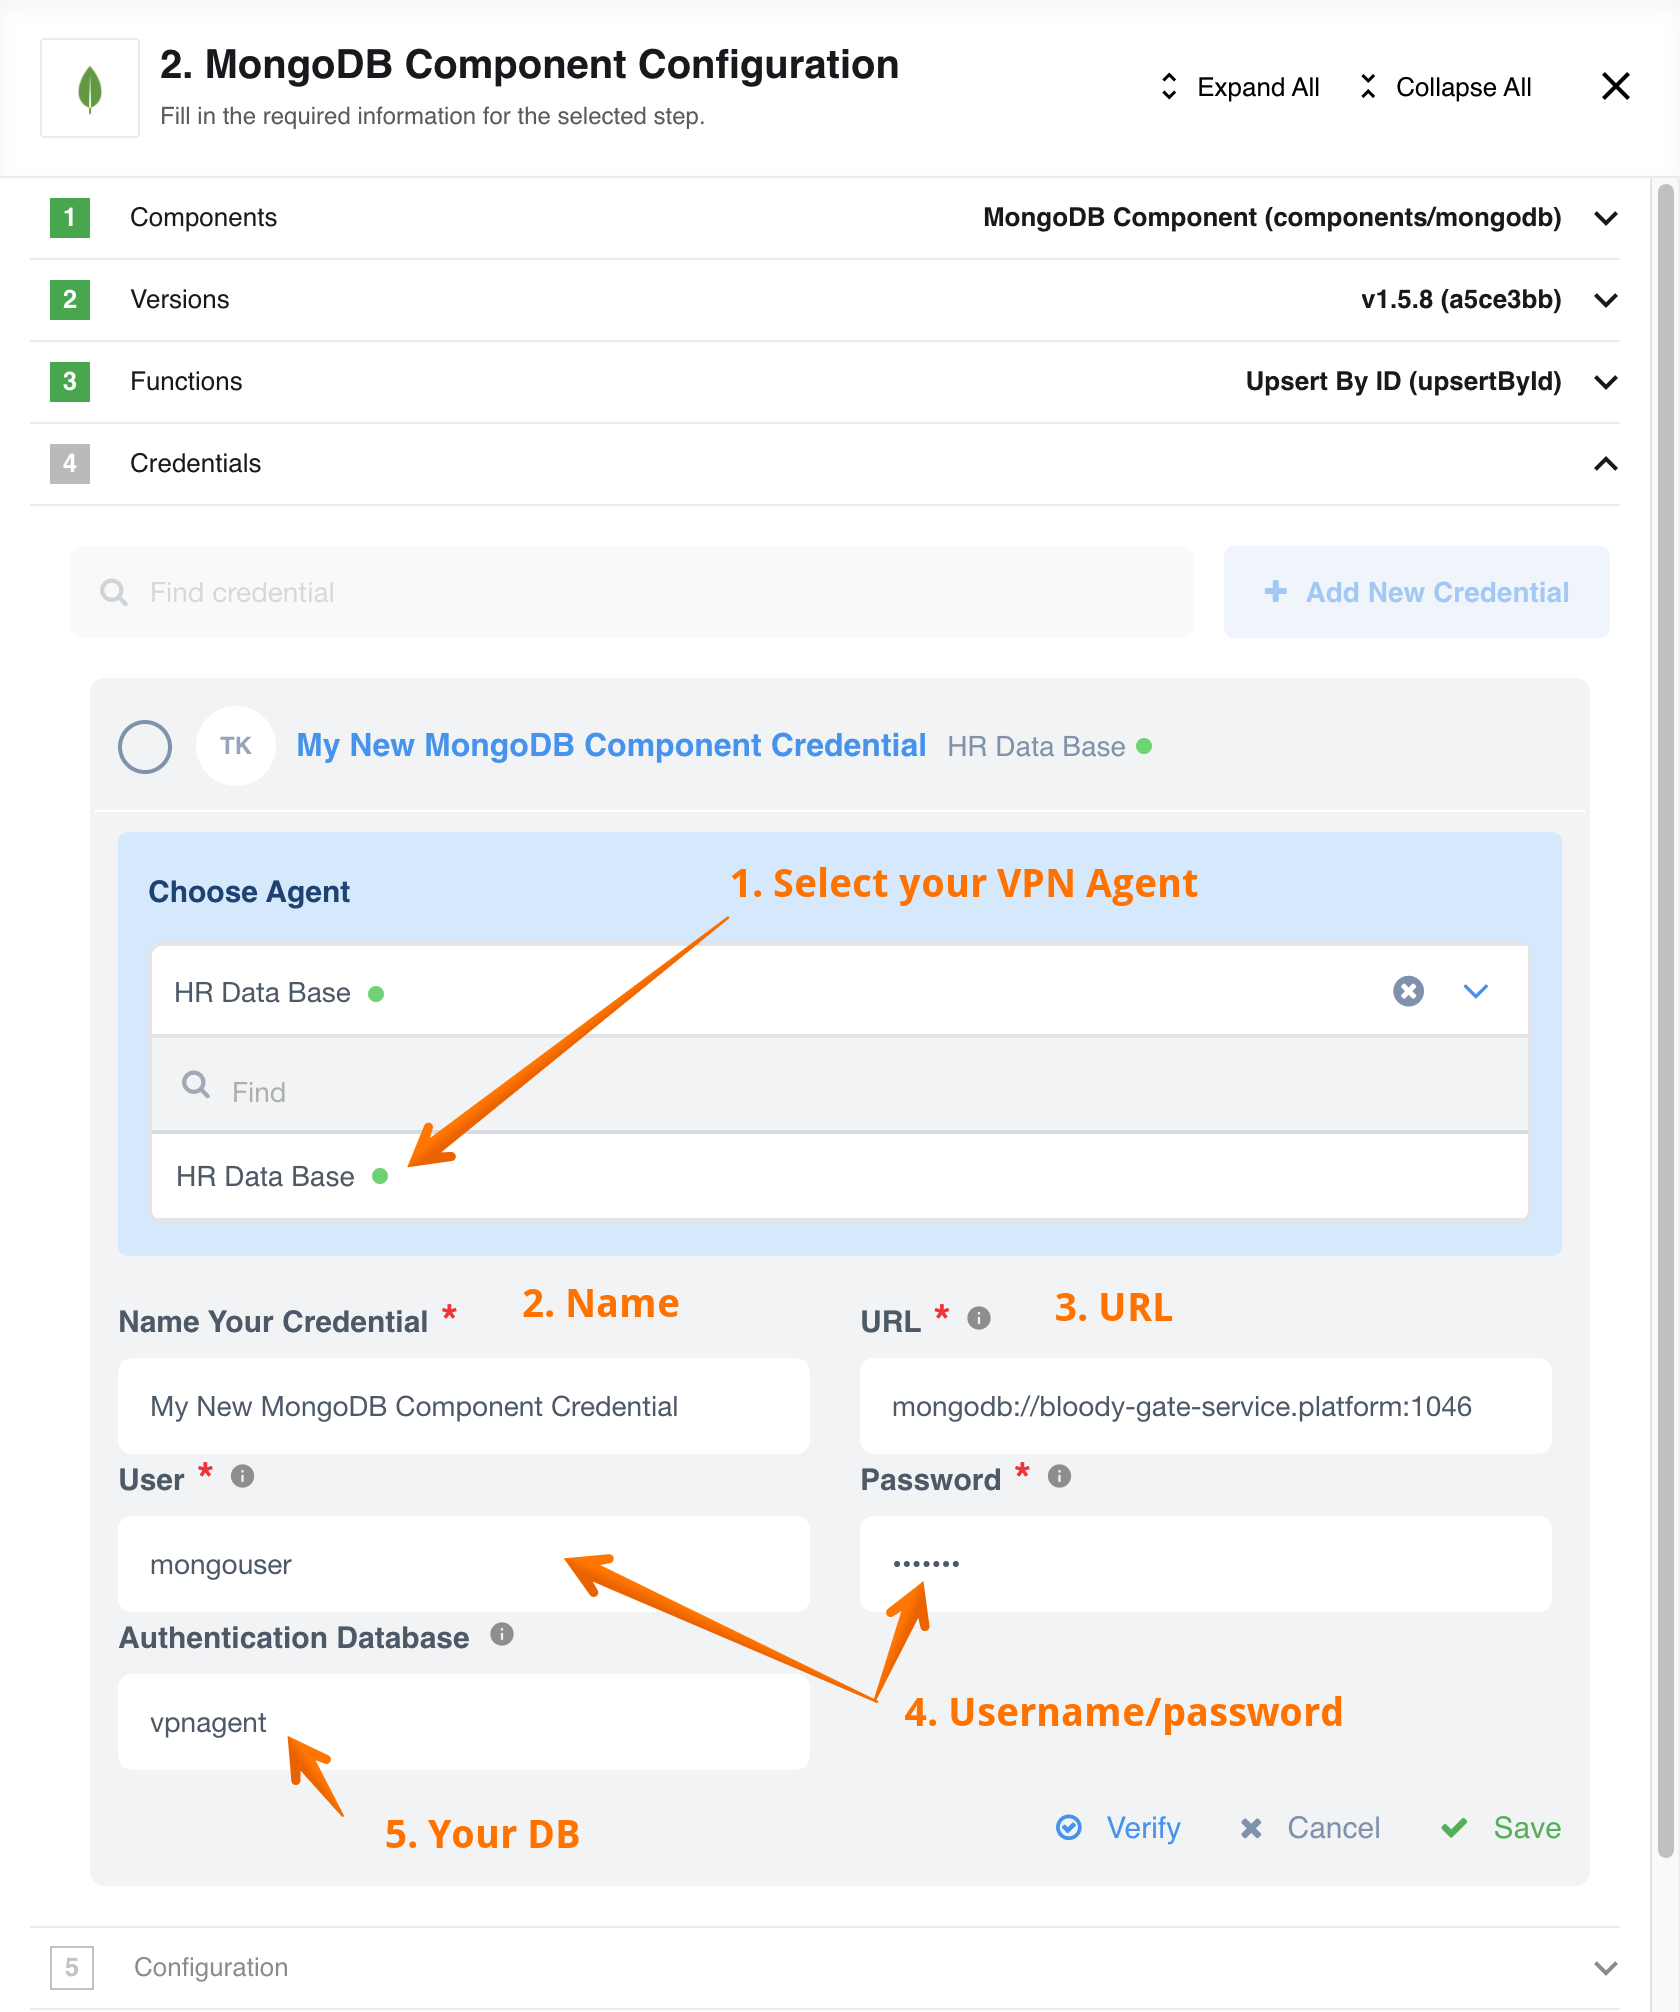
Since we have used MongoDB for our example we will use the MongoDB component in the configuration of our integration flow. We will jump directly to the step configuration to show how to use the Agent.
Picture above shows the filled form for MongoDB credentials in the step configuration where couple of details should be considered:
- Use Drop-down menu Choose Agent to select the Agent. Our new agent called
MongoDB_local_connis online as indicative of the green dot beside the name. - Give an informative name to your credential.
- Make sure to enter the correct URL address like we do
mongodb://bloody-gate-service.platform:1046. You must not use the connection URL available on your local environment. The VPN gateway will take care of port forwarding for you. - Use the same
username/passwordpair as you would use locally. - Enter the Authentication Database as you would do locally to login.
And lastly Verify and Save your credential.
Congratulations, you are now ready to query your local database and use the results to process further.
You can always update your agent, get all the information you need about it, or just delete it using the appropriate API endpoints. All the necessary information about this you can find in our API documentation.


