Model Context Protocol (MCP)
Description
An MCP server that connects AI assistants to the elastic.io iPaaS platform — letting them discover, build, modify, and debug integration flows directly.
Important: Before proceeding with the installation of the MCP server, please read the applicable Terms of Use.
Terms of Use
The elastic.io MCP server is optional. By installing it or connecting an AI agent to elastic.io through it, you agree to the elastic.io Terms of Use, in particular the MCP Interface and AI agents section.
In short:
- Your agent acts as you: Everything your AI agent does through MCP is done on behalf of your account.
- Limit its permissions: The agent can read, change and delete data within the permissions of the user account you connect. Use a dedicated user with only the permissions the agent needs, and read-only access wherever possible.
- Your data goes to your AI provider: Data the agent reads is sent to the AI provider you use. You are responsible for your agreement with that provider.
- We don’t control your agent: elastic.io does not provide or control your AI agent and is not responsible for its actions or outputs.
- We don’t use AI on your data: elastic.io does not use AI to process your data and does not use it to train AI models.
Quick Start
Prerequisites
- Node.js 22+ — download from nodejs.org
- A desktop AI client — install one of the supported clients (see below)
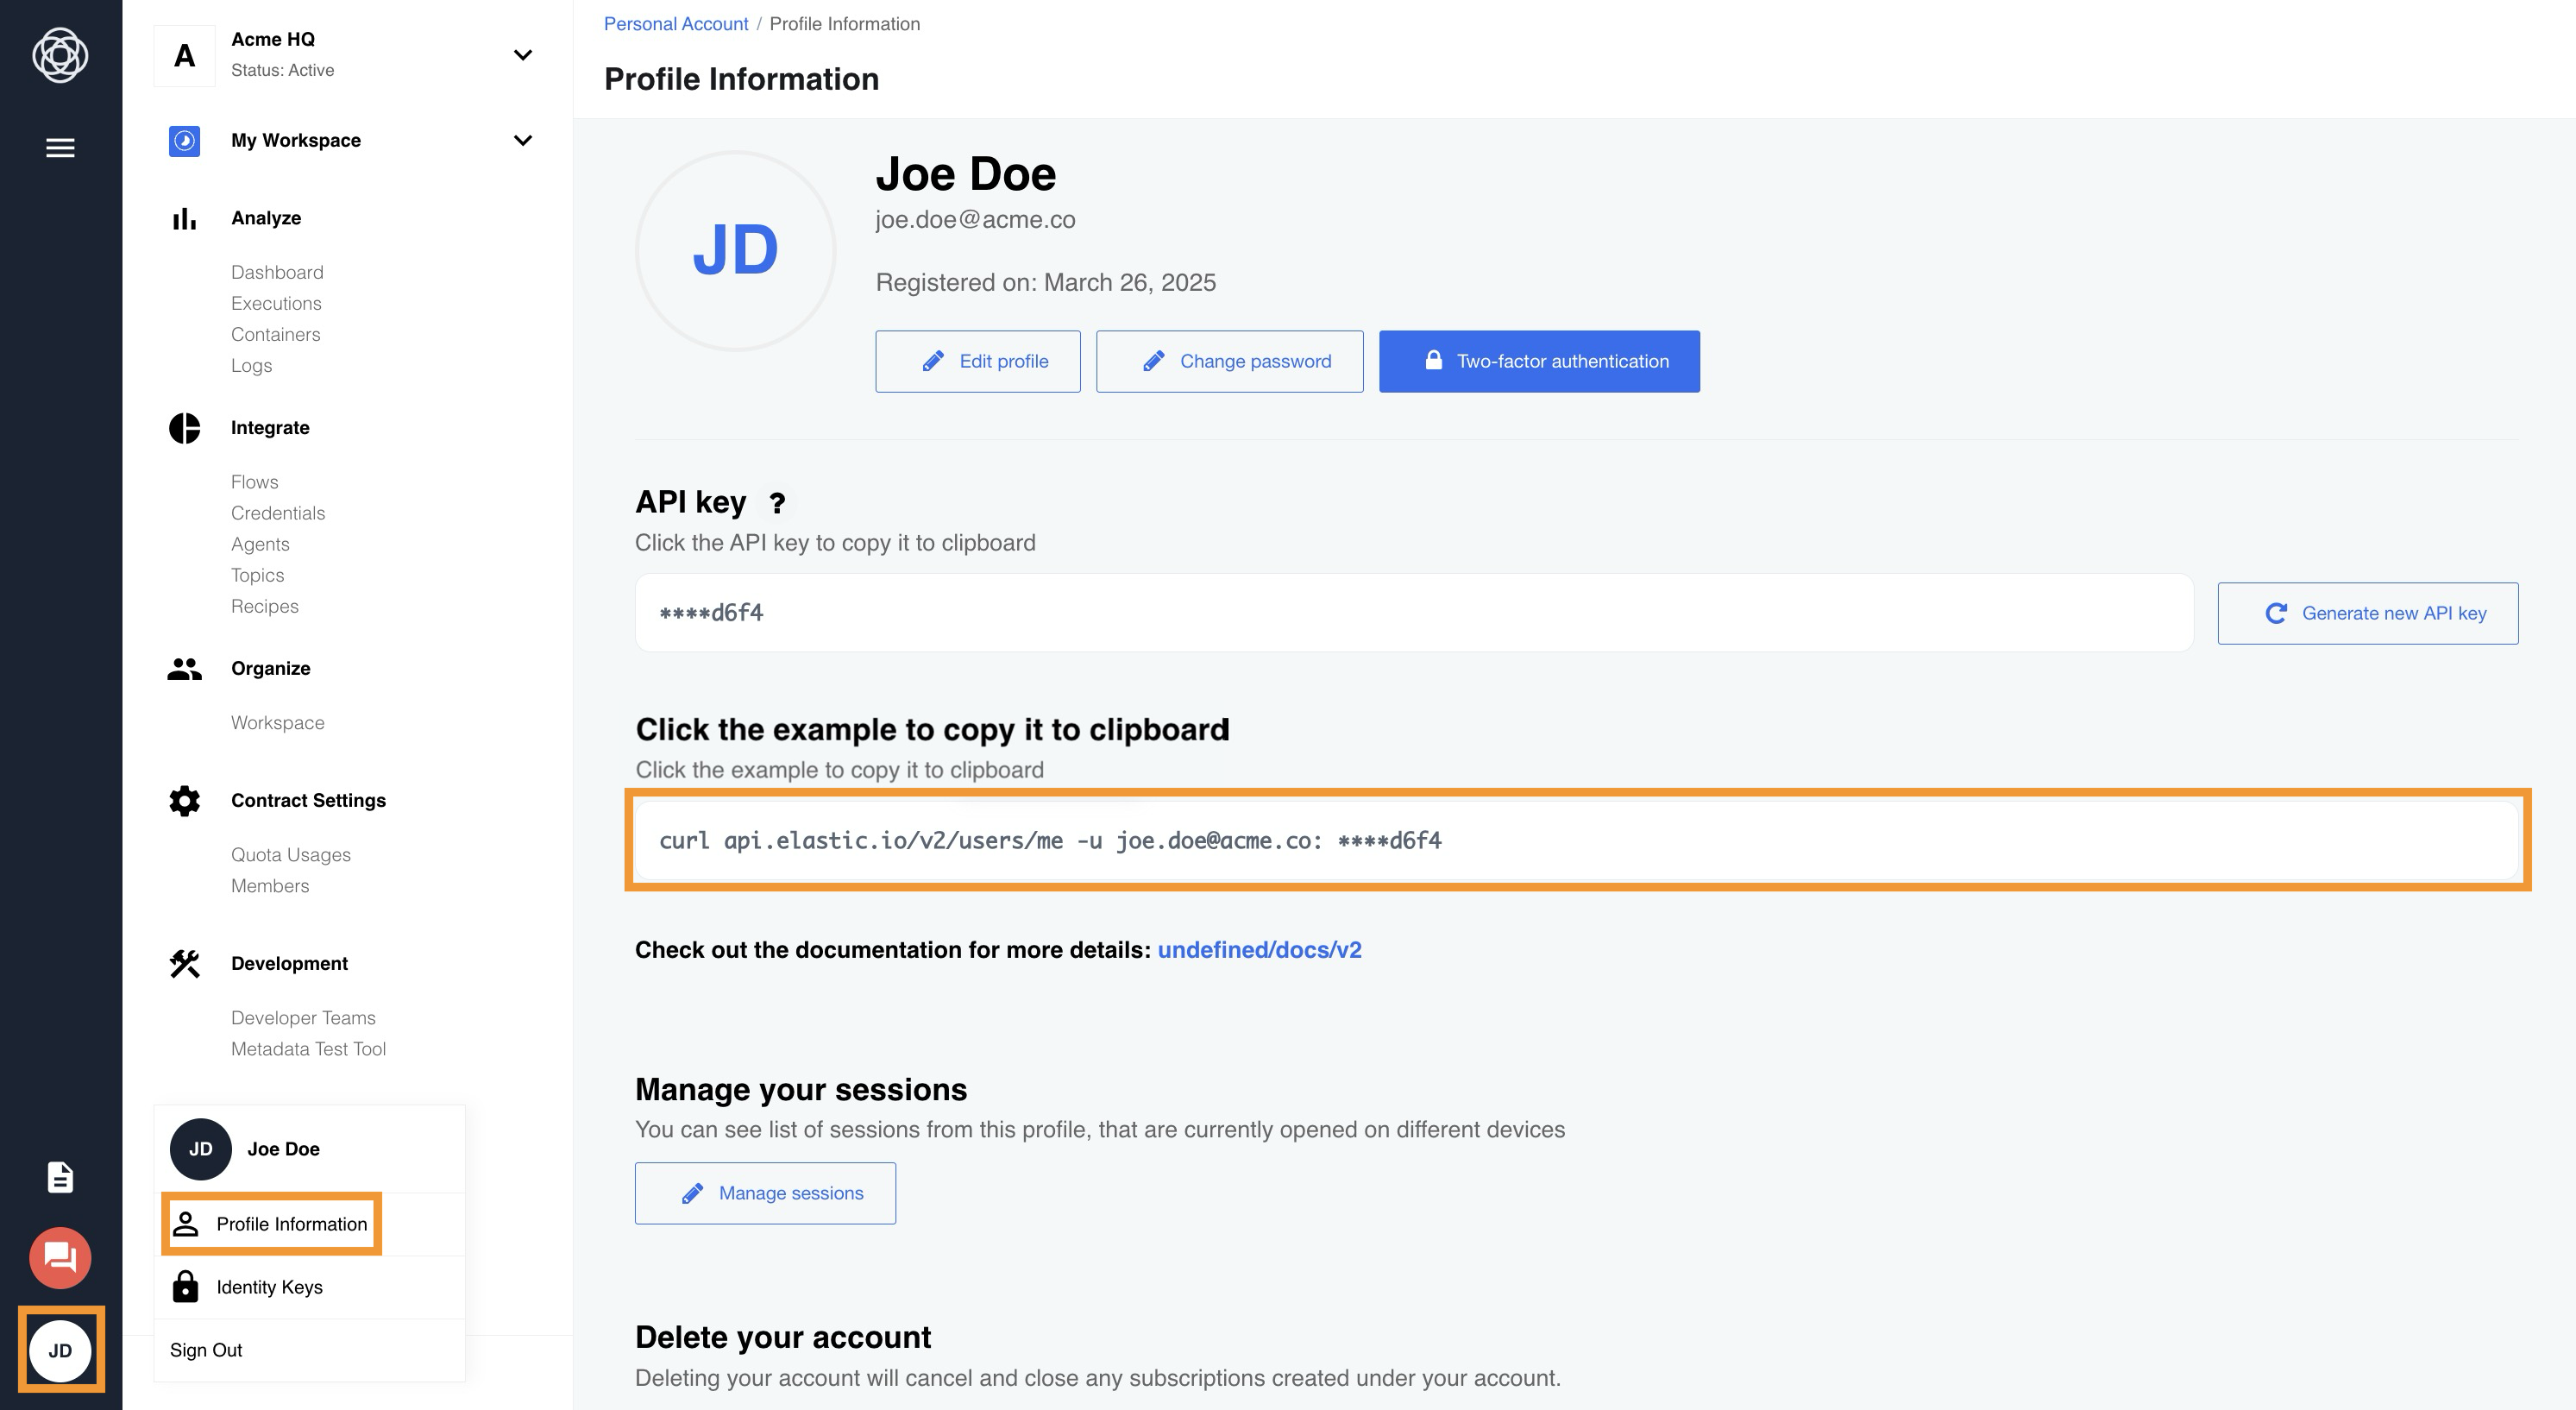
- Platform credentials — log in to the platform account, go to your User Profile page, and click the example to copy the
curlcommand to clipboard. The setup wizard accepts this command directly — just paste it when prompted.
One-Command Setup
Run this in your terminal — it will detect your installed AI clients and configure them automatically:
macOS / Linux:
npx -y @elastic.io/mcp@beta setup
Windows (PowerShell):
npx -y "@elastic.io/mcp@beta" setup
Windows notes:
- Always wrap the package name in quotes (
"@elastic.io/mcp") — PowerShell misinterprets the@symbol without them.- If you get a
PSSecurityExceptionerror, allow script execution for your user first:Set-ExecutionPolicy -Scope CurrentUser -ExecutionPolicy RemoteSigned
Works on macOS, Linux, and Windows. The setup wizard will:
- Check your Node.js version (22+ required)
- Accept the
curlcommand from your profile page (or ask for email and API key manually) - Detect which AI clients are installed on your machine
- Resolve the full path to
node/npx(handles NVM, fnm, Homebrew, etc.) - Write the MCP config files with correct paths for each client
After setup, restart your AI client — the elastic.io tools will appear in the chat.
Supported Clients
Our MCP server supports a wide range of MCP-compatible clients:
- Claude Desktop / Code
- ChatGPT / Codex
- Cursor
- VS Code (Copilot)
- Windsurf
- Gemini CLI / IDE
- Zed
- Cline
- Trae
- Qwen Code
- Kimi Code
- DeepSeek
Please Note: Configuration instructions may vary between clients. Refer to each client’s documentation for setup instructions and configuration file locations.
Manual Configuration
If you prefer to configure manually, add the following to your client’s MCP config file:
{
  "mcpServers": {
    "elasticio": {
      "command": "npx",
      "args": ["-y", "@elastic.io/mcp"],
      "env": {
        "ELASTICIO_API_EMAIL": "your_email@example.com",
        "ELASTICIO_API_KEY": "your_api_key",
        "ELASTICIO_API_BASE_URL": "https://<tenant_api_base_url>"
      }
    }
  }
}
Please Note: ChatGPT / Codex uses TOML format — use
npx -y @elastic.io/mcp@beta setupfor automatic configuration.
How It Works
The AI client starts the MCP server as a subprocess and communicates over stdin/stdout:
AI Client (Claude/ChatGPT/Cursor/...) <--> [stdin / stdout] <--> MCP Server <--> elastic.io API
The server exposes tools that let the AI: list components, discover credentials, create and manage flows, build JSONata mappings, debug flow steps, manage data samples, analyze logs, and more.
Built-in Safeguards
- State-Machine Verification — components and credentials must be discovered in the current session before they can be used, preventing hallucinated IDs.
- JSONata Safety Checks — warns when mappings have common mistakes (quoted expressions, missing
$getPassthrough()calls). - Token Optimization — large metadata and enums are dynamically pruned to stay within context limits.
Environment Variables
| Variable | Required | Default | Description |
|---|---|---|---|
ELASTICIO_API_EMAIL |
yes | — | Your user account email |
ELASTICIO_API_KEY |
yes | — | Your user API key |
ELASTICIO_API_BASE_URL |
no | https://<tenant_api_base_url> |
Base URL for the platform REST API |
ELASTICIO_MCP_LOCAL_SEARCH |
no | — | Set to any truthy value to use local Qdrant + Gemini search instead of platform API |
EMBEDDING_PROVIDER_API_KEY |
if local search | — | Google Gemini API key for generating embeddings |
VECTOR_STORE_URL |
if local search | — | Qdrant instance URL |
VECTOR_STORE_API_KEY |
no | — | Qdrant API key (if authentication is enabled) |
LOG_LEVEL |
no | INFO |
Log level (DEBUG, INFO, WARN, ERROR) |
LOG_FILE |
no | — | Path to a log file (logs to file in addition to stderr) |
Update
To update to the latest version, clear the npx cache first, then run setup again:
# macOS / Linux
npx -y clear-npx-cache && npx -y @elastic.io/mcp@beta setup

# Windows (PowerShell)
npx -y clear-npx-cache; npx -y "@elastic.io/mcp@beta" setup
This ensures npx fetches the latest version from npm. Your credentials will be re-prompted. Restart your AI clients after the update.
Uninstall
To completely remove the elastic.io MCP server and its credentials from your machine:
1. Remove the elasticio entry from your AI client configs
Open the config file for each client you configured and delete the elasticio section. Config file locations:
| Client | macOS | Windows | Linux |
|---|---|---|---|
| Claude Desktop | ~/Library/Application Support/Claude/claude_desktop_config.json |
%APPDATA%\Claude\claude_desktop_config.json |
~/.config/Claude/claude_desktop_config.json |
| Claude Code | ~/.claude.json |
~/.claude.json |
~/.claude.json |
| ChatGPT / Codex | ~/.codex/config.toml |
~/.codex/config.toml |
~/.codex/config.toml |
| Cursor | ~/.cursor/mcp.json |
~/.cursor/mcp.json |
~/.cursor/mcp.json |
| VS Code (Copilot) | ~/Library/Application Support/Code/User/mcp.json |
%APPDATA%\Code\User\mcp.json |
~/.config/Code/User/mcp.json |
| Windsurf | ~/.codeium/windsurf/mcp_config.json |
~/.codeium/windsurf/mcp_config.json |
~/.codeium/windsurf/mcp_config.json |
| Gemini CLI / Gemini IDE | ~/.gemini/config/mcp_config.json |
~/.gemini/config/mcp_config.json |
~/.gemini/config/mcp_config.json |
| Zed | ~/.config/zed/settings.json |
~/.config/zed/settings.json |
~/.config/zed/settings.json |
| Cline (VS Code) | ~/Library/Application Support/Code/User/globalStorage/saoudrizwan.claude-dev/settings/cline_mcp_settings.json |
%APPDATA%\Code\User\globalStorage\saoudrizwan.claude-dev\settings\cline_mcp_settings.json |
~/.config/Code/User/globalStorage/saoudrizwan.claude-dev/settings/cline_mcp_settings.json |
| Trae | ~/.trae/mcp.json |
~/.trae/mcp.json |
~/.trae/mcp.json |
| Qwen Code | ~/.qwen/settings.json |
~/.qwen/settings.json |
~/.qwen/settings.json |
| Kimi Code | ~/.kimi-code/mcp.json |
~/.kimi-code/mcp.json |
~/.kimi-code/mcp.json |
| DeepSeek | ~/.deepseek/mcp.json |
~/.deepseek/mcp.json |
~/.deepseek/mcp.json |
2. Clear the npx cache
The MCP server binary is cached by npx. To remove it:
# macOS / Linux
npx -y clear-npx-cache
# or manually:
rm -rf ~/.npm/_npx

# Windows (PowerShell)
Remove-Item -Recurse -Force "$env:USERPROFILE\.npm\_npx"
3. Revoke your API key
Your elastic.io API key is stored in plain text in each config file listed above. After removing the config entries:
- Log in to your elastic.io account
- Go to your User Profile page
- Regenerate your API key
This invalidates the old key even if a copy remains on disk.
Security Note: Keep your MCP credentials secret and revoke them without delay if you suspect they may have been compromised.
4. Restart your AI clients
Restart any AI clients that were configured to pick up the changes.