Product Updates in 2021 Q2
Product update - v21.14
Released: 2021-04-13
Features (v21.14)
New “Grant Support Access” Button (v21.14)
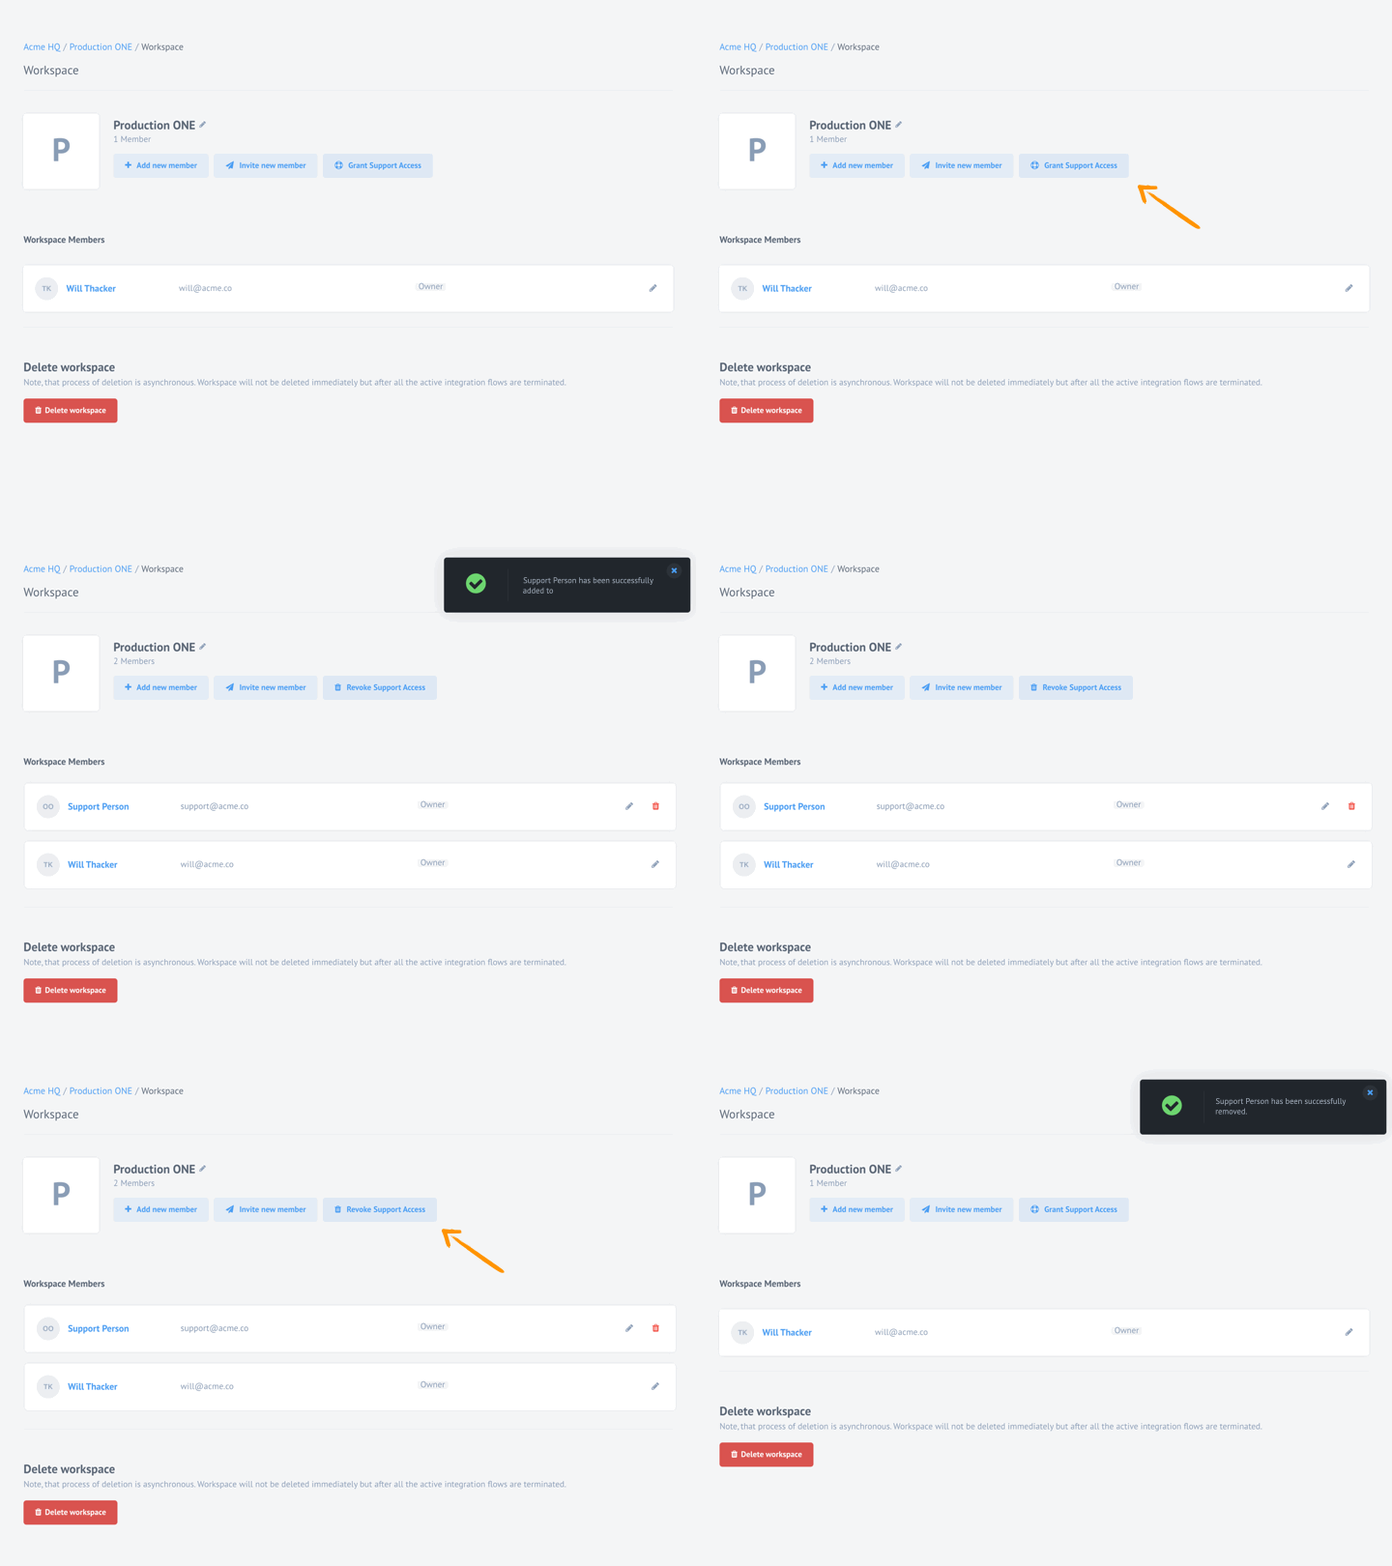
With we introduce a new capability to grant support access to your workspace. Click on Grant Support Access button found in the workspace settings page to add our support representative so he/she can help in troubleshooting.
When you no longer need this help you can click on Revoke Support Access button to remove our representative from your workspace.
Please note the button Grant Support Access changes into Revoke Support Access when you add the support representative to your workspace.
Intercom Chat Icon (v21.14)
To make it easier to chat with us we placed the Intercom Chat Icon directly on the left-hand-side menu for more prominence.

Remove component versions (v21.14)
You can now remove versions of components using a new API endpoint
DELETE /v2/components/{COMPONENT_ID}/versions/{GIT_REVISION}. For more
information refer to the
API documentation pages.
You can delete any version of your component unless that particular version is in use by any integration flow. In this case you will get an error listing the integration flow IDs where this particular version is in use.
Improvements and Updates (v21.14)
Add Flow Info to disable emails for limited workspace. (v21.14)
Added a link to the flow into the letter template wiper-stop-limited-flow
Dynamic flow control and JVM Sailor (v21.14)
You can disable the dynamic flow control for Java based component which use our
latest sailor-jvm 3.3.5. This feature is part of larger development effort to
ensure higher than average platform throughput. For now, this is in experimentation and exploration phase.
To disable it use the following parameter in the flow configuration:
{
  "data": {
    "attributes": {
      "nodes_config": {
        "step_1": {
          "disable_dynamic_flow_control": true
        }
      }
    }
  }
}
OEM Related (v21.14)
News in this section are for our customers who use OEM version of the elastic.io platform.
Tenant Administration Improvements (v21.14)
With this release we introduce a new API endpoint (GET /v2/components/all) to list
all exiting components in the tenant. This endpoint returns all components regardless of
the set visibility level (Team, Tenant or Global). You can use an optional filter (?contract_id)
with this endpoint to get components in the given contract.
In back-end part, we introduced a new tenants.component.list_all permission to
control who can use the /v2/components/all API endpoint. By default the
tenantAdmin role holder has this permission.
Grant Support Access Configuration (v21.14)
The introduction of Grant Support Access button on the workspace members page
comes with a necessary back-end configuration of support user. You have a
possibility to configure a support user at both contract and tenant level using
the attributes.support_user_id parameter. Patch the contract or tenant record and add the
user ID of the support user for this to work.
Please note: You must use the user ID of the support user not his/her email address. Since you are setting up this role and the user, you can get the user ID with an API call to
/v2/users/me.
For this feature we introduced the following API endpoints and functionalities:
- PATCH
/v2/workspaces/{WORKSPACE_ID}/members/support- with an empty body, which adds support user, which is defined in a contract or tenant to a workspace, as a member with Owner role. If support user is not a member of the corresponding contract he/she will be added to this contract with owner role as well. - DELETE
/v2/workspaces/{WORKSPACE_ID}/members/support- removes the support user from workspace and contract, in case if it was the last workspace in this contract for support user. - We have also a new permission
workspaces.edit_membership_supportwhich is granted to the owner and the admin role holders in the workspace. - There is a new button on the Workspace Settings Page in case if
support_user_idis set for the contract or tenant to which this workspace belongs. If the parameter is not set in both places - the button would not show.
Here is how to update the tenant configuration.
Registration and login page improvements (v21.14)
OPEN ID provider to be done with the API call.
We are working towards improving the registration and login pages. In this light, we are introducing couple of new capabilities.
- You can now define a unique logo for registration page by adding a new
logo_urlparameter and point it the logo address you want to use. If you do not specify this parameter, the platform will use the standardheader_logo_urlvalue as fall-back. - You can now directly enable Sign up with Google or Sign in with Google options. You would need to provide the value for the
google_provider_idparameter. If the value exist in the tenant configuration and it exist in the DB, then this will add an ability to authenticate with your Google account (register a new user and logging in the existed user).
You can use the following structure as en example to update the tenant configuration:
{
  "data": {
    "type": "tenant",
    "attributes": {
      "signin_v_2" : {
        "logo_url": "https://cdn.example.com/logo-mini.png",
        "google_provider_id": ""
      }
    }
  }
}
Intercom chat icon on the panel (v21.14)
Now you can place the Intercom Chat icon more prominently on the left-hand-side panel.
You can use the existing customNavItems capability and the following structure
while updating the tenant records:
{
  "data" : {
    "type": "tenant",
    "attributes": {
      "custom_nav_menu_items": [
        {
        "title" : "Intercom",
        "icon" : "forum",
        "customClass" : "intercom-launcher",
        "links": []
      }
      ]
    }
  }
}
Please note: If you need the Intercom Chat icon right above the user profile you must have this item the last listed in the
customNavItemssection of the tenant records.
Use Google Tag Manager (v21.14)
You can now configure and use the Google Tag Manager services on your tenant.
To use this, update the tenant record parameter google_tag_manager_id
value and add your google Tag Manager container ID without GTM- prefix:
{
  "data": {
    "type": "tenant",
    "attributes": {
      "google_tag_manager_id":"XXXXXX"
    }
  }
}
Fixed Bugs (v21.14)
- Fixed inconsistency when step deletion was incorrectly reflected in the
nodes_configpart of the flow configuration. Now they will be reset to reflect correct step order. - Addressed UI crashes caused by deleting secrets which were used in the flow-drafts.
- Fixed the delay in flow saving in cases when using components with custom metadata.
- Addressed tool-tip text of
URLaddress field in the REST-API component for OEM compliance.
Components (v21.14)
Sailor version update in bulk (v21.14)
As a part of the component code audit we updated the Node.js Sailor version to
2.6.24 in the following components:
- Docusign component
- Microsoft OneDrive component
- Google PubSub component
- Open API Component
- Ldap component
- AMQP component
Product update - v21.19
Released: 2021-05-13
Features (v21.19)
Remove component versions from UI (v21.19)
You can now remove versions of components directly from the Build history UI of the repository in the developer teams in addition to the API endpoint.

Define timeout per component (v21.19)
During the flow design process some components must connect with the third party services which might have slower response times or take longer to process the request. In that cases you can now define how long system must wait for the sample data retreival process for each component.
- Set the new environment variable
DEBUG_TASK_TIMEOUTin seconds to control the time. - If the variable is not set, platform will use the default value set in
FORCE_DESTROY_DEBUG_TASK_TIMEOUT_SECvariable. - If multiple
DEBUG_TASK_TIMEOUTvariables are set for the flow components (i.e. for mapper and component after), the system will take bigger value of them.
Improvements and Updates (v21.19)
Component version display (v21.19)
You can now set your own component version to show in the platform UI when you use
the version parameter without letter v in your component.json configuration.
{
  "title": "Petstore API (Node.js)",
  "description": "Component for the Petstore API",
  "buildType":"docker",
  "version":"1.0.1",
  "etc_fields":"to show"
}
This would show as v1.0.1 when you select the component version while designing the flow, as well as in the list of deployed component versions in the repository of your developer team.
After you use the component version the following rules would apply:
- Platform would check the
versionparameter and enforce the semantic versioning rules. - Platform would reject duplicate and lower versions.
- Platform would reject absence version in case when the previous build has one.
OEM Related (v21.19)
News in this section are for our customers who use OEM version of the elastic.io platform.
Registration page further optimisation (v21.19)
With this release we simplified the registration process to work with email and
password. We removed the required first name, last name and company name
parameters.
The registration process can get the necessary details from OIDC parameters if allowed or construct from the entered email address following the logic:
- If user registers with an email address
abc@xyz.comthen - The Contract would have
TRIAL_abc@xyz.comname. - The First Name will be
abc, - The Last Name will be
xyz.com.
Please Note User can change their contract name as well as enter complete first and last names if desired.
As areminder: You can enable the custom registration page in the tenant record following the instructions here.
Cached Browser Assets (v21.19)
With this release we enforce asset invalidation of browser assets after every platform deployment. The following assets would now contain short git revision IDs:
/webpack/filter-tree-worker..js/webpack/single-spa.config..js/frontend..min.js
Fixed Bugs (v21.19)
- Addressed the issue with recipe creation from API when the component would have only a trigger function.
- Fixed the UI bug when the component version names were sorted as strings instead of deployment date.
- Addressed the issue with authentication secret based credential caching in the browser session.
- Fixed the bug with authentication client data exposure in the UI. Now all client secrets are obfuscated even if you are the owner of the record.
- Addressed the problem when authentication secrets service would remove the query parameters from the refresh token URL.
- Fixed the bug when the platform would incorrectly redirect the user in case when he/she would login with OIDC provider.
- Addressed the problem with error report emails which would get blocked when one of the subscribers were removed from the platform.
Components (v21.19)
CSV component v2.2.0 (v21.19)
- UPDATED the write CSV attachment from JSON Array and write CSV attachment from JSON Object actions by adding a new separator - a pipe (
|), to the list of separators.
Batch component v2.0.0 (v21.19)
- UPDATED the component to use an internal storage service called
Maester. - UPDATED the Node.js sailor to
v2.6.24. - DISABLED the MongoDB as an external storage (credentials are no longer supported).
- REPLACED the Delete Batch After Retrieval feature in the Get ready batches trigger by Do Not Delete Batch After Retrieval feature.
Request-reply component v1.2.0 and v1.2.1 (v21.19)
- NEW action is now available: Reply With Attachment
- FIXED a bug with sample retrieve in the Reply With Attachment action.
Product update - v21.23
Released: 2021-06-10
Features (v21.23)
The release introduces new features for component developers and high-end integration projects.
Fine-tuning the timeout per component (v21.23)
We continue the work dedicated to defining and setting custom timeout intervals.
In this round we extended the capability to include verify credentials, select model
and dynamic data processes. We call them one-time executions. To define a custom
interval for one-time executions set the newly introduced environment variable
SCHEDULED_EXECUTION_TIMEOUT (seconds) in the component repository. If the variable
is not set the platform will use the system defined value.
Scaling of flow steps (v21.23)
With we are happy to introduce the project dedicated to providing a high availability of integration flow steps by scaling them to replica sets.
Please Note : Most integration scenarios do not require step scaling Using this feature might cause high costs.
The implementation has specific guidelines:
- Use step scaling on steps which need scaling. For these steps platform will use deployments which control the pods.
- Never enable startup and shutdown hooks for scaled steps.
- Set the same number of instances for the following mapper step.
- At the moment we have set an upper limit for scaling - maximum 5 replicas.
- If you set scaling to 1, the system will not create deployments.
To set number of replicas for the integration flow step use the API call to PATCH v2/flows/:id
endpoint. Here is an example of body for API call.
{
    "data": {
        "type": "flow",
        "id": "",
        "attributes": {
            "nodes_config": {
                "step_1": {
                    "replicas": 3
                }
            }
        }
    }
}
Improvements and Updates (v21.23)
Support for infinity tokens (v21.23)
Some OAuth2 providers supply one access token and no refresh token. These are the cases of infinity tokens. To support these cases we extend the functionality of Secrets feature. We implemented the following changes in the Secrets feature:
- Refresh token is no longer a required parameter in the Secrets feature,
- Refresh token is not a required field while creating a secret on the UI,
- If no refresh token is supplied then the parameter will be ignored and the system will not try to refresh the secret.
Java Sailor 3.3.6 (v21.23)
We released a new Java Sailor 3.3.6 which introduces a parallel processing of messages.
All components written in Java using the new sailor version (3.3.6+) can use newly introduced
environment variable ELASTICIO_CONSUMER_THREAD_POOL_SIZE to set the size
of thread pool for AMQP consumer. If not specified (by default) it equals Prefetch
Count value.
Validation for timeout variables (v21.23)
With introduction of SCHEDULED_EXECUTION_TIMEOUT and DEBUG_TASK_TIMEOUT (last release),
we also implemented a validation mechanism for them.
- The platform will allow only numbers in seconds for
DEBUG_TASK_TIMEOUTandSCHEDULED_EXECUTION_TIMEOUTenvironment variables. DEBUG_TASK_TIMEOUTandSCHEDULED_EXECUTION_TIMEOUTvalues have maximum values controlled by the system definedMAX_FORCE_DESTROY_DEBUG_TASK_TIMEOUT_SECandMAX_FORCE_DESTROY_ONE_TIME_EXEC_SECparameter values.- We deprecate the
LOG_LEVEL,PREFETCHandAMQP_PUBLISH_CONFIRM_ENABLEDpreviously defined environment variables. These variables MUST be deleted from the component repositories if they exist.
OEM Related (v21.23)
News in this section are for our customers who use OEM version of the elastic.io platform.
HELM3 deployment (v21.23)
The platform deployments migrated to HELM3 from the Ksonnet (last deployment 21.19). Since the intermediate release 21.21 deployments done with HELM3. The current release is the second successful deployment using HELM3 charts.
We are using Helm OCI Registry, credentials available upon request.
Fixed Bugs (v21.23)
- Addressed the network issue caused by the web-sockets timeouts while loading responses to sample retrieval during the flow design process.
- Fixed the bug when updating the Salesforce credentials would fail with 400 response.
Components (v21.23)
Petstore-nodejs component (v21.23)
- UPDATED statuses are now case-insensitive.
- UPDATED to sailor version
2.6.24. - UPDATED README documentation.
- UPDATED petstore password in the
component.json.
Dun-and-bradstreet component (v21.23)
- FIXED a bug in Cleanse and Match action when a single field was not treated as an array item.
Magento2 component (v21.23)
- ADDED support for Magento2 versions 2.3.5 and 2.3.6